STEAM OVEN OS24N models USER GUIDE US CA
CONTENTS Safety and warnings 2 Introduction 7 First use 8 User preference settings 13 Starting your oven 16 Cooking mode tables 17 Traditional cooking 18 Steam cooking 19 Using oven lights 22 Automatic cooking 23 Using the meat probe (some models only) 25 Recipes 28 Care and cleaning 31 Replacing the oven lamp 32 Troubleshooting 33 Warranty and service 35 IMPORTANT! SAVE THESE INSTRUCTIONS The models shown in this user guide may not be available in all markets and are subject
SAFETY AND WARNINGS IMPORTANT SAFETY INSTRUCTIONS! Save these instructions for the local inspectors use. ● ● ● ● ● ● ● ● ● ● ● To avoid hazard, follow these instructions carefully before installing or using this appliance. Make this information available to the person installing the appliance – doing so could reduce your installation costs. This oven is to be installed and connected to the electricity supply only by an authorized person.
SAFETY AND WARNINGS IMPORTANT SAFETY INSTRUCTIONS! To reduce the risk of fire, electrical shock, injury to persons or damage when using the oven, follow the important safety instructions listed below: ● ● ● ● ● ● ● ● ● ● ● ● ● ● ● ● ● ● Read all the instructions before using the oven. Use the oven only for its intended purpose as described in these instructions. PROPER INSTALLATION: be sure your appliance is properly installed and grounded by a qualified technician.
SAFETY AND WARNINGS IMPORTANT SAFETY INSTRUCTIONS! ● ● ● ● ● ● ● ● ● ● ● ● ● ● ● 6 CAUTION: Hot air can blow from the vent at the base of the oven as part of the oven’s cooling system. PLACEMENT OF OVEN SHELVES: always position shelves in the desired location while the oven is cool (before preheating). If a shelf must be removed while the oven is hot, do not let the oven mitts or potholder contact hot heating elements in the oven or the base of the oven.
INTRODUCTION Congratulations on your new purchase. Your Fisher & Paykel oven has a number of features to make cooking a great experience for you: ● ● A wide choice of oven functions. Intuitive controls and displays. Before you start ● ● ● ● ● ● ● Make sure the installer has completed the ‘Final checklist’ in the Installation instructions. Read this guide, taking special note of the ‘Safety and warnings’ section. Remove all internal and external packaging and dispose of it responsibly.
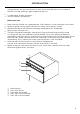
FIRST USE ● ● ● 8 Using the wire shelf Using the perforated tray To remove the wire shelf, pull it towards you until it stops and then lift, by pulling upwards, until it comes completely out. To insert the wire shelf, slide it in at an angle of 45° until it locks and then lower it horizontally and push it all the way in. If the wire shelf has a low drip tray, to remove it, lift it slightly and slide it towards you.
FIRST USE Error codes Error codes appear when a fault has been detected. When the error appears, the current function is blocked. If the type of error is related to a safety function, the oven becomes unusable and you will need to contact Customer Care. If the error relates to a minor fault, after being restarted the oven can be used for the functions that do not involve the faulty part (eg a heating element). Beeps ● ● ● ● Confirms that the command has been received after a key has been pressed.
FIRST USE First use and user settings ● ● ● ● When using your oven for the first time, you will be prompted to enter user settings for: Time Date Language Temperature and weight measurements These settings can be modified at anytime by accessing the settings menu.
STEAM COOKING Steam cooking has numerous benefits which include retaining the nutritional value of food, along with retaining taste, structure, color and natural juices. ● ● Useful tips To ensure that you get the best results from using the steam function, start cooking food from a cold oven. Avoid using the steam cooking function directly after using the convection oven, as this will reduce the benefits of steam cooking.
STEAM COOKING 130 Steam cooking IMPORTANT Before using any steam functions, the water container must be filled. If while the oven is on, the message CHECK WATER CONTAINER appears on the display, open the door and avoid hot steam that will be released, extract the container and refill it. When the door is closed, the oven will go into PAUSE mode. to continue cooking. Press Steam 100 This function allows you to cook on three different rack levels at the same time.
USING OVEN LIGHTS ● ● ● ● Press to turn lights on or off. The oven lights will turn on automatically when the door is opened. When a cooking mode has started, the oven lights will turn on automatically. When a cooking mode is finished or cancelled the lights will turn off. NOTE: when using oven mode the lights will automatically turn off after three minutes. To turn the lights back on, press or open the door.
USING THE MEAT PROBE (SOME MODELS ONLY) Setting the temperature for meat probe The meat probe is supplied with some models only. For other models it may be purchased separately. For further information or to purchase a meat probe, contact Customer Care, your authorized service centre or visit our website: fisherpaykel.com. Use your meat probe to accurately judge when meat is perfectly cooked.
USING THE MEAT PROBE (SOME MODELS ONLY) IMPORTANT! ● ● ● ● ● ● ● ● ● ● ● To avoid burns, use a kitchen glove to fit and remove the meat probe when the oven is hot. Always remove the probe using the grip. Removing it by pulling the cable, may cause damage. Make sure food is completely defrosted before using the probe. The meat probe is not enabled for all functions, for example the meat probe function cannot be used when using the recipe function.
RECIPES The Recipe function on your oven enables you to cook without having to set the oven manually every time. By selecting a recipe, the cooking mode, temperature and time are automatically set according to the recipe selected from the menu.
REPLACING THE OVEN LAMP ● ● ● ● The oven lamp must have the following specifications. Structure suitable for high temperatures up to 572°F (300°C). Power supply: see the V/Hz value on the serial number plate. Power 25W. Type G9 connector. IMPORTANT! Ensure the appliance is off before replacing the lamp to avoid the possibility of electric shock. ● ● ● ● ● ● ● 32 To protect the oven cavity, spread a tea towel inside the oven. Remove the screws holding the steel frame.
TROUBLESHOOTING Cooking problems If there is a problem, check the chart below to see if you can fix it. If the problem cannot be fixed or persists, call your Authorised Repairer or Customer Care.
TROUBLESHOOTING 34 OVEN PROBLEM PROBLEM SOLVING STEPS Other F__ Error appears in the display window Remove power and turn it back on again after a few seconds. If condition persists, note the code number (in the EVENT LOG list) and contact Customer Support or your authorised repairer. The oven display won’t turn on Turn off power at the main power supply, then turn the power back on. If this does not resolve the issue, call Customer Support or an authorised repairer.
WARRANTY AND SERVICE Before you call for service or assistance... Check the things you can do yourself. Refer to the installation instructions and your user guide and check that: 1 Your product is correctly installed. 2 You are familiar with its normal operation. If after checking these points you still need assistance or parts, please refer to the Service & Warranty book for warranty details and your nearest Authorised Service Centre, Customer Care, or contact us through our website fisherpaykel.com.
FISHERPAYKEL.COM © Fisher & Paykel Appliances 2018. All rights reserved. The product specifications in this booklet apply to the specific products and models described at the date of issue. Under our policy of continuous product improvement, these specifications may change at any time. You should therefore check with your Dealer to ensure this booklet correctly describes the product currently available. US CA 591474B 07.