
Installation Guide - Cavity Trim Kit


COMPANION PRODUCTS
18 7/8" (480mm) CAVITY TRIM KIT
NZ AU GB IE US CA
Keep this document handy for easy reference.
This Cavity Trim Kit is designed to complement your companion product if installing into 18 7/8" (480mm) high cabinetry.
For contact information or if you require service, assistance or replacement parts, see your ‘Service&warranty’ booklet.
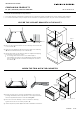
SECURE THE SUPPORT BRACKETS IN THE CAVITY
1 Place the two support brackets into the cabinetry with the flat side
to the outside (A).
2 Align the front alignment tab with the front edge of the cabinetry
(B) with the bracket hard up to the side wall (C).
3 Attach the bracket to the cabinetry with the supplied self tapping
wood screws. You have the option:
of screwing down into the base of the cabinet (D), or
if the brackets are going to be installed above another product
then the brackets can be screwed horizontally into the side of
the cabinet (E).
591779A 02.19
SCREW THE TRIM ONTO THE CABINETRY
4 Ensure the front trim is correctly orientated (F) (ie the vents are
pointing downwards) and loosely attach it to the support brackets
with the supplied M4 machine screws. Do not tighten.
5 Move the front trim sideways to center it within the cabinetry.
Tighten the screws to fix securely in place (G).
6 Install companion product (H) as directed in installation instructions.
A
B
D
E
Support
bracket
F
Cabinetry carcassPanel below
appliance
Panel above
appliance
C
G
H
INSTALLATION GUIDE