INSTALLATION INSTRUCTIONS USER GUIDE Freestanding Wine Cabinets RF106RDWX1, RF206RDWX1, RF306RDWX1 and RF356RDWX1 models NZ AU GB IE EU AE IN
CONTENTS Introduction 3 Safety and warnings 4 Installation instructions 8 Moving or storing your appliance 13 Operating instructions – External control panel 14 Operating instructions – Special functions 15 Interior and exterior features 16 Storing your wine 19 Loading your wine bottles 20 Cleaning care – Exterior 24 Cleaning care – Interior 25 User warnings and sounds 26 Troubleshooting 27 Manufacturer’s Warranty 29 Customer Care 31 European Directive 2012/19/EU on
INTRODUCTION Thank you for buying a Fisher & Paykel Wine Cabinet to store your treasured wine, you’ve made a great choice. Having purchased our dual-zone cabinet you can rest assured that your red and white wines are well cared for, over short term and long term periods. Wine generally matures at a steady temperature between 11°C to 13°C, and for ready to drink wines they are best served at their ideal drinking temperatures (see ‘Storing your wine’ section).
Safety and warnings ! WARNING! Electric Shock Hazard Read and follow the safety and warnings outlined in this user guide before operating this appliance. Failure to do so can result in death, electric shock, fire or injury to persons. R600a This Wine Cabinet contains flammable refrigerant isobutane (R600a). Use this appliance only for the intended purpose as described in the user guide.
Safety and warnings • Cleaning and user maintenance shall not be made by children without supervision. • Keep ventilation openings in the appliance enclosure clear of obstruction. • In case of damage to the refrigerant circuit, ventilate the area by opening all windows. Do not operate electrical equipment or any other equipment that may produce arcs, sparks or flames in the area. Contact your Fisher & Paykel Authorised Repairer immediately to arrange for the appliance to be repaired.
Safety and warnings • If the power supply cord is damaged, it must only be replaced by your Fisher & Paykel Authorised Repairer. • When moving your appliance, be careful not to roll over or damage the power cord. • Do not use electrical appliances inside the Wine Cabinet. IMPORTANT! Your Wine Cabinet is designed to operate without the need for regular service checks. However, if your Wine Cabinet is malfunctioning, have it attended to by your Fisher & Paykel Authorised Repairer as soon as possible.
Safety and warnings • Your Fisher & Paykel Authorised Repairer will be able to give advice on environmentally friendly methods of disposing your old Wine Cabinet. • It is hazardous for anyone other than an authorised repairer to service this appliance. In Queensland, Australia the authorised service person must hold a gas work licence or authorisation for hydrocarbon refrigerants to carry out service or repairs which involve removal of covers.
INSTALLATION INSTRUCTIONS Please follow the installation steps below to ensure your appliance operates correctly. Power ●● ●● ●● ●● ●● ●● The appliance must be installed so the plug is accessible. To ensure that the appliance is not accidentally switched off, connect your Wine Cabinet to its own power point. Do not plug in any other appliance at this power point. For power requirements, please refer to the serial plate located on the rear of the cabinet.
INSTALLATION INSTRUCTIONS Product installation ●● ●● ●● ●● Your Wine Cabinet is fitted with rear rollers designed for moving the product in the forwards and backwards direction. Avoid moving the product in a sideways direction as this may damage the floor covering/surface. Your Wine Cabinet will arrive with the front feet raised making moving the product into its final location a simple task.
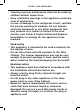
INSTALLATION INSTRUCTIONS Product and cabinetry dimensions QQ QQ PP Q DD D A BB E oo K FF Q o R K Go o MJ KJ M K o J N O NN I K M K o S So H J S S Flush with Wine Cabinet door O – 90° door rotation I 10 L H R G S G o F QF II Flush with Wine Cabinet door KC K M M C O – full door rotation B R Ro P C E oo K HL H P OO GG Flush with Wine Cabinet chassis K K LL B KK – full door rotation Q A CC EE Q P AA D Q Power plug to power wall socket T o J
INSTALLATION INSTRUCTIONS A Overall height of product RF356RDWX1 RF306RDWX1 RF206RDWX1 RF106RDWX1 Product Dimensions mm 825 1270 1660 1855 Overall width of product 595 595 595 595 C Overall depth of product 639 639 639 639 B (excludes handle, includes back cover) Cabinetry Dimensions (Including minimum air clearances) D Inside height of cavity mm 875 1320 1710 1905 E Inside width 635 635 635 635 Inside depth 612 612 612 612 G Inside width 635 635 635 635 H Inside
INSTALLATION INSTRUCTIONS What to do if your Wine Cabinet is unstable 1 Gently push the Wine Cabinet back until the rear contacts the floor. ●● Measure the gap under the front foot, which has come off the floor. ●● Obtain some solid packing material (hardwood, plastic, etc) which fits firmly into the gap under the foot. important! Do not use metallic materials that may corrode, stain and/or damage floor coverings.
MOVING OR STORING YOUR APPLIANCE If your Wine Cabinet is turned off for any reason, wait 10 minutes before turning it back on. This will allow the refrigeration systems pressures to equalise before restarting. Moving your appliance ●● ●● ●● ●● ●● Turn off the appliance and unplug from the power point. Remove all wine bottles. Turn the adjustable feet counter-clockwise to lower the product, making sure the feet are wound up into the product. Ease the appliance out of its position.
OPERATING INSTRUCTIONS – external control panel The control panel enables you to view and modify all the features and options on your Wine Cabinet. Temperature control ●● ●● ●● ●● ●● When the Wine Cabinet is turned on for the first time, the control panel will display the actual temperature of the cabinet. The system will automatically cool both zones to their default temperature setting of 12°C (ideal for long term storage). This will take between 1 – 2 hours.
OPERATING INSTRUCTIONS – Special functions Special functions Keylock The external control panel automatically locks from any key presses after 30 seconds from being enabled. 1 To deactivate Keylock and allow key presses. Press the ‘Keylock’ button for 3 seconds, when unlocked the back lit LED lights intensify. 2 To activate Keylock press the ‘Keylock’ button for 3 seconds, when locked the back lit LED lights will dim.
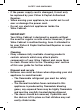
Interior and exterior features Door Switch Upper zone Standard shelf Fixed shelf Bottom zone Single Tier shelf UV-tempered glass door Fixed shelf Safety lock RF106RDWX1 model Door Switch Upper zone Presentation shelf Upper zone carbon filter Fixed shelf UV-tempered glass door Bottom zone Double Tier shelf Bottom zone Single Tier shelf Fixed shelf Safety lock RF206RDWX1 model 16
INTERIOR and EXTERIOR FEATURES Interior features Shelving The oak shelves have been designed to allow for even air distribution around your wine bottles. Depending on your model there are a range of adjustable shelves that can be rearranged to suit your storage needs. Standard shelf (all models) These shelves are located in both zones and is designed to hold up to 22 Bordeaux bottles depending on the support lugs selected. The ideal loading arrangement for these shelves is to have bottle necks interlocking.
INTERIOR and EXTERIOR FEATURES ●● ●● Activated carbon filters (all models) Air quality is critical for preserving wine, the activated carbon filters helps to remove stale, unwanted odours and replenishes with fresh air. The filters are fitted to the rear wall on the right-hand side of the upper and bottom zone. We recommend that you replace your activated carbon filters once every five years. Replacement filters are available from your Fisher & Paykel Authorised Repairer.
STORING YOUR WINE Short-term storage/serving ●● ●● ●● This Wine Cabinet is perfect for short-term storage such as entertaining. Red wines are best served at warmer temperatures and white wines are best served at cooler temperatures. The ideal serving temperature of your wine is crucial for your taste and enjoyment. The following are recommended serving temperatures for different wines.
LOADING YOUR WINE BOTTLES When loading your Wine Cabinet please keep in mind our loading capacities are based on the standard 750 ml Bordeaux bottles. The loading arrangement outlined for the following models is recommended when using the Presentation shelf. Maximum capacities are listed, and storage can be maximised by removing the Presentation shelf and replacing with the additional Standard shelf supplied (except RF106RDWX1).
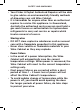
LOADING YOUR WINE BOTTLES Presentation shelf 9 wine bottles in the upright position only Upper zone Standard shelf 22 wine bottles only Fixed shelf 8 wine bottles only Double Tier shelf 11 wine bottles only Standard shelf 8 wine bottles only Bottom zone Single Tier shelf 6 wine bottles only Fixed shelf 17 wine bottles only RF206RDWX1 model Maximum capacity: 83 wine bottles 21
LOADING YOUR WINE BOTTLES Presentation shelf 9 wine bottles in the upright position only Upper zone Standard shelf 22 wine bottles only Fixed shelf 8 wine bottles only Double Tier shelf 11 wine bottles only Standard shelf 22 wine bottles only Bottom zone Standard shelf 8 wine bottles only Single Tier shelf 6 wine bottles only Fixed shelf 17 wine bottles only RF306RDWX1 model Maximum capacity: 127 wine bottles 22
LOADING YOUR WINE BOTTLES Presentation shelf 9 wine bottles in the upright position only Upper zone Standard shelf 22 wine bottles only Fixed shelf 8 wine bottles only Double Tier shelf 6 wine bottles only Standard shelf 22 wine bottles only Bottom zone Single Tier shelf 6 wine bottles only Fixed shelf 17 wine bottles only RF356RDWX1 model Maximum capacity: 144 bottles 23
CLEANING CARE – EXTERIOR Stainless steel exterior door ●● ●● ●● Use only liquid dishwashing detergent dissolved in warm water and a soft lint-free cloth to clean the exterior door surface. Rinse with clean water and dry with a clean, lint-free cloth. The use of any abrasive or stainless steel cleaners and solvents will damage the door surface. Other exterior surfaces ●● ●● Clean all other exterior surfaces with liquid dishwashing detergent dissolved in warm water and a soft lint-free cloth.
CLEANING CARE – INTERIOR Interior ●● ●● ●● For ease of cleaning, empty the Wine Cabinet first and remove all shelves. Wipe interior surfaces using only liquid dishwashing detergent dissolved in warm water and a soft lint-free cloth. Rinse with clean water and dry with a clean, lint-free cloth. Do not use harsh chemicals, abrasives, ammonia, chlorine, bleach, concentrated detergents, solvents or abrasive scouring pads on any part of your Wine Cabinet.
USER WARNINGS AND SOUNDS User warnings – faults In the unlikely event of a fault occurring, a fault code will be displayed on the external control panel and an alarm will sound. ●● ●● Please take note of the fault code and contact our Customer Care Centre. Contact details are located towards the end of the user guide. To silence the fault alarm press any button on the external control panel. The fault code will remain illuminated until the fault is corrected.
TROUBLESHOOTING If there is a problem with your Wine Cabinet, please check the following points before contacting your local Fisher & Paykel Authorised Repairer or Customer Care Centre. Product parts and accessories can be purchased through Fisher & Paykel Customer Care or online at www.fisherpaykel.com (this service is available to selected markets only). PROBLEM POSSIBLE CAUSES WHAT TO DO Appliance does not operate. No electricity at the power outlet.
TROUBLESHOOTING 28 PROBLEM POSSIBLE CAUSES WHAT TO DO Unfamiliar noises. The cabinet is not stable or level. Level the cabinet. Refer to the ‘Installation instructions’ section or refer to ‘User warnings and sounds’ section. Door alarm sounds continuously and a fault code appears. This is dependent on the displayed fault code. Please take note of the fault code and contact the Customer Care Centre. Exterior of cabinet is warm. This is normal.
MANUFACTURER’S WARRANTY You automatically receive a 2 year Manufacturer’s Warranty with the purchase of this Wine Cabinet covering parts and labour for servicing within the countries New Zealand, Australia, The Republic of Ireland and Northern Ireland. All other countries are excluded.
MANUFACTURER’S WARRANTY Service under this Manufacturer’s Warranty must be provided by a Fisher & Paykel Authorised Repairer (refer to the ‘Customer Care’ section at the back of this book). Such service shall be provided during normal business hours. This Manufacturer’s Warranty certificate should be shown when making any claim. For Australian customers This Manufacturer’s Warranty is an extra benefit and does not affect your legal rights.
customer care Before you call for service or assistance... Check the things you can do yourself. Refer to your user guide and check that: 1 Your product is correctly installed. 2 You are familiar with its normal operation. 3 You have read the ‘Troubleshooting’ section at the back of the book. If after checking these points you still need assistance or parts, please refer to your nearest Authorised Service Centre, Customer Care, or contact us through our website www.fisherpaykel.com.
customer care In Ireland if you need assistance…* Phone: 1800 625 174 or 01-8077960 Fax: 1800 635 012 Website: www.fisherpaykel.com Postal address: Fisher & Paykel Appliances, Unit D2, North Dublin Corporate Park, Swords, Co. Dublin For rest of the world…* Call your Fisher & Paykel retailer/dealer from whom you purchased the product. They are trained to provide information on your appliance. If we can be of any further help, please contact use on: Phone: +64 9 273 0660 Fax: +64 9 273 0580 Website: www.
EUROPEAN DIRECTIVE 2012/19/EU ON WASTE ELECTRICAL AND ELECTRONIC EQUIPMENT (WEEE) EU This appliance is marked according to the European directive 2012/19/EU on Waste Electrical and Electronic Equipment (WEEE). By ensuring this product is disposed of correctly, you will help prevent potential negative consequences for the environment and human health, which could otherwise be caused by inappropriate handling of this product.
www.fisherpaykel.com Copyright © Fisher & Paykel 2015. All rights reserved. The product specifications in this booklet apply to the specific products and models described at the date of issue. Under our policy of continuous product improvement, these specifications may change at any time. You should therefore check with your dealer to ensure this booklet correctly describes the product currently available. NZ AU GB IE EU AE IN 842781 A 03.