USER GUIDE ActiveSmart™ Built-in refrigerator RS36A72J and RS36A72U models RS36A80J and RS36A80U models US CA
CONTENTS Introduction 3 Safety and warnings 4 Moving and storing your appliance 7 Storage features list 8 Operating instructions 9 Special functions 11 External display – Ice & Water models only 13 Using your water dispenser – Ice & Water models only 14 Water filter 15 Using your Ice maker 17 ActiveSmart™ refrigerator special features 19 Cleaning care – Exterior 21 Cleaning care – Interior 24 Storing food in your refrigerator 26 Storing food in your freezer 28 Defrosting food i
INTRODUCTION Thank you for buying this Fisher & Paykel Built-in refrigerator. Introducing the next generation in Fisher & Paykel refrigeration. With new flush-fit design and the ability to easily slide into existing kitchen spaces or be integrated behind kitchen cabinetry, these family-sized fridges offer a seamless look to the kitchen while providing excellent food care with ActiveSmart™ technology. As your life changes, so can your refrigerator.
SAFETY AND WARNINGS ! WARNING! Electric Shock Hazard Read and follow the safety and warnings outlined in this user guide before operating this appliance. Failure to do so can result in death, electric shock, fire or injury to persons. Use this appliance only for the intended purpose as described in the user guide.
SAFETY AND WARNINGS ●● ●● ●● ●● If the power supply cord is damaged, it must only be replaced by your Fisher & Paykel Authorized Service Agent because special purpose tools are required. When moving your appliance away from the wall, be careful not to roll over or damage the power cord. Follow the National Electrical Code and all local codes and ordinances when installing this product.
SAFETY AND WARNINGS ●● 6 Power failure – food safety Do not refreeze frozen foods that have thawed completely. The food may be dangerous to eat. Follow the recommendations below if you discover food in your freezer has thawed: – Ice crystals still visible – food may be refrozen but should be stored for a shorter period than recommended. – Thawed but refrigerator cold – refreezing generally not recommended. Fruits and some cooked food can be refrozen but use as soon as possible.
MOVING AND STORING YOUR APPLIANCE TO ENSURE YOUR APPLIANCE OPERATES CORRECTLY PLEASE REFER TO THE INSTALLATION INSTRUCTIONS BOOKLET SUPPLIED WITH THIS PRODUCT. If your refrigerator is turned off for any reason, wait 10 minutes before turning it back on. This will allow the refrigeration system pressures to equalize before restarting. Moving your appliance ●● ●● ●● ●● ●● Turn off the appliance at the isolating switch and unplug from the power point. Remove all food.
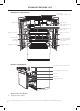
STORAGE FEATURES LIST Refrigerator compartment* Water tank (Ice & Water models only) Dairy shelf Dairy shelf Half-width cantilever glass shelves Full-width cantilever glass shelves Mid door shelves Mid door shelves Slim bin with humidity control lid Fruit and vegetable bins with humidity control lids Large door shelf Large door shelf Freezer compartment* Ice maker (top left of freezer) Ice storage bin with scoop Top bin Mid tray Large bottom bin ●● Accessories (not shown) Single bottle holders
OPERATING INSTRUCTIONS Internal control panel The internal control panel enables you to view and modify all the features and options of your refrigerator. Temperature control ●● ●● ●● When the refrigerator is first turned on, the cooling system will automatically cool both refrigerator and freezer compartments to their set temperatures. This will take between 2 – 3 hours.
OPERATING INSTRUCTIONS Key mute Key mute allows you to silence all button presses. ●● ●● ●● ●● ●● ●● To activate key mute, press and hold the button for 4 seconds. The icon on the internal control panel will be illuminated. The keys will be silenced when key mute is activated. Door alarms and ‘Bottle Chill’ alarm will still operate. Key mute will not automatically deactivate. To manually deactivate, press and hold the button for 4 seconds. The icon will no longer be illuminated.
SPECIAL FUNCTIONS Bottle Chill This function allows you to chill your beverages rapidly in the freezer without the worry of forgetting them. The timer is set for 15 minutes however the time taken to chill depends on the size of your beverage. If after 15 minutes your beverage is not cold enough, simply place it back in the freezer and reset the ‘Bottle Chill’ function. ●● ●● To activate, press the button on the internal display.
SPECIAL FUNCTIONS Door alarms ●● ●● ●● If the fresh food compartment door is left open the alarm will beep after 90 seconds, and if the freezer door is left open the alarm will beep after 60 seconds. While either door remains open, subsequent beeps will sound every 30 seconds for 5 minutes. A continuous alarm will sound if either of the doors have been left open for 5 minutes or longer and the interior compartment light(s) will turn off. The alarm will stop only when the door(s) is closed.
EXTERNAL DISPLAY – ICE & WATER MODELS ONLY The external display enables you to lock the water dispenser, indicates to you when ‘Bottle Chill’ is activated and when your water filter requires changing. EXTERNAL DISPLAY FEATURES Dispenser lock button and LED light Locks/unlocks the water dispenser. Bottle Chill indicator Icon will illuminate indicating when ‘Bottle Chill’ is activated and flashes when beverage is ready.
USING YOUR WATER DISPENSER – ICE & WATER MODELS ONLY TO ENSURE YOUR APPLIANCE OPERATES CORRECTLY PLEASE REFER TO THE INSTALLATION INSTRUCTIONS BOOKLET SUPPLIED WITH THIS PRODUCT. Before using your water dispenser Ensure your ice and water system has been correctly installed by following the installation instructions booklet supplied. ●● ●● ●● ●● ●● ●● To flush the water filtration system: Ensure your refrigerator is switched on, and the isolation faucet has been connected and turned on.
WATER FILTER All the water supplied to your refrigerator is filtered through a filter cartridge, this helps remove unwanted impurities and is located behind the kickstrip grille. To maintain water quality we recommend replacing the filter cartridge every 6 months. ●● ●● When the filter cartridge requires replacing, the filter change icon will illuminate on the internal control panel and/or external display. The icon will flash as a reminder on the external display whenever water is dispensed.
WATER FILTER To install new filter cartridge 1 Pull freezer drawer slightly open in order to fit filter 2 3 4 5 6 7 ●● ●● ●● ●● cartridge tool. Remove the red protective cap on the spigot head. Align the filter cartridge tool over the filter. Insert the filter cartridge and tool into the bottom left of the product, as shown on the right. Firmly push the cartridge in until the filter head cannot be pushed any further. Turn 90° clockwise to tighten as shown on the right.
USING YOUR ICE MAKER TO ENSURE YOUR APPLIANCE OPERATES CORRECTLY PLEASE REFER TO THE INSTALLATION INSTRUCTIONS BOOKLET SUPPLIED WITH THIS PRODUCT. Ice On/Off Your automatic ice maker is designed to dispense ice cubes into the ice storage bin below until it senses the bin is full. If you require more ice, the storage bin can be removed and ice will dispense into the top freezer bin.
USING YOUR ICE MAKER Ice storage bin and scoop Information about your automatic ice maker ●● ●● ●● ●● ●● ●● ●● ●● ●● Your product comes with an ice storage bin located inside the top freezer bin, and a hygienic scoop for ice. This scoop provides hygienic access to clean, clear ice cubes. Your automatic ice maker will produce approximately eight cubes of ice every 3 – 4 hours, depending on the freezer compartment temperature and the number of door openings.
ACTIVESMART™ REFRIGERATOR SPECIAL FEATURES Fruit and vegetable bins with humidity control lids ●● ●● ●● Your refrigerator has two fruit and vegetable bins and one slim bin. These bins are fitted with humidity control lids and settings for either fruit or vegetable storage. The unique humidity control lid functions to seal the bins and provide a humid microclimate to extend the storage times of fruit and vegetables.
ACTIVESMART™ REFRIGERATOR SPECIAL FEATURES Slim bin The slim bin provides the ideal environment for long vegetables which may not fit in the fruit and vegetable bins. Alternatively the bin can conveniently be used for deli items, beverages or for defrosting foods. Single bottle holders ●● ●● ●● ●● ●● The bottle holders can be used to store a variety of bottles. To position the bottle holder in your refrigerator, simply place the holder along the length of any shelf.
CLEANING CARE – EXTERIOR Exterior ●● ●● ●● ●● ●● ●● ●● ●● ●● ●● Stainless steel exterior doors It is important when cleaning the exterior door surface of your refrigerator, to use only liquid dishwashing detergent dissolved in warm water and a soft lint-free cloth. Rinse with clean water and dry with a clean, lint-free cloth. Other exterior surfaces Clean all other exterior surfaces with liquid dishwashing detergent dissolved in warm water and a soft lint-free cloth.
CLEANING CARE – EXTERIOR Kickstrip grilles and kickstrip filter Your refrigerator is fitted with a kickstrip grille and filter to protect the internal working components. We recommend cleaning the grille and filter in conjunction with changing your water filter cartridge (every 6 months). ●● ●● To maximize operating efficiency keep ventilation openings clear of obstructions by regularly vacuuming the flooring in front of your appliance.
CLEANING CARE – EXTERIOR RS36A80J and RS36A80U models only 1 2 3 4 5 To clean the bottom kickstrip grille and kickstrip filter: Remove the air flow divider by pulling towards you (A). To remove the top kickstrip grille, insert fingers into the left and right square openings on the grille. Pull towards you (B). To remove kickstrip filter, insert fingers into the left and right square openings on the filter. Pull towards you. Refer to ‘Removing and replacing kickstrip filter’ drawing.
CLEANING CARE – INTERIOR Interior ●● ●● ●● ●● ●● ●● ●● ●● It is important to keep the interior of the refrigerator clean to help prevent food from becoming contaminated during storage. The amount and types of food stored determines how often cleaning should be carried out in the refrigerator (ideally once every 1 – 2 weeks). For ease of cleaning, empty the refrigerator first and remove all glass shelves, door shelves and storage bins.
CLEANING CARE – INTERIOR Fruit and vegetable bins and slim bin When cleaning use only liquid dishwashing detergent dissolved in warm water and a soft lint-free cloth. Rinse with clean water and dry with a clean, lint-free cloth. 1 To remove a bin, extend the bin on its runners, making sure the bin is empty. 2 With hands on either side of the bin corners, firmly push the bin upwards to dislodge from securing tabs. 3 Pull the bin towards you to remove. Push both runners back into the refrigerator.
STORING FOOD IN YOUR REFRIGERATOR Your refrigerator is designed to help prolong the storage life of fresh and cooked foods. Each compartment’s specialized zones along with a constant cold temperature delays the onset of food spoilage – particularly the metabolic growth of bacteria, molds and yeasts causing chemical and physical changes. General fresh food care The quality of food before being placed in the refrigerator is critical to successful storage.
STORING FOOD IN YOUR REFRIGERATOR ●● ●● ●● ●● ●● ●● ●● ●● ●● ●● ●● ●● ●● ●● ●● ●● ●● ●● Precooked foods and leftovers Ensure cooked foods are stored in suitable covered containers, this will prevent foods from drying out. Keep for only 1 – 2 days. Reheat leftovers only once and until steaming hot. Red meats Ensure raw and cooked foods are stored in separate air tight containers to prevent cross contamination from the loss of raw meat juices.
STORING FOOD IN YOUR FREEZER Freezing and storing foods at temperatures -0.4°F (-18°C) or colder helps retain the physical quality and nutritional value of foods. Low temperatures inhibit the growth of bacteria, molds and yeasts, thereby restricting chemical and physical reactions to extend the food’s storage life. General fresh frozen food care Successful freezing depend on the foods’ quality, packaging and proportions.
STORING FOOD IN YOUR FREEZER ●● ●● ●● ●● ●● Precooked foods and leftovers Ensure cooked food are stored in suitable covered containers and away from raw frozen foods. Not all foods are suitable for freezing; some separate on defrosting such as cooked egg whites, custards and cream fillings, meringue toppings, milk porridges, gelatin or jellylike dishes and salad dressings. Red meats, poultry and game We recommend selecting lean meats as opposed to fatty meats.
DEFROSTING FOOD IN YOUR REFRIGERATOR Your refrigerator is also designed to help defrost/thaw foods in a safe manner by avoiding the growth of bacteria, molds and yeasts – major causes of food spoilage. General defrosting food care ●● ●● ●● ●● ●● ●● ●● ●● For best results: Ensure foods are defrosted in the refrigerator, microwave oven or multifunction oven. – Never defrost foods at room temperature, this could potentially promote the growth of bacteria and cause food poisoning even after cooking.
USER WARNINGS AND SOUNDS User warnings Faults In the unlikely event a fault occurs the icon will illuminate on the internal control panel and an alarm will sound when the fresh food compartment door is opened. ●● ●● ●● Please count the number of beeps made when the fresh food compartment door is opened. Please record the number and sequence of temperature lights displayed on the internal control panel and contact our Customer Care Center.
TROUBLESHOOTING If there is a problem with your appliance, please check the following points before contacting your local Fisher & Paykel Authorized Service Agent or the Customer Care Center. Product parts and accessories can be purchased through Fisher & Paykel Customer Care Center or online at www.fisherpaykel.com (this service is available to selected markets only). All models PROBLEM POSSIBLE CAUSES WHAT TO DO Appliance does not operate. No electricity at power outlet.
TROUBLESHOOTING All models PROBLEM POSSIBLE CAUSES WHAT TO DO Unfamiliar noises. Cabinet not stable or level. See ‘Installation instructions’ booklet. Freezer is defrosting. This is normal. Ice maker sounds. Normal ice maker operation. See ‘User warnings and sounds’ section. Fault icon illuminates on the internal control panel and an alarm sounds when the fresh food compartment door is opened.
TROUBLESHOOTING All models PROBLEM POSSIBLE CAUSES WHAT TO DO Automatic ice maker does not work. Ice maker has not been turned on. Switch on ice maker, see ‘Using your ice maker’ section. Water supply turned off or not connected. Connect water supply. Freezer compartment not working. Contact Customer Care Center. Water pressure too low. Check water pressure. Water line kinked/squashed. Check water line for kinks/squashing. Filter clogged. Water filter may need replacing.
TROUBLESHOOTING Ice & Water models only PROBLEM POSSIBLE CAUSES WHAT TO DO Water has poor taste/odor. Refrigerator not used for an extended period. Flush the water filtration system. Dispense and discard 4 qt (4 L) of water, this will ensure the water tank is refilled with fresh water. Water dispenser does not work. Water supply turned off or not connected. Turn water on. Supply line may be blocked. Check supply for kinks or leaks. On first installation there may be air in water system.
SERVICE AND WARRANTY Before you call for service or assistance... Check the things you can do yourself. Refer to the installation instructions booklet and your user guide that: 1 Your product is correctly installed by the installer. 2 You are familiar with its normal operations. 3 You have read the ‘Troubleshooting’ section.
www.fisherpaykel.com Copyright © Fisher & Paykel 2015. All rights reserved. The product specifications in this booklet apply to the specific products and models described at the date of issue. Under our policy of continuous product improvement, these specifications may change at any time. You should therefore check with your dealer to ensure this booklet correctly describes the product currently available. US CA 843156 A 06.