ACTIVESMART™ INTEGRATED REFRIGERATOR FRENCH DOOR REFRIGERATOR FREEZER RS32A72, RS36A72 & RS36A80 BOTTOM MOUNT REFRIGERATOR FREEZER RS36W80 USER GUIDE US CA
CONTENTS 4 9 11 12 13 25 26 31 32 33 37 Registration To register your product visit our website: fisherpaykel.
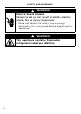
SAFETY AND WARNINGS WARNING! Electric Shock Hazard Failure to do so can result in death, electric shock, fire or injury to persons. ! • Read and follow the safety and warnings outlined in this user guide before operating this appliance. ! WARNING! This appliance contains flammable refrigerant isobutane (R600a).
SAFETY AND WARNINGS READ AND SAVE THIS GUIDE WARNING! Read entire manual. Failure to follow all guides and rules could cause personal injury or property damage. When using this appliance, always exercise basic safety precautions including the following: General Use z z z z z z z z z z z z z z This product has been designed for use in a normal domestic (residential) environment. Children should be supervised to ensure that they do not play with the appliance.
SAFETY AND WARNINGS z z z z When moving your appliance away from the wall, be careful not to roll over or damage the power cord. WARNING: Do not use electrical appliances inside the food storage compartments of the appliance, unless they are of the type recommended by the manufacturer. When positioning the appliance, ensure the power cord is not trapped or damaged. Do not locate multiple portable socket-outlets or portable power supplies at the rear of the appliance.
SAFETY AND WARNINGS z z z The thermal insulation foam in this appliance may contain flammable insulation blowing gases, any exposed foam may be highly flammable and must be carefully treated during disposal. WARNING: Risk of child entrapment. Before you throw away your old refrigerator or freezer, the doors and panels should be removed and the racks left in place so that children may not easily climb inside.
SAFETY AND WARNINGS Ice making z z Avoid contact with the moving parts of the ice maker ejector mechanism, and do not place your fingers on the automatic ice- making mechanism while the appliance is in operation. At first use or after water filter has been replaced, there may be discolouration in the first bin of ice cubes. Discard the discoloured ice cubes. If discolouration continues in succeeding bins, contact your Fisher & Paykel trained and supported service technician.
BEFORE YOU BEGIN z z z Ensure the installer has completed the final checklist in the installation guide. Read this guide, taking special note of the safety and warnings section. Remove all packaging and dispose of it responsibly. Recycle items that you can.
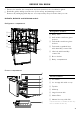
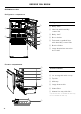
BEFORE YOU BEGIN RS36W80 models Refrigerator compartment Refrigerator features 3 1 4 2 1 Dairy shelf 2 Slim bin with humidity control lid 3 Dairy shelf 5 4 Door shelves 6 5 Fruit and vegetable bins with humidity control lids 7 6 Bottle divider 7 Large aluminium extrusion door shelf Freezer compartment 1 2 3 4 5 Freezer features 1 Ice maker* 2 Ice storage bin with scoop 3 Top bin 4 Mid tray 6 5 Large bottom bin 6 Water filter 7 Manual ice tray with lid** * Top left of freezer (Ice & Water models
USING THE CONTROL PANEL The control panel enables you to view and modify all the features and options of your refrigerator. Extra features available on selected models. 1 2 3 4 5 Ice & Water models Non-Ice & Water models WiFi illuminates when functionality is activated. 1 Illuminates to indicate that the keys on the control panel are locked. Allows you to disable the buttons on the control panel. Illuminates when the water filter needs replacing.
STORAGE FEATURES REFRIGERATOR Fruit and vegetable bins/Slim bin with humidity control lids Separate fruits and vegetables to prevent the ethylene-sensitive produce from ripening too quickly-helps to extend their storage life. Also used for storing deli items and beverages, or for defrosting foods. Slim bin with humidity control lid The slim bin stores long vegetables which cannot fit in the fruit and vegetable bins. Also used for storing deli items and beverages, or for defrosting foods.
USING YOUR APPLIANCE Temperature control (all models) When you turn your refrigerator on for the first time, the cooling system will automatically cool all compartments to their recommended temperatures as displayed by 6 LEDs — 37°F (3°C) refrigerator and 0°F (-18°C) freezer. This will take between 2-3 hours. For storage of general household foods in the most efficient manner, it is recommended to use the product in the factory configuration supplied.
USING YOUR APPLIANCE Door alarms If the refrigerator compartment door is left open, the alarm will beep after 90 seconds, if the freezer door is left open the alarm will beep after 60 seconds. If either of the doors remains open, subsequent beeps will sound every 30 seconds for five minutes. Alarm mute To activate/deactivate ALARM MUTE, press once. The light above the button will illuminate to indicate the refrigerator is muted.
USING YOUR APPLIANCE Sabbath mode In SABBATH MODE, alarms, lights and displays are deactivated for 80 hours. Once in Sabbath mode: z z z z z The interior light will not turn on when you open the refrigerator. The door alarms will not operate. The display will not illuminate, except the Sabbath mode icon. The internal and external control panels will not operate. Sabbath mode automatically deactivates after 80 hours. 1 To activate/deactivate SABBATH MODE, press , and together for four seconds.
USING YOUR APPLIANCE Features Fast Freeze FAST FREEZE boosts freezing speed by dropping to its coldest temperature for 24 hours, helping retain freshness, texture and taste during the freezing process. 1 To activate, press on the internal display. The FAST FREEZE light will illuminate. 2 To deactivate before the 24 hours has again. elapsed, press When FAST FREEZE is deactivated the light is off. For best results, activate the function before it is required.
USING YOUR APPLIANCE Bottle Chill BOTTLE CHILL rapidly chills your beverages in the freezer for a set time of 15 minutes. Depending on bottle size, you may need to return it to the freezer and reset. 1 To activate, press on the control panel. The BOTTLE CHILL light will illuminate. The icon will illuminate on the external display (Ice & Water models only). An alarm will sound after 15 minutes to remind you to remove your beverage.
USING YOUR APPLIANCE Ice On/Off ICE ON/OFF activates automatic ice - this is only available in the lower compartment. Your ice maker is designed to automatically dispense ice into the ice storage bin below until it detects the bin is full. The more ice you use, the more it makes. Before first use the automatic ice systems needs to be flushed. 1 To activate/deactive, press . When the ice maker is activated the light will illuminate.
USING YOUR APPLIANCE Information about your ice maker Your automatic ice maker will produce approximately eight cubes of ice every 3 – 4 hours, depending on the freezer compartment temperature and the number of door openings. The ice cube tray will fill with water. When cubes are frozen, they will be ejected from the ice tray into the ice storage bin. Ice making will continue until the storage bin is full. Ice making will resume once you start to use the stored ice.
USING YOUR APPLIANCE Water dispenser (Ice & Water models only) 3 2 1 4 1 Dispenser lock button and LED light Locks/unlocks the water dispenser. The LED above the lock button will illuminate when dispenser is locked. 2 Bottle Chill indicator Icon will illuminate when BOTTLE CHILL is activated and flashes when the beverage is ready. 3 Filter change indicator Icon will illuminate when water filter requires changing.
USING YOUR APPLIANCE Dispenser lock The DISPENSER LOCK is located on the external display and can be activated to prevent water from being dispensed. This is useful when you are cleaning the external display or when there are small children around. To activate/deactivate DISPENSER LOCK, press for four seconds. When activated the light above the button will illuminate. When the dispenser pad is pressed, several beeps will sound to alert the user that water cannot be dispensed.
USING YOUR APPLIANCE Flushing the water filter Before you start using the Ice & Water function, complete the flushing steps to ensure optimum performance of your water filter. To flush through the automatic icemaker 1 Press and hold , and together for 4 seconds then close the door(s). The ice tray will flip twice and empty the water into the bin below. The ice tray will flip only after the doors are closed.
USING YOUR APPLIANCE Humidity control system Humidity control lids The control lids are fitted to the fruit and vegetable bins and slim bin of your refrigerator. z z These lids seal the bins and provide a humid microclimate to extend the storage times of fruit and vegetables. The lids have specially designed grooves that retain moisture to prevent condensation from dripping onto the fruits and vegetables at times of high humidity.
USING YOUR APPLIANCE Slim storage drawer The slim bins at the bottom of the refrigerator compartment provide storage space for items that you may want to keep separate from the rest of the refrigerator. These slim storage bins can be used for deli item storage, beverages or for defrosting foods. Slim storage drawer Glass shelves Standard glass shelves can not be repositioned in your refrigerator. The cantilever glass shelves are designed to be strong and versatile.
WIFI CONNECTION Your appliance can be connected to your home wireless network and operated remotely using the app. Getting started z z z Ensure your home WiFi network is turned on. You will be given step by step guidance on your mobile device. It may take up to 10 minutes to connect your appliance. On your mobile device: 1 Download the app from www.fisherpaykel.com/connect 2 Register and create an account. 3 Add your appliance and set up the WiFi connection.
CLEANING AND CARE Exterior Clean all surfaces with liquid dishwashing detergent dissolved in warm water and a soft cloth. Rinse with clean water and dry with a clean, lint-free cloth. Do not use any abrasive stainless steel cleaners, glass cleaners, solvents or scourer pads as these will damage the door surface. Door gasket Clean the magnetic door gasket every three months with a toothbrush, and liquid detergent dissolved in warm water. Bottle holder (where fitted) Clean with warm water and detergent.
CLEANING AND CARE Toe kick grilles and filter Your refrigerator is fitted with a toe kick grille and filter to protect the internal working components. We recommend cleaning the grille and filter in conjunction with changing your water filter cartridge (every 6 months). Keep ventilation openings clear of obstructions by regularly vacuuming the flooring in front of your appliance to maximize the operating efficiency of your appliance.
CLEANING AND CARE RS9120W models only To clean the toe kick grille and filter: 1 Remove the air flow divider by pulling towards you (A). A IF TOEKICK IS HIGHER THAN 4" USE SIDE CUTTER TO CUT UNREQUIRED VANES FROM DOTTOM Removing air flow divider 2. DRILL HOLES THROUGH DIMPLES 3. USE PROVIDED SCREWS TO FIX GRILL TO MATCHING HOLES ON PLASTIC PARTS 1. 2 To remove the top toe kick grille, insert fingers into the left and right square openings on the grille. Pull towards you (B).
CLEANING AND CARE Interior It is important to keep the interior of the refrigerator clean to help prevent food from becoming contaminated during storage. The amount and types of food stored determines how often cleaning should be carried out in the refrigerator (ideally once every 1 – 2 weeks). For ease of cleaning, empty the refrigerator first and remove all glass shelves, door shelves and storage bins.
CLEANING AND CARE Fruit and vegetable bins and slim bin When cleaning, use only liquid detergent dissolved in warm water and a soft lint-free cloth. Rinse with clean water and dry with a clean, lint-free cloth. 1 To remove a bin, extend the bin on its runners, and make sure you empty the bin. 2 Hold both sides of the bin corners and push the bin firmly upwards to dislodge from the securing tabs. 3 Pull the bin towards you to remove. Push both runners back into the refrigerator.
FOOD CARE For best food care z z z z z z z z z z Store only high-quality, fresh food in your appliance. Store perishable foods in the appliance immediately after purchase. Storing at room temperature increases the rate of deterioration and can allow harmful microbial growth. Foods such as meat, poultry and seafood should be well wrapped or sealed in suitable packaging to prevent dehydration, color deterioration, loss of flavor, and transfer of odor.
USER WARNINGS AND SOUNDS Faults z z z Count the number of beeps made when the refrigerator compartment door is opened. Record the number and sequence of temperature lights displayed on the internal control panel and contact a Fisher & Paykel trained and supported service technician in order to repair the fault. You can do this by going online to fisherpaykel.com or by contacting our Customer Care Centre. To silence the fault alarm press any button on the internal control panel.
TROUBLESHOOTING If there is a problem with your appliance, check the following points before contacting your local Fisher & Paykel trained and supported service technician or the Customer Care Centre. Product parts and accessories can be purchased through Fisher & Paykel Customer Care Centre or online at fisherpaykel.com (this service is available to selected markets only). All models PROBLEM POSSIBLE CAUSES WHAT TO DO Appliance does not operate No electricity at power outlet.
TROUBLESHOOTING All models PROBLEM POSSIBLE CAUSES Fault alarm sounds when the refrigerator compartment door is opened Water in the vegetable bins WHAT TO DO Record the number of beeps along with the number and sequence of temperature lights displayed on the internal control panel. Contact Customer Care Center. Condensation is formed by the water produced by fruit and vegetables. A small amount of condensation is beneficial for fruit and vegetable storage. Wipe out water with a cloth.
TROUBLESHOOTING Ice & Water models only PROBLEM POSSIBLE CAUSES WHAT TO DO Automatic ice maker does not work Ice maker has not been turned on. Switch on ice maker, see ‘Ice On/Off’ section. Water supply turned off or not connected. Connect water supply. Freezer compartment not working. Contact Customer Care Center. Water pressure too low. Check water pressure. Water line kinked/squashed. Check water line for kinks/squashing. Filter clogged. Water filter may need replacing.
TROUBLESHOOTING Ice & Water models only PROBLEM POSSIBLE CAUSES WHAT TO DO Water has poor taste/odor Refrigerator not used for an extended period. Flush the water filtration system. Dispense and discard 1 gal (4L) of water, this will ensure the water tank is refilled with fresh water. Poor incoming water quality Refrigerator not used for an extended period. Flush the water filtration system. Dispense and discard 1 gal (4L) of water, this will ensure the water tank is refilled with fresh water.
SERVICE & WARRANTY For details of your Manufacturer’s Warranty and contacts for servicing, please refer to your separate ‘Service & Warranty’ book provided with your refrigerator. This product has been designed for use in a normal domestic (residential environment). This product is not designed for any commercial use. Any commercial use by the customer will affect this products Manufacturer’s Warranty. Complete and keep for safe reference: Model Serial No.
FISHERPAYKEL.COM © Fisher & Paykel Appliances 2021. All rights reserved. The models shown in this guide may not be available in all markets and are subject to change at any time. The product specifications in this guide apply to the specific products and models described at the date of issue. Under our policy of continuous product improvement, these specifications may change at any time.