FRONT LOADING CONDENSER CLOTHES WASHER WH2424F & WH2424P models INSTALLATION GUIDE / USER GUIDE US CA
CONTENTS Introduction 5 Safety and warnings 6 Installation instructions 9 Before you do your first wash 19 Getting started 20 Washer controls 24 Safety features 25 Sorting and loading 26 Detergent and fabric softener 28 Wash cycles 32 Wash cycle options 34 Caring for your washer 39 Before you call for service 42 Fault codes 44 Troubleshooting 45 Limited Warranty 51 Registration To register your product visit our website: fisherpaykel.
INTRODUCTION Welcome Thank you for buying a Fisher & Paykel clothes washer. We are proud of this washer and trust it will serve you well for many years. At Fisher & Paykel we aim to provide innovative products that are simple to use, ergonomic and kind to the environment. Your washer has numerous wash cycles and options so you can perform every wash task with ease and the knowledge your clothes are receiving the best possible care.
SAFETY AND WARNINGS READ AND SAVE THIS GUIDE Many washers are located near a gas dryer or a water heater in the home. ! WARNING! Risk of Fire Hazard z z z For your safety the information in this manual must be followed to minimize the risk of fire or explosion or to prevent property damage, personal injury or loss of life. Do not store or use gasoline or other flammable vapors and liquids in the vicinity of this or any other appliance.
SAFETY AND WARNINGS ! WARNING! Risk of Fire, Electric Shock and Injury to Persons Hazards ● Follow the safety precautions outlined in this User guide. ● Failure to do so can result in death, electric shock, fire or injury to persons. WARNING! When using your clothes washer, follow basic precautions, including the following: z z z z z z z z z z z z Read all instructions before using the appliance.
SAFETY AND WARNINGS z z z z z z z z z z z z z z z z Use this appliance only for its intended purpose as described in this User guide. Connect to a properly rated, protected and sized power supply circuit to avoid electrical overload. Connect to adequate plumbing and drain facilities as described in the Installation Instructions. When disconnecting the appliance pull by the plug rather than the cord or junction of cord to avoid damage to the cord or junction of the cord and plug.
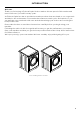
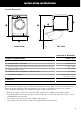
INSTALLATION INSTRUCTIONS Product dimensions C E D A B FRONT VIEW Wall TOP VIEW WH2424F & WH2424P PRODUCT DIMENSIONS INCHES (MM) A Overall height of product 33 1/2” (850) B Overall width of product 23 5/8” (600) C Overall depth of product (including dial and door when closed) 25 5/8” (645) D Depth of door open E Minimum door clearance to adjacent wall Standpipe height 42” (1065) 13” (330) min. 31 1/2” – 47 1/4” (min. 800 – 1200) CAPACITY 2.
INSTALLATION INSTRUCTIONS Accessories Please check you received the following accessories with your Fisher & Paykel washer. You will find them inside the drum or attached to the packaging. z z z z z 2 x Inlet hoses 1 x Drain hose guide 1 x Installation instructions and User guide 1 x Wrench 1 x Installation leaflet (attached to the top of the washer) Unpacking WARNING! Recycle or destroy the carton and plastic bags after the washer is unpacked. Make materials inaccessible to children.
INSTALLATION INSTRUCTIONS To remove the bolts: 1 Use a wrench or socket to unscrew and remove all four transit bolts at the back of the washer (A). 2 Pull the black rubber grommets to remove the bolt, grommet and black plastic spacers from the machine. Keep the transit bolts in case they are required for future transit of the machine. Never transport the machine without the transit bolts properly fixed in place.
INSTALLATION INSTRUCTIONS Installing the washer 1 Run some water from the hot and cold faucets to flush the water lines and remove particles that might clog the water valve screens. 2 Remove the inlet hoses from the plastic bag. Remove black rubber washers from bag and insert into hose fitting before connecting to unit. 90° elbow end – Carefully connect the inlet hose marked 3 HOT to the outside “H” outlet of the water valve. Tighten by hand; then tighten another 2/3 turn with pliers.
INSTALLATION INSTRUCTIONS 7 Attach U-shaped hose guide to the end of the drain hose. Place the hose in a standpipe. Note: if the drain hose is placed in a standpipe without forming a U shape, a siphoning action could occur. There must be an air gap around the drain hose. A snug hose fit can also cause a siphoning action. Installing the drain hose Note: do not place drain hose deeper than 7” (177.8mm) into the drain. The suggested depth is 4 – 7” (101.6 – 177.8mm). Deeper than 7” (177.
INSTALLATION INSTRUCTIONS If you have an uncontrolled water heating source (eg a wet back or solar heating system) you should fit a tempering valve. This will ensure the hot water temperature remains within safe limits. Contact your registered plumber to select and install the tempering valve. IMPORTANT! ● ● This appliance must be installed in accordance with the installation instructions before use.
INSTALLATION INSTRUCTIONS Draining the hose guide must be fitted to the drain hose. The height of the standpipe or tub should be between 31 1/2” – 47 1/4” (800 – 1200mm). 2 Secure the hose guide so it cannot become dislodged from the standpipe or tub. IMPORTANT! ● ● If the drain hose is placed on the ground or if the standpipe or tub is less than 31 1/2” (800mm) high, the washing machine will continuously drain while being filled (siphon).
INSTALLATION INSTRUCTIONS Electrical connection ! WARNING! Electric Shock Hazard ● Plug into a grounded 3-prong outlet ● DO NOT remove ground prong. ● DO NOT use an adapter. ● DO NOT use an extension cord. ● Failure to follow these instructions can result in death, fire or electrical shock. Circuit Individual, properly polarized and grounded 15 or 20 amp circuit breaker or time-delay fuse. Power supply 2 wire plus ground, 120 Volt, single phase, 60 Hz, alternating current.
INSTALLATION INSTRUCTIONS Washer must be electrically grounded in accordance with local codes and ordinances, or in the absence of local codes, with latest edition of the NATIONAL ELECTRICAL CODE, ANSI/NFPA NO. 70 or CANADIAN ELECTRICAL CODE, CSA C22.1. Check with a licensed electrician if you are not sure that the washer is properly grounded. 1 Uncoil the power cord, remove and discard the plastic pin cover and plug into a wall socket.
INSTALLATION INSTRUCTIONS Completing the installation Installation test cycle IMPORTANT! Do this before you wash any items in your washer. This is to check that your washer is installed correctly and that it is functioning correctly prior to use. 1 Turn your washer on by pressing the ‘POWER’ button. 2 Select the ‘Quick’ cycle. Ensure the drum is empty and the door closed. button. The machine will start to fill.
BEFORE YOU DO YOUR FIRST WASH Before you start, it is a good idea to go through the following checklist: 1 Have the packaging and transit bolts been removed? 2 Is the drain hose threaded through the ‘U bend’ (with no more than 3/4” (20mm) extended) and hooked into your standpipe or tub, or attached to a spigot? 3 Is the hot hose connected to the hot valve (color-coded orange, if present)? Is the 4 5 6 7 cold hose connected to the cold valve (color-coded white)? Have the faucets been turned on? Is the mac
GETTING STARTED WARNING! PUSH To reduce the risk of fire, electric shock, or injury to persons, read the IMPORTANT SAFETY INSTRUCTIONS before operating this appliance. WH2424F model ● ● ● PUSH ● Sort your washing carefully. Separate white/light colors from dark colors. Wash new, highly colored and dark colored items separately to prevent dye transfer. Refer to the ‘Sorting and loading’ section. Load your clothes individually into the wash drum. Close the door.
GETTING STARTED 1 Press ‘POWER’ to activate your washer. 2 Select your wash cycle by turning the SmartTouch™ Control Dial. 3 Choose your wash options, if you wish to select options different from the default options for the cycle. to start the cycle. 4 Touch ● ● ● ● If you make an invalid selection the washer will beep to alert you. When the cycle finishes, your washer will perform end of cycle beeps and then turn off automatically.
GETTING STARTED WARNING! PUSH To reduce the risk of fire, electric shock, or injury to persons, read the IMPORTANT SAFETY INSTRUCTIONS before operating this appliance. WH2424P model ● ● ● PUSH ● Sort your washing carefully. Separate white/light colors from dark colors. Wash new, highly colored and dark colored items separately to prevent dye transfer. Refer to the ‘Sorting and loading’ section. Load your clothes individually into the wash drum. Close the door.
GETTING STARTED 1 Press ‘POWER’ to activate your washer. 2 Select your wash cycle by turning the SmartTouch™ Control Dial. 3 Choose your wash options, if you wish to select options different from the default options for the cycle. to start the cycle. 4 Touch ● ● ● ● If you make an invalid selection the washer will beep to alert you. When the cycle finishes, your washer will perform end of cycle beeps and then turn off automatically.
WASHER CONTROLS SmartTouch™ Control Dial The SmartTouch™ Control Dial provides easy and efficient wash cycle selection. As you rotate the dial, the icon of the wash cycle selected will be illuminated, along with the default settings for that cycle on the right side of the control panel. SmartTouch™ buttons The smooth, easy clean buttons enable easy selection of options with lights clearly showing the selections you are making.
SAFETY FEATURES Door lock The door of your washer will lock once you touch until the machine beeps at the end of the cycle, ensuring safety for you and your family while your machine is operating. ● ● To unlock the door during the cycle: You can open the door to add or remove items during the wash simply by touching the button.
SORTING AND LOADING When preparing your wash load there are some important things to consider: Sorting Sort items according to color, fabric type, and soil type. Wash fine, delicate fabrics separately from thick, heavy fabrics. Always separate colored items from whites, especially when they are new. Color run could be an issue if you wash items at higher temperatures. Some soils, like mud and blood are best washed in cold water.
SORTING AND LOADING Before you load ● ● ● ● Check pockets for items that could damage your clothes or get caught in the washer. Close zippers, hooks and eyes, and other fastenings (ie fasten the opening of comforter), and remove loose bra wires. All these can damage both your washer and your clothes. Place delicate items, such as lingerie, in a mesh laundry bag before placing in the machine.
DETERGENT AND FABRIC SOFTENER Detergent type Your washer requires low sudsing detergent to prevent oversudsing problems. Low sudsing detergent comes in powder, liquid or pod form and is labelled ‘High Efficiency’ or ‘HE’. Using top loading detergent in your front loader washer may lead to excessive suds formation, which will lengthen the cycle time as the machine waits for the suds to dissolve. IMPORTANT! Do not use chlorine based bleaches in the washer as damage to the machine and clothing may result.
DETERGENT AND FABRIC SOFTENER Pods Detergent pods are a ‘no mess’ alternative to powdered or liquid detergent. Pod type detergent or wash boosters must be placed at the back of the drum prior to loading your clothes. This will ensure they are activated quickly in the wash. Do not place pods in the detergent dispenser drawer or on top of your clothes. Pre wash WH2424F model Liquid detergent If you wish to use the ‘Pre Wash’ option, liquid detergent is added to the pre wash compartment marked (A).
DETERGENT AND FABRIC SOFTENER WH2424P model If you wish to use the ‘Pre Wash’ option, liquid or powdered detergent only must be placed in the pre wash detergent compartment on the right side of the drawer, marked with a . When you select ‘Pre Wash’, the pre wash compartment is flushed at the start of the cycle. For more information refer to ‘Wash cycle options’.
DETERGENT AND FABRIC SOFTENER Fabric softener Add fabric softener to the middle compartment of the dispenser marked with a . The washer will automatically flush the fabric softener during the rinse part of the cycle. If you wish to use fabric softener we recommend to: 1 Use it sparingly. Measure it carefully and do not use more than 0.85 ounces (25ml or 1/2 cap), some thicker varieties may need diluting. 2 Clean your dispenser regularly. 3 Clean your machine regularly using the ‘Drum Clean’ cycle.
WASH CYCLES WH2424F model Your washer has a number of wash cycles to suit your laundering needs. Selecting the most appropriate cycle for each particular wash load will help ensure you get the best wash result. CYCLE DESIGNED FOR DESCRIPTION MAX. LOAD SIZE DEFAULT WASH TEMP. MAX. WASH TEMP. DEFAULT SPIN SPEED (rpm) MAX. SPIN SPEED (rpm) Cottons Normally soiled everyday cotton loads, eg whites. A comprehensive cycle specifically designed for cottons. 17.
WASH CYCLES WH2424P model Your washer has a number of wash cycles to suit your laundering needs. Selecting the most appropriate cycle for each particular wash load will help ensure you get the best wash result. CYCLE DESIGNED FOR DESCRIPTION MAX. LOAD SIZE DEFAULT WASH TEMP. MAX. WASH TEMP. DEFAULT SPIN SPEED (rpm) MAX. SPIN SPEED (rpm) Cottons Normally soiled everyday cotton loads, eg whites. A comprehensive cycle specifically designed for cottons. 17.
WASH CYCLE OPTIONS All wash cycles default to the recommended options for that cycle based on the average expected load to be washed. You can vary the options (eg ‘Wash Temp’, ‘Spin Speed’) to create your desired cycle. Note: some options are not available on some cycles, for clothes care reasons, or because the option is not appropriate for the cycle.
WASH CYCLE OPTIONS Soil Level (WH2424P model only) The ‘Soil Level’ option lets you adjust the wash to suit the amount of soil in your load. For example, select ‘Heavy’ for dirty clothes; for items that are only lightly soiled, select ‘Light’. This adjusts the wash time accordingly to give the load the right amount of agitation to remove the soil. Wash Boost Pre Wash For extra dirty loads you can perform a ‘Pre Wash’. Your washer will start the wash with a short wash in cool water to remove excess soil.
WASH CYCLE OPTIONS Options Soak (WH2424F model only) A soak option is available on selected wash cycles. When this option is chosen the machine will add a one hour soak sequence, which combines periods of tumbling with soaking to help lift stubborn stains. If ‘Soak’ and ‘Time Saver’ are selected in the same cycle, the soak duration will be reduced to 30 minutes. ‘Soak’ is not available on the ‘Wool’, ‘Drum Clean’, ‘Quick’, ‘Rinse’ or ‘Spin’ Cycles.
WASH CYCLE OPTIONS Keylock This option enables you to deactivate the buttons on the display panel, except for the ‘Power’ and ‘Keylock’ buttons. This prevents accidental button presses. ● To turn Keylock mode ON or OFF when the washer is powered on: Touch and hold the button for 2 seconds. Note: when activated, the light above the displayed on the display panel. ● ● button is illuminated.
CUSTOMIZING WASH CYCLES After using your washer a few times you may discover there are some wash options you prefer for some cycles. You can program your washer to remember the wash options you prefer for each wash cycle. For instance, you may want to set the ‘Perm Press’ cycle to cold wash temperature or set the ‘Everyday’ cycle so it gives you Rinse+ every cycle. To customize a cycle: 1 Press ‘POWER’ to turn the machine on. 2 Turn the dial to select the cycle you wish to customize.
CARING FOR YOUR WASHER When you have finished using your washer ● ● ● Unplug the machine from the power socket. Wipe around the door and in the rubber gasket to remove any remaining water and foreign matter. Turn off the faucets to prevent the chance of flooding should a hose burst. Cleaning your washer Before you start cleaning your washer, ensure that it is disconnected from the power (ie unplug the machine from the power socket).
CARING FOR YOUR WASHER ● ● ● ● Cleaning the drum and the door Use a soft damp cloth to wipe the door, cleaning any water marks or residue off it. Wipe the rubber seal around the door. Remove any items or lint accumulating in the bottom of the seal catchment and wipe out any accumulated water. If this is not cleaned out, unpleasant odors will develop. If the drum has any residual dirt or lint stuck to it, remove this and wipe the drum clean.
CARING FOR YOUR WASHER Cleaning the hose(s) Each hose has a filter in it, preventing any solid contaminants in the water entering your washing machine. Occasionally you should disconnect the water inlet hose(s) where they connect to the faucet(s). Check these for any build up of dirt and wash this out. Diaper sanitizers/bleach Diaper sanitizers and bleach are very corrosive to metal surfaces. DO NOT tip the contents of a diaper bucket into your machine.
BEFORE YOU CALL FOR SERVICE User warnings Your washer is capable of diagnosing a number of its own problems. In most cases, your washer will sound a continuous series of beeps and display a code when it has a problem that you can correct yourself. All control panel lights will turn off and the code will be displayed to inform you what the problem is. To stop the beeps, press any button on the control panel. Do not try to continue washing once you stop the noise.
BEFORE YOU CALL FOR SERVICE PROBLEM Too many suds DISPLAYED AS WHAT TO DO Machine will stop and flash while waiting for suds to dissipate. The machine will not beep during this time. When the suds have dissipated, the machine will automatically restart. Check you are using a suitable detergent. Check you are not overdosing the detergent. Check the standpipe height for the drain does not exceed 47 1/5” (1200mm).
FAULT CODES When a continuous series of beeps is sounded, all the lights turn off on the control panel and a number appears on the display, a fault has occurred. The washer will automatically enter this mode if a fault occurs. The fault code will be displayed as followed by a number on the digital display. To stop the sound, touch any button and perform the following steps: 1 2 3 4 5 6 7 Turn your machine off at the power point. Wait one minute and turn it back on.
TROUBLESHOOTING The following is a list of problems you may encounter when using this appliance and some suggestions that may help to correct the problem. If you still have problems, please contact your Fisher & Paykel trained and supported service technician. Solving operating problems PROBLEM POSSIBLE CAUSES WHAT TO DO Washer not turning on Power not switched on at the wall. Switch the power on at the wall. Then press ‘POWER’. Household power supply not working.
TROUBLESHOOTING Solving operating problems PROBLEM POSSIBLE CAUSES WHAT TO DO Washer drains while filling Drain hose too low. Ensure the height of the drain hose is at least 31 1/2” (800mm) from the floor level (refer to page 13). Drain hose sitting in water. Clear the drain. Drain hose blocked. Clear the drain hose. Pump filter blocked. Clear the pump filter (refer to page 38). Drain hose higher than 47 1/5” (1200mm) above floor level. Lower the level of the drain hose (refer to page 13).
TROUBLESHOOTING Solving operating problems PROBLEM POSSIBLE CAUSES WHAT TO DO Small puddle of water from under the machine Inlet hose or drain hose leaking. Check inlet hose(s) and the drain hose are correctly attached and not damaged. Lots of suds. Suds may have leaked and then dissolved. Detergent dispenser blocked. Clean detergent dispenser drawer (refer to page 37). Detergent dispenser drawer not fully closed.
TROUBLESHOOTING Solving operating problems PROBLEM POSSIBLE CAUSES WHAT TO DO Washing very wet at the end of the cycle Cycle selected not appropriate. Particularly short or delicate cycles have shorter spins which can result in wetter washing at the end of the cycle. Incorrect spin speed for load selected. Select a faster spin speed. An out of balance load has occurred. The washer compensates for the out of balance by using a lower spin speed, to reduce noise and potential damage to itself.
TROUBLESHOOTING Solving wash problems PROBLEM POSSIBLE CAUSES WHAT TO DO Creasing Washer overloaded. Do not overload washer. Incorrect cycle for load type. Use the ‘Perm Press’ or ‘Delicate’ cycle for creasable items. Spin speed too fast. Select a slower spin speed. Wet clothes left in washer or laundry basket. Laundry left sitting wet is more likely to crease. If not removing clothes from washer immediately at end of cycle, select the ‘Wrinkle Free’ option.
TROUBLESHOOTING Solving wash problems PROBLEM POSSIBLE CAUSES WHAT TO DO Dye transfer Colored items not washed separately from white/light colored items. Remember to separate whites and colors. New or non-colorfast items not washed separately. Wash non-colorfast items separately and select ‘Cold’ wash temperature. Wet items have been left sitting for too long.
LIMITED WARRANTY When you purchase any new Fisher & Paykel FabricSmart™ or WashSmart™ clothes washer product for personal or consumer use you automatically receive a two year limited warranty covering parts and labor for servicing within the 48 mainland United States, Hawaii, Alaska, Washington DC and Canada. You also receive an additional eight year parts only limited warranty on the direct drive motor part only.
LIMITED WARRANTY These limited warranties do not cover: A Service calls that are not related to any defect in the product. The cost of a service call will be charged if the problem is not found to be a defect of the product. For example: 1 Correcting faulty installation of the product. 2 Instructing you how to use the product. 3 Replacing house fuses, resetting circuit breakers, correcting house wiring or plumbing, or replacing light bulbs. 4 Correcting fault(s) caused by the user.
LIMITED WARRANTY How to get service Please read your User guide. If you then have any questions about operating the product, need the name of your local Fisher & Paykel Authorized Service Agent, or believe the product is defective and wish service under this limited warranty, please contact your dealer or call us at: USA and Canada TOLL FREE 1.888.9.FNP.USA (1.888.936.7872) or use the link at: www.fisherpaykel.
LIMITED WARRANTY Complete and keep for safe reference: Model Serial No.
FISHERPAYKEL.COM © Fisher & Paykel Appliances 2020. All rights reserved. The models shown in this guide may not be available in all markets and are subject to change at any time. The product specifications in this guide apply to the specific products and models described at the date of issue. Under our policy of continuous product improvement, these specifications may change at any time.