INSTALLATION INSTRUCTIONS USER GUIDE INSTRUCTIONS D’INSTALLATION GUIDE D’UTILISATION Front Loading Clothes Washer Laveuse à Chargement Frontal WH2424F and WH2424P models Modèles WH2424F et WH2424P US CA
English Page 1 – 52 Français Page 55 – 106
CONTENTS EN Introduction 3 Safety and warnings 4 Installation instructions 7 Before you do your first wash 17 Getting started 18 Washer controls 22 Safety features 23 Sorting and loading 24 Detergent and fabric softener 26 Wash cycles 30 Wash cycle options 32 Customizing wash cycles 36 Caring for your washer 37 Before you call for service 40 Fault codes 42 Troubleshooting 43 Limited warranty 49 IMPORTANT! SAVE THESE INSTRUCTIONS The models shown in this User guide may no
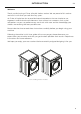
INTRODUCTION EN Welcome Thank you for buying a Fisher & Paykel clothes washer. We are proud of this washer and trust it will serve you well for many years. At Fisher & Paykel we aim to provide innovative products that are simple to use, ergonomic and kind to the environment. Your washer has numerous wash cycles and options so you can perform every wash task with ease and the knowledge your clothes are receiving the best possible care.
SAFETY AND WARNINGS Read all safety information before using Many washers are located near a gas dryer or a water heater in the home. ! WARNING! Risk of Fire Hazard ●● For your safety the information in this manual must be followed to minimize the risk of fire or explosion or to prevent property damage, personal injury or loss of life. ●● Do not store or use gasoline or other flammable vapors and liquids in the vicinity of this or any other appliance.
SAFETY AND WARNINGS ! EN WARNING! Risk of Fire, Electric Shock and Injury to Persons Hazards ●● Follow the safety precautions outlined in this User guide. ●● Failure to do so can result in death, electric shock, fire or injury to persons. IMPORTANT SAFETY INSTRUCTIONS WARNING! When using your clothes washer, follow basic precautions, including the following: ●● ●● ●● ●● ●● ●● ●● ●● ●● ●● ●● Read all instructions before using the appliance.
SAFETY AND WARNINGS ●● ●● ●● ●● ●● ●● ●● ●● ●● ●● ●● ●● ●● ●● ●● Use this appliance only for its intended purpose as described in this User guide. Connect to a properly rated, protected and sized power supply circuit to avoid electrical overload. Connect to adequate plumbing and drain facilities as described in the Installation Instructions. When disconnecting the appliance pull by the plug rather than the cord or junction of cord to avoid damage to the cord or junction of the cord and plug.
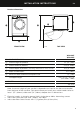
INSTALLATION INSTRUCTIONS EN Product dimensions C E D A B FRONT VIEW Wall TOP VIEW WH2424F WH2424P PRODUCT DIMENSIONS inches (mm) A Overall height of product 33 1/2” (850) B Overall width of product 23 5/8” (600) C Overall depth of product (including dial and door when closed) D Depth of door open E Minimum door clearance to adjacent wall Standpipe height 25 5/8” (645) 42” (1065) 13” (330) min. 31 1/2” – 47 1/4” (min. 800 – 1200) CAPACITY 2.
INSTALLATION INSTRUCTIONS Accessories Please check you received the following accessories with your Fisher & Paykel washer. You will find them inside the drum or attached to the packaging. ●● ●● ●● ●● ●● 2 x Inlet hoses 1 x Drain hose guide 1 x Installation instructions and User guide 1 x Wrench 1 x Installation leaflet (attached to the top of the washer) Unpacking WARNING! Recycle or destroy the carton and plastic bags after the washer is unpacked. Make materials inaccessible to children.
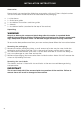
INSTALLATION INSTRUCTIONS EN To remove the bolts: 1 Use a wrench or socket to unscrew and remove all four transit bolts at the back of the washer (A). 2 Pull the black rubber grommets to remove the bolt, grommet and black plastic spacers from the machine. Keep the transit bolts in case they are required for future transit of the machine. Never transport the machine without the transit bolts properly fixed in place.
INSTALLATION INSTRUCTIONS Installing the washer 1 Run some water from the hot and cold faucets to flush the water lines and remove particles that might clog the water valve screens. 2 Remove the inlet hoses from the plastic bag. Remove black rubber washers from bag and insert into hose fitting before connecting to unit. 90° elbow end – Carefully connect the inlet hose marked 3 HOT to the outside “H” outlet of the water valve. Tighten by hand; then tighten another 2/3 turn with pliers.
INSTALLATION INSTRUCTIONS EN 7 Attach U-shaped hose guide to the end of the drain hose. Place the hose in a standpipe. Note: if the drain hose is placed in a standpipe without forming a U shape, a siphoning action could occur. There must be an air gap around the drain hose. A snug hose fit can also cause a siphoning action. Installing the drain hose Note: do not place drain hose deeper than 7” (177.8mm) into the drain. The suggested depth is 4 – 7” (101.6 – 177.8mm). Deeper than 7” (177.
INSTALLATION INSTRUCTIONS If you have an uncontrolled water heating source (eg a wet back or solar heating system) you should fit a tempering valve. This will ensure the hot water temperature remains within safe limits. Contact your registered plumber to select and install the tempering valve. IMPORTANT! ●● ●● This appliance must be installed in accordance with the installation instructions before use.
INSTALLATION INSTRUCTIONS EN Draining the hose guide must be fitted to the drain hose. The height of the standpipe or tub should be between 31 1/2” – 47 1/4” (800 – 1200mm). 2 Secure the hose guide so it cannot become dislodged from the standpipe or tub. IMPORTANT! ●● ●● If the drain hose is placed on the ground or if the standpipe or tub is less than 31 1/2” (800mm) high, the washing machine will continuously drain while being filled (siphon).
INSTALLATION INSTRUCTIONS Electrical connection ! WARNING! Electric Shock Hazard ●● Plug into a grounded 3-prong outlet ●● DO NOT remove ground prong. ●● DO NOT use an adapter. ●● DO NOT use an extension cord. ●● Failure to follow these instructions can result in death, fire or electrical shock. Circuit – Individual, properly polarized and grounded 15 or 20 amp circuit breaker or time-delay fuse. Power supply – 2 wire plus ground, 120 Volt, single phase, 60 Hz, alternating current.
INSTALLATION INSTRUCTIONS EN IMPORTANT! ●● ●● ●● ●● If you are using an extension cord or a portable electrical outlet device (eg multisocket outlet box), ensure that it is positioned so that it does not come into contact with water or moisture. FAILURE TO DO SO MAY RESULT IN DEATH OR ELECTRICAL SHOCK. Do not touch or operate the machine with wet hands or with bare-feet. A damaged power cord must be replaced by a Fisher & Paykel trained and supported service technician, in order to avoid a hazard.
INSTALLATION INSTRUCTIONS Completing the installation Installation test cycle IMPORTANT! Do this before you wash any items in your washer. This is to check that your washer is installed correctly and that it is functioning correctly prior to use. 1 Turn your washer on by pressing the ‘POWER’ button. 2 Select the ‘Quick’ cycle. Ensure the drum is empty and the door closed. button. The machine will start to fill.
BEFORE YOU DO YOUR FIRST WASH EN Before you start, it is a good idea to go through the following checklist: 1 Have the packaging and transit bolts been removed? 2 Is the drain hose threaded through the ‘U bend’ (with no more than 3/4” (20mm) extended) and hooked into your standpipe or tub, or attached to a spigot? 3 Is the hot hose connected to the hot valve (color-coded orange, if present)? Is the 4 5 6 7 cold hose connected to the cold valve (color-coded white)? Have the faucets been turned on? Is th
GETTING STARTED WARNING! PUSH To reduce the risk of fire, electric shock, or injury to persons, read the IMPORTANT SAFETY INSTRUCTIONS before operating this appliance. WH2424F model ●● ●● ●● PUSH ●● Sort your washing carefully. Separate white/light colors from dark colors. Wash new, highly colored and dark colored items separately to prevent dye transfer. Refer to the ‘Sorting and loading’ section. Load your clothes individually into the wash drum. Close the door.
GETTING STARTED EN 1 Press ‘POWER’ to activate your washer. 2 Select your wash cycle by turning the SmartTouch™ Control Dial. 3 Choose your wash options, if you wish to select options different from the default options for the cycle. to start the cycle. 4 Touch ●● ●● ●● ●● If you make an invalid selection the washer will beep to alert you. When the cycle finishes, your washer will perform end of cycle beeps and then turn off automatically.
GETTING STARTED WARNING! PUSH To reduce the risk of fire, electric shock, or injury to persons, read the IMPORTANT SAFETY INSTRUCTIONS before operating this appliance. WH2424P model ●● ●● ●● PUSH ●● Sort your washing carefully. Separate white/light colors from dark colors. Wash new, highly colored and dark colored items separately to prevent dye transfer. Refer to the ‘Sorting and loading’ section. Load your clothes individually into the wash drum. Close the door.
GETTING STARTED EN 1 Press ‘POWER’ to activate your washer. 2 Select your wash cycle by turning the SmartTouch™ Control Dial. 3 Choose your wash options, if you wish to select options different from the default options for the cycle. to start the cycle. 4 Touch ●● ●● ●● ●● If you make an invalid selection the washer will beep to alert you. When the cycle finishes, your washer will perform end of cycle beeps and then turn off automatically.
WASHER CONTROLS SmartTouch™ Control Dial The SmartTouch™ Control Dial provides easy and efficient wash cycle selection. As you rotate the dial, the icon of the wash cycle selected will be illuminated, along with the default settings for that cycle on the right side of the control panel. SmartTouch™ buttons The smooth, easy clean buttons enable easy selection of options with lights clearly showing the selections you are making.
SAFETY FEATURES EN Door lock The door of your washer will lock once you touch until the machine beeps at the end of the cycle, ensuring safety for you and your family while your machine is operating. ●● ●● To unlock the door during the cycle: You can open the door to add or remove items during the wash simply by touching the button.
SORTING AND LOADING When preparing your wash load there are some important things to consider: Sorting Sort items according to color, fabric type, and soil type. Wash fine, delicate fabrics separately from thick, heavy fabrics. Always separate colored items from whites, especially when they are new. Color run could be an issue if you wash items at higher temperatures. Some soils, like mud and blood are best washed in cold water.
SORTING AND LOADING EN Before you load ●● ●● ●● ●● Check pockets for items that could damage your clothes or get caught in the washer. Close zippers, hooks and eyes, and other fastenings (ie fasten the opening of comforter), and remove loose bra wires. All these can damage both your washer and your clothes. Place delicate items, such as lingerie, in a mesh laundry bag before placing in the machine.
DETERGENT AND FABRIC SOFTENER Detergent type Your washer requires low sudsing detergent to prevent oversudsing problems. Low sudsing detergent comes in powder, liquid or pod form and is labelled ‘High Efficiency’ or ‘HE’. Using top loading detergent in your front loader washer may lead to excessive suds formation, which will lengthen the cycle time as the machine waits for the suds to dissolve. IMPORTANT! Do not use chlorine based bleaches in the washer as damage to the machine and clothing may result.
DETERGENT AND FABRIC SOFTENER EN Pods Detergent pods are a ‘no mess’ alternative to powdered or liquid detergent. Pod type detergent or wash boosters must be placed at the back of the drum prior to loading your clothes. This will ensure they are activated quickly in the wash. Do not place pods in the detergent dispenser drawer or on top of your clothes. Pre wash WH2424F model Liquid detergent If you wish to use the ‘Pre Wash’ option, liquid detergent is added to the pre wash compartment marked (A).
DETERGENT AND FABRIC SOFTENER WH2424P model If you wish to use the ‘Pre Wash’ option, liquid or powdered detergent only must be placed in the pre wash detergent compartment on the right side of the drawer, marked with a . When you select ‘Pre Wash’, the pre wash compartment is flushed at the start of the cycle. For more information refer to ‘Wash cycle options’.
DETERGENT AND FABRIC SOFTENER EN Fabric softener Add fabric softener to the middle compartment of the dispenser marked with a . The washer will automatically flush the fabric softener during the rinse part of the cycle. If you wish to use fabric softener we recommend to: 1 Use it sparingly. Measure it carefully and do not use more than 0.85 ounces (25ml or 1/2 cap), some thicker varieties may need diluting. 2 Clean your dispenser regularly. 3 Clean your machine regularly using the ‘Drum Clean’ cycle.
WASH CYCLES WH2424F model Your washer has a number of wash cycles to suit your laundering needs. Selecting the most appropriate cycle for each particular wash load will help ensure you get the best wash result. CYCLE DESIGNED FOR DESCRIPTION MAX. LOAD SIZE DEFAULT WASH TEMP. MAX. WASH TEMP. DEFAULT SPIN SPEED (rpm) MAX. SPIN SPEED (rpm) Cottons Normally soiled everyday cotton loads, eg whites. A comprehensive cycle specifically designed for cottons. 17.
WASH CYCLES EN WH2424P model Your washer has a number of wash cycles to suit your laundering needs. Selecting the most appropriate cycle for each particular wash load will help ensure you get the best wash result. CYCLE DESIGNED FOR DESCRIPTION MAX. LOAD SIZE DEFAULT WASH TEMP. MAX. WASH TEMP. DEFAULT SPIN SPEED (rpm) MAX. SPIN SPEED (rpm) Cottons Normally soiled everyday cotton loads, eg whites. A comprehensive cycle specifically designed for cottons. 17.
WASH CYCLE OPTIONS All wash cycles default to the recommended options for that cycle based on the average expected load to be washed. You can vary the options (eg ‘Wash Temp’, ‘Spin Speed’) to create your desired cycle. Note: some options are not available on some cycles, for clothes care reasons, or because the option is not appropriate for the cycle.
WASH CYCLE OPTIONS EN Soil Level (WH2424P model only) The ‘Soil Level’ option lets you adjust the wash to suit the amount of soil in your load. For example, select ‘Heavy’ for dirty clothes; for items that are only lightly soiled, select ‘Light’. This adjusts the wash time accordingly to give the load the right amount of agitation to remove the soil. Wash Boost Pre Wash For extra dirty loads you can perform a ‘Pre Wash’.
WASH CYCLE OPTIONS Options Soak (WH2424F model only) A soak option is available on selected wash cycles. When this option is chosen the machine will add a one hour soak sequence, which combines periods of tumbling with soaking to help lift stubborn stains. If ‘Soak’ and ‘Time Saver’ are selected in the same cycle, the soak duration will be reduced to 30 minutes. ‘Soak’ is not available on the ‘Wool’, ‘Drum Clean’, ‘Quick’, ‘Rinse’ or ‘Spin’ Cycles.
WASH CYCLE OPTIONS EN Keylock This option enables you to deactivate the buttons on the display panel, except for the ‘Power’ and ‘Keylock’ buttons. This prevents accidental button presses. ●● To turn Keylock mode ON or OFF when the washer is powered on: Touch and hold the button for 2 seconds. Note: when activated, the light above the displayed on the display panel. ●● ●● button is illuminated.
CUSTOMIZING WASH CYCLES After using your washer a few times you may discover there are some wash options you prefer for some cycles. You can program your washer to remember the wash options you prefer for each wash cycle. For instance, you may want to set the ‘Perm Press’ cycle to cold wash temperature or set the ‘Everyday’ cycle so it gives you Rinse+ every cycle. To customize a cycle: 1 Press ‘POWER’ to turn the machine on. 2 Turn the dial to select the cycle you wish to customize.
CARING FOR YOUR WASHER EN When you have finished using your washer ●● ●● ●● Unplug the machine from the power socket. Wipe around the door and in the rubber gasket to remove any remaining water and foreign matter. Turn off the faucets to prevent the chance of flooding should a hose burst. Cleaning your washer Before you start cleaning your washer, ensure that it is disconnected from the power (ie unplug the machine from the power socket).
CARING FOR YOUR WASHER ●● ●● ●● ●● Cleaning the drum and the door Use a soft damp cloth to wipe the door, cleaning any water marks or residue off it. Wipe the rubber seal around the door. Remove any items or lint accumulating in the bottom of the seal catchment and wipe out any accumulated water. If this is not cleaned out, unpleasant odors will develop. If the drum has any residual dirt or lint stuck to it, remove this and wipe the drum clean.
CARING FOR YOUR WASHER EN Cleaning the hose(s) Each hose has a filter in it, preventing any solid contaminants in the water entering your washing machine. Occasionally you should disconnect the water inlet hose(s) where they connect to the faucet(s). Check these for any build up of dirt and wash this out. Diaper sanitizers/bleach Diaper sanitizers and bleach are very corrosive to metal surfaces. DO NOT tip the contents of a diaper bucket into your machine.
BEFORE YOU CALL FOR SERVICE User warnings Your washer is capable of diagnosing a number of its own problems. In most cases, your washer will sound a continuous series of beeps and display a code when it has a problem that you can correct yourself. All control panel lights will turn off and the code will be displayed to inform you what the problem is. To stop the beeps, press any button on the control panel. Do not try to continue washing once you stop the noise.
BEFORE YOU CALL FOR SERVICE PROBLEM Too many suds DISPLAYED AS EN WHAT TO DO Machine will stop and flash while waiting for suds to dissipate. The machine will not beep during this time. When the suds have dissipated, the machine will automatically restart. Check you are using a suitable detergent. Check you are not overdosing the detergent. Check the standpipe height for the drain does not exceed 47 1/5” (1200mm).
FAULT CODES When a continuous series of beeps is sounded, all the lights turn off on the control panel and a number appears on the display, a fault has occurred. The washer will automatically enter this mode if a fault occurs. The fault code will be displayed as followed by a number on the digital display. To stop the sound, touch any button and perform the following steps: 1 2 3 4 5 6 7 Turn your machine off at the power point. Wait one minute and turn it back on.
TROUBLESHOOTING EN The following is a list of problems you may encounter when using this appliance and some suggestions that may help to correct the problem. If you still have problems, please contact your Fisher & Paykel trained and supported service technician. Solving operating problems PROBLEM POSSIBLE CAUSES WHAT TO DO Washer not turning on Power not switched on at the wall. Switch the power on at the wall. Then press ‘POWER’. Household power supply not working.
TROUBLESHOOTING Solving operating problems PROBLEM POSSIBLE CAUSES WHAT TO DO Washer drains while filling Drain hose too low. Ensure the height of the drain hose is at least 31 1/2” (800mm) from the floor level (refer to page 13). Drain hose sitting in water. Clear the drain. Drain hose blocked. Clear the drain hose. Pump filter blocked. Clear the pump filter (refer to page 38). Drain hose higher than 47 1/5” (1200mm) above floor level. Lower the level of the drain hose (refer to page 13).
TROUBLESHOOTING EN Solving operating problems PROBLEM POSSIBLE CAUSES WHAT TO DO Small puddle of water from under the machine Inlet hose or drain hose leaking. Check inlet hose(s) and the drain hose are correctly attached and not damaged. Lots of suds. Suds may have leaked and then dissolved. Detergent dispenser blocked. Clean detergent dispenser drawer (refer to page 37). Detergent dispenser drawer not fully closed.
TROUBLESHOOTING Solving operating problems PROBLEM POSSIBLE CAUSES WHAT TO DO Washing very wet at the end of the cycle Cycle selected not appropriate. Particularly short or delicate cycles have shorter spins which can result in wetter washing at the end of the cycle. Incorrect spin speed for load selected. Select a faster spin speed. An out of balance load has occurred. The washer compensates for the out of balance by using a lower spin speed, to reduce noise and potential damage to itself.
TROUBLESHOOTING EN Solving wash problems PROBLEM POSSIBLE CAUSES WHAT TO DO Creasing Washer overloaded. Do not overload washer. Incorrect cycle for load type. Use the ‘Perm Press’ or ‘Delicate’ cycle for creasable items. Spin speed too fast. Select a slower spin speed. Wet clothes left in washer or laundry basket. Laundry left sitting wet is more likely to crease. If not removing clothes from washer immediately at end of cycle, select the ‘Wrinkle Free’ option.
TROUBLESHOOTING Solving wash problems PROBLEM POSSIBLE CAUSES WHAT TO DO Dye transfer Colored items not washed separately from white/light colored items. Remember to separate whites and colors. New or non-colorfast items not washed separately. Wash non-colorfast items separately and select ‘Cold’ wash temperature. Wet items have been left sitting for too long.
LIMITED WARRANTY EN When you purchase any new Fisher & Paykel FabricSmart™ or WashSmart™ clothes washer product for personal or consumer use you automatically receive a two year limited warranty covering parts and labor for servicing within the 48 mainland United States, Hawaii, Alaska, Washington DC and Canada. You also receive an additional eight year parts only limited warranty on the direct drive motor part only.
LIMITED WARRANTY These limited warranties do not cover: A Service calls that are not related to any defect in the product. The cost of a service call will be charged if the problem is not found to be a defect of the product. For example: 1 Correcting faulty installation of the product. 2 Instructing you how to use the product. 3 Replacing house fuses, resetting circuit breakers, correcting house wiring or plumbing, or replacing light bulbs. 4 Correcting fault(s) caused by the user.
LIMITED WARRANTY EN How to get service Please read your User guide. If you then have any questions about operating the product, need the name of your local Fisher & Paykel Authorized Service Agent, or believe the product is defective and wish service under this limited warranty, please contact your dealer or call us at: USA and Canada TOLL FREE 1.888.9.FNP.USA (1.888.936.7872) or use the link at: www.fisherpaykel.
LIMITED WARRANTY Complete and keep for safe reference: Model Serial No.
TABLE DES MATIÈRES FR Introduction 57 Consignes de sécurité et mises en garde 58 Instructions d’installation 61 Avant d’effectuer votre premier lavage 71 Démarrage 72 Commandes de la laveuse 76 Fonctions de sécurité 77 Triage et chargement 78 Détergent et assouplisseur 80 Cycles de lavage 84 Options de cycle de lavage 86 Personnalisation des cycles de lavage 90 Entretien de votre laveuse 91 Avant d’effectuer un appel de service 94 Codes de défaillance 96 Dépannage 97 Garant
INTRODUCTION FR Bienvenue Nous vous remercions d’avoir acheté une laveuse Fisher & Paykel. Nous sommes fiers de cette laveuse et avons confiance qu’elle vous sera très utile pendant de nombreuses années. Chez Fisher & Paykel, notre but est de vous offrir des produits novateurs qui sont simples d’utilisation, ergonomiques et écologiques.
CONSIGNES DE SÉCURITÉ ET MISES EN GARDE Lisez toutes les informations de sécurité avant l’utilisation De nombreuses laveuses sont situées à proximité d’une sécheuse au gaz ou d’un chauffe-eau dans la maison. ! MISE EN GARDE! Risque d’incendie ●● Pour votre sécurité, il importe de suivre les directives comprises dans le présent manuel afin de réduire le risque d’incendie ou d’explosion, ou prévenir tout dommage matériel, toute blessure ou toute perte de vie.
CONSIGNES DE SÉCURITÉ ET MISES EN GARDE ! FR MISE EN GARDE! Risque d’incendie, de choc électrique et de blessures ●● Suivez les consignes de sécurité indiquées dans ce Guide d’utilisation. ●● Le fait de ne pas respecter ces consignes peut causer la mort, un choc électrique, un incendie ou des blessures.
CONSIGNES DE SÉCURITÉ ET MISES EN GARDE ●● ●● ●● ●● ●● ●● ●● ●● ●● ●● ●● ●● ●● ●● ●● Utilisez uniquement cet appareil aux fins pour lesquelles il a été conçu, comme le stipule le présent Guide d’utilisation. Branchez l’appareil à un circuit d’alimentation électrique correctement homologué, protégé et calibré pour éviter toute surcharge électrique. Effectuez le raccordement à des installations de plomberie et d’évacuation adéquates, de la manière décrite dans les instructions d’installation.
INSTRUCTIONS INSTALLATIOND’INSTALLATION INSTRUCTIONS FR Dimensions du produit C E D A B VUE DE FACE Mur VUE DE DESSUS WH2424F WH2424P DIMENSIONS DU PRODUIT pouces (mm) A Hauteur hors tout du produit 33 1/2 po (850) B Largeur hors tout du produit 23 5/8 po (600) C Profondeur hors tout du produit (incluant le bouton et 25 5/8 po (645) la porte lorsque fermée) D Profondeur avec la porte ouverte E Dégagement minimal de la porte par rapport au mur adjacent Hauteur de la conduite verticale 42
INSTRUCTIONS D’INSTALLATION Accessoires Veuillez vérifier que les accessoires suivants sont fournis avec votre laveuse Fisher & Paykel. Ils se trouvent à l’intérieur du tambour ou sont fixés à l’emballage.
INSTRUCTIONS D’INSTALLATION FR Pour retirer les boulons : 1 Utilisez une clé ou une douille pour dévisser et retirer chacun des quatre boulons de transport à l’arrière de la laveuse (A). 2 Tirez sur les œillets en caoutchouc noir pour retirer le boulon, l’œillet et les espaceurs en plastique noir de l’appareil. Conservez les boulons de transport pour tout déplacement ultérieur de l’appareil. Ne transportez jamais l’appareil sans les boulons de transport correctement fixés.
INSTRUCTIONS D’INSTALLATION Installation de la laveuse 1 Faites couler un peu d’eau des robinets d’eau chaude et d’eau froide pour rincer les conduites d’eau et déloger les particules qui pourraient obstruer les grillages d’orifice d’entrée d’eau. 2 Retirez les tuyaux d’alimentation du sac en plastique. Retirez les rondelles en caoutchouc noir du sac et insérez-les dans le raccord de tuyau avant d’effectuer le raccordement à l’appareil.
INSTRUCTIONS D’INSTALLATION FR 7 Fixez le guide-tuyau en forme de U à l’extrémité du tuyau d’évacuation. Placez le tuyau dans une conduite verticale. Remarque : si le tuyau d’évacuation est placé dans une conduite verticale sans former un U, un siphonnement pourrait se produire. Il doit y avoir un espacement autour du tuyau d’évacuation. Un ajustement trop serré du tuyau peut également causer un siphonnement.
INSTRUCTIONS TITLE TOD’INSTALLATION GO HERE Si vous utilisez une source de chauffage d’eau non contrôlée (par ex. : système à fond humide ou chauffage solaire), vous devez installer un dispositif de régulation. Cela permet de vous assurer que la température de l’eau chaude demeure dans les limites adéquates. Faites appel à un plombier autorisé pour sélectionner et installer le dispositif de régulation.
INSTRUCTIONS TITLE TOD’INSTALLATION GO HERE FR Évacuation Faites passer le tuyau dans le guide IMPORTANT! ●● ●● Si le tuyau d’évacuation est placé au sol ou si la hauteur de la conduite verticale ou la cuve à lessive est inférieure à 31 1/2 po (800 mm), la laveuse évacuera continuellement l’eau pendant le remplissage (siphonnement).
INSTRUCTIONS D’INSTALLATION Raccordement électrique ! MISE EN GARDE! Risque de choc électrique ●● Branchez l’appareil dans une prise à 3 broches avec mise à la terre. ●● NE retirez PAS la broche de mise à la terre. ●● N’utilisez PAS d’adaptateur. ●● N’utilisez PAS de rallonge. ●● Le fait de ne pas respecter ces instructions peut causer la mort, un incendie ou un choc électrique. Circuit – Disjoncteur ou fusible à fusion lente individuel de 15 ou 20 ampères, correctement polarisé et mis à la terre.
INSTRUCTIONS D’INSTALLATION FR IMPORTANT! ●● ●● ●● ●● Si vous utilisez une rallonge électrique ou un appareil avec prise électrique portatif (par ex. : boîtier à prises multiples), assurez-vous de le placer de façon à ce qu’il n’entre pas en contact avec l’eau ou l’humidité. LE FAIT DE NE PAS RESPECTER CES CONSIGNES PEUT ENTRAÎNER UN CHOC ÉLECTRIQUE OU LA MORT. Ne touchez et ne faites pas fonctionner l’appareil avec les mains humides ou les pieds nus.
INSTRUCTIONS D’INSTALLATION Pour terminer l’installation Cycle de test d’installation IMPORTANT! Effectuez ce cycle avant de laver des articles dans votre laveuse. Cela permet de vérifier que la laveuse est installée correctement et qu’elle fonctionne adéquatement avant l’utilisation. 1 Mettez votre laveuse en marche en appuyant sur la touche ‘POWER’. 2 Sélectionnez le cycle ‘Quick’ (rapide). Assurez-vous que le tambour est vide et la porte est fermée. 3 Appuyez sur la touche .
AVANT D’EFFECTUER VOTRE PREMIER LAVAGE FR Avant de démarrer, il est préférable de passer en revue la liste de vérification suivante : 1 L’emballage et les boulons de transport ont-ils été retirés? 2 Le tuyau d’évacuation est-il inséré dans le guide en forme de U (avec une longueur 3 4 5 6 7 maximale de 3/4 po (20 mm) qui en dépasse) et accroché dans votre conduite verticale ou cuve à lessive, ou fixé à un raccord? Le tuyau d’eau chaude est-il raccordé à l’orifice d’eau chaude (de couleur orange, si prés
DÉMARRAGE MISE EN GARDE! PUSH Pour réduire les risques d’incendie, de choc électrique ou de blessures, lisez les CONSIGNES DE SÉCURITÉ IMPORTANTES avant d’utiliser cet appareil. Modèle WH2424F ●● ●● ●● PUSH ●● Triez soigneusement votre brassée. Séparez les articles blancs/pâles des articles foncés. Lavez les articles neufs, très colorés et foncés séparément pour éviter les transferts de couleurs. Reportez-vous à la section ‘Triage et chargement’.
DÉMARRAGE FR 1 Appuyez sur ‘POWER’ pour activer votre laveuse. 2 Sélectionnez votre cycle de lavage en tournant le bouton de commande SmartTouch™. 3 Choisissez vos options de lavage, si vous souhaitez sélectionner des options différentes des options par défaut pour le cycle. pour démarrer le cycle. 4 Appuyez sur ●● ●● ●● ●● Lorsque vous effectuez une sélection invalide, la laveuse émet un bip sonore pour vous avertir.
DÉMARRAGE MISE EN GARDE! PUSH Pour réduire les risques d’incendie, de choc électrique ou de blessures, lisez les CONSIGNES DE SÉCURITÉ IMPORTANTES avant d’utiliser cet appareil. Modèle WH2424P ●● ●● ●● PUSH ●● Triez soigneusement votre brassée. Séparez les articles blancs/pâles des articles foncés. Lavez les articles neufs, très colorés et foncés séparément pour éviter les transferts de couleurs. Reportez-vous à la section ‘Triage et chargement’.
DÉMARRAGE FR 1 Appuyez sur ‘POWER’ pour activer votre laveuse. 2 Sélectionnez votre cycle de lavage en tournant le bouton de commande SmartTouch™. 3 Choisissez vos options de lavage, si vous souhaitez sélectionner des options différentes des options par défaut pour le cycle. pour démarrer le cycle. 4 Appuyez sur ●● ●● ●● ●● Lorsque vous effectuez une sélection invalide, la laveuse émet un bip sonore pour vous avertir.
COMMANDES DE LA LAVEUSE Bouton de commande SmartTouch™ Le bouton de commande SmartTouch™ vous permet de sélectionner facilement et rapidement un cycle de lavage. Lorsque vous tournez le bouton, l’icône du cycle de lavage sélectionné s’allume, ainsi que les réglages par défaut de ce cycle dans la partie droite du panneau de commande.
FONCTIONS DE SÉCURITÉ FR Verrouillage de la porte , la porte de votre laveuse se verrouille jusqu’à ce qu’elle Lorsque vous appuyez sur émette des bips sonores à la fin du cycle, afin d’assurer votre sécurité et celle de votre famille pendant le fonctionnement. ●● ●● Pour déverrouiller la porte pendant le cycle : Vous pouvez ouvrir la porte pour ajouter ou retirer des articles pendant le lavage en appuyant simplement sur la touche .
TRIAGE ET CHARGEMENT Lorsque vous préparez votre brassée, tenez compte de certains points importants : Triage Triez les articles en fonction de la couleur, du type de tissus et du type de saleté. Lavez les tissus fins et délicats séparément des tissus épais et résistants. Séparez toujours les articles de couleur des articles blancs, plus particulièrement lorsqu’ils sont neufs. Le transfert des couleurs peut causer des problèmes si vous lavez des articles à des températures élevées.
TRIAGE ET CHARGEMENT FR Avant le chargement ●● ●● ●● ●● Vérifiez les poches pour vous assurer qu’il n’y a aucun article risquant d’endommager vos vêtements ou de rester coincé dans la laveuse. Fermez les fermetures à glissière, crochets, œillets et autres attaches (par ex. : fermez l’ouverture des couettes) et retirez les armatures de soutien-gorge amovibles. Tous ces objets peuvent endommager votre laveuse et vos vêtements.
DÉTERGENT ET ASSOUPLISSEUR Type de détergent Votre laveuse nécessite l’utilisation d’un détergent faiblement moussant pour éviter les problèmes de mousse excessive. Les détergents faiblement moussants sont disponibles en poudre, liquide ou capsule et portent la mention ‘Haute efficacité’ ou ‘HE’. L’utilisation d’un détergent pour laveuse à chargement par le dessus peut entraîner une formation de mousse excessive, qui augmente la durée du cycle en raison de l’attente requise pour la dissolution de la mousse.
DÉTERGENT ET ASSOUPLISSEUR FR Capsules Les capsules de détergent représentent une alternative sans gâchis aux détergents liquides ou en poudre. Les détergents en capsules ou les renforçateurs de lavage doivent être placés dans la partie arrière du tambour avant le chargement de vos vêtements. Cela permet d’assurer qu’ils s’activent rapidement pendant le lavage. Ne placez pas les capsules dans le tiroir du distributeur de détergent ou au-dessus de vos vêtements.
DÉTERGENT ET ASSOUPLISSEUR Modèle WH2424P Si vous souhaitez utiliser l’option ‘Pre Wash’, placez uniquement un détergent liquide ou en poudre dans le compartiment de détergent de prélavage sur le côté droit du tiroir, marqué du symbole . Lorsque vous sélectionnez ‘Pre Wash’, l’eau est déversée dans le compartiment de prélavage au début du cycle. Pour plus d’informations, reportezvous à la section ‘Options de cycle de lavage’.
DÉTERGENT ET ASSOUPLISSEUR FR Assouplisseur Ajoutez l’assouplisseur dans le compartiment central du distributeur marqué du symbole . La laveuse déversera automatiquement l’assouplisseur à l’étape de rinçage du cycle. 1 2 3 4 Si vous souhaitez utiliser un assouplisseur, nous vous recommandons de respecter ces consignes : Utilisez l’assouplisseur avec modération.
CYCLES DE LAVAGE Modèle WH2424F Votre laveuse propose divers cycles de lavage pour répondre à tous vos besoins. Le fait de sélectionner le cycle le mieux adapté à chacune de vos brassées vous aidera à obtenir un lavage de la meilleure qualité. TAILLE DE BRASSÉE MAX. TEMP. DE LAVAGE PAR DÉFAUT TEMP. DE LAVAGE MAX. VITESSE D’ESSORAGE PAR DÉFAUT (tr/min) VITESSE D’ESSORAGE MAX.
CYCLES DE LAVAGE FR Modèle WH2424P Votre laveuse propose divers cycles de lavage pour répondre à tous vos besoins. Le fait de sélectionner le cycle le mieux adapté à chacune de vos brassées vous aidera à obtenir un lavage de la meilleure qualité. TAILLE DE BRASSÉE MAX. TEMP. DE LAVAGE PAR DÉFAUT TEMP. DE LAVAGE MAX. VITESSE D’ESSORAGE PAR DÉFAUT (tr/min) VITESSE D’ESSORAGE MAX.
OPTIONS DE CYCLE DE LAVAGE Tous les cycles de lavage sont programmés par défaut avec les options recommandées pour le cycle en fonction de la brassée moyenne prévue pour le lavage. Vous pouvez sélectionner les options (par ex. : ‘Wash Temp’, ‘Spin Speed’) pour créer votre cycle souhaité. Remarque : certaines options ne sont pas disponibles pour certains cycles parce qu’elles risquent d’endommager les vêtements ou ne sont pas appropriées pour le cycle en question.
OPTIONS DE CYCLE DE LAVAGE FR Niveau de saleté (Modèle WH2424P uniquement) L’option ‘Soil Level’ (niveau de saleté) vous permet d’ajuster le lavage en fonction de la quantité de saleté dans votre brassée. Par exemple, sélectionnez ‘Heavy’ pour les vêtements sales ou ‘Light’ pour les articles légèrement sales. Cela permet d’ajuster le temps de lavage en conséquence afin que les mouvements de l’agitateur parviennent à éliminer les saletés.
OPTIONS DE CYCLE DE LAVAGE Options Trempage (Modèle WH2424F uniquement) Une option de trempage est disponible pour certains cycles de lavage. Lorsque cette option est sélectionnée, l’appareil ajoute une séquence de trempage d’une heure, qui combine des périodes de culbutage avec le trempage pour aider à déloger les taches tenaces. Si les options ‘Soak’ (trempage) et ‘Time Saver’ (économie de temps) sont sélectionnées dans le même cycle, la durée de trempage est réduite à 30 minutes.
OPTIONS DE CYCLE DE LAVAGE FR Verrou des touches Cette option vous permet de désactiver les touches du panneau d’affichage, à l’exception des touches ‘Power’ et ‘Keylock’. Elle permet de prévenir l’utilisation accidentelle des touches. ●● Pour activer ou désactiver le mode Keylock (verrou des touches) pendant que la laveuse est en marche : Appuyez sur la touche et maintenez votre doigt sur celle-ci pendant 2 secondes.
PERSONNALISATION DES CYCLES DE LAVAGE Après quelques utilisations de votre laveuse, vous pourriez découvrir que vous préférez certaines options de lavage pour certains cycles. Vous pouvez programmer votre laveuse de façon à mémoriser vos options de lavage préférées pour chaque cycle de lavage. Par exemple, vous pouvez régler le cycle ‘Perm Press’ à une température de lavage froide ou régler le cycle ‘Everyday’ afin que l’option ‘Rinse+’ soit sélectionnée pour chaque cycle.
ENTRETIEN DE VOTRE LAVEUSE FR Lorsque vous terminez d’utiliser votre laveuse ●● ●● ●● Débranchez la laveuse de la prise de courant. Essuyez le contour de la porte et l’intérieur du joint en caoutchouc pour enlever toute eau restante et tout corps étranger. Fermez les robinets pour réduire les risques d’inondation en cas de bris d’un tuyau. Nettoyage de votre laveuse Avant de commencer à nettoyer votre laveuse, assurez-vous qu’elle soit déconnectée de l’alimentation (par ex.
ENTRETIEN DE VOTRE LAVEUSE ●● ●● ●● ●● Nettoyage du tambour et de la porte Utilisez un chiffon doux et humide pour essuyer la porte et faire disparaître les traces d’eau ou résidus sur celle-ci. Essuyez le joint d’étanchéité autour de la porte. Retirez tout article ou toute accumulation de charpie dans le bas du bassin de joint d’étanchéité et essuyez toute eau accumulée. Sinon, des odeurs désagréables s’en dégageront.
ENTRETIEN DE VOTRE LAVEUSE FR Nettoyage de(s) tuyau(x) Chaque tuyau contient un filtre qui empêche les contaminants solides de pénétrer dans votre laveuse. Vous devez occasionnellement déconnecter le(s) tuyau(x) d’alimentation en eau au point de raccordement au(x) robinet(s). Vérifiez s’ils contiennent des accumulations de saletés et rincez-les. Désinfectants pour couches/javellisants Les javellisants et les désinfectants pour couches sont très corrosifs pour les surfaces métalliques.
AVANT D’EFFECTUER UN APPEL DE SERVICE Avertissements à l’intention de l’utilisateur Votre laveuse est en mesure de diagnostiquer un certain nombre de problèmes. Dans la plupart des cas, votre laveuse émet une série de bips sonores et affiche un code lorsqu’elle détecte un problème que vous pouvez résoudre vous-même. Tous les témoins du panneau de commande s’éteindront et le code s’affichera pour vous aider à identifier le problème.
AVANT D’EFFECTUER UN APPEL DE SERVICE PROBLÈME Trop de mousse CODE AFFICHÉ FR SOLUTIONS L’appareil s’arrête et le témoin clignote pendant qu’il doit attendre que la mousse se dissipe. L’appareil n’émet pas de bips sonores pendant ce temps. Une fois la mousse dissipée, l’appareil redémarre automatiquement. Assurez-vous d’utiliser un détergent adéquat. Assurez-vous de ne pas utiliser une trop grande quantité de détergent.
CODES DE DÉFAILLANCE L’appareil vous indique qu’une défaillance est survenue lorsqu’une série de bips sonores est émise, que tous les témoins s’éteignent sur le panneau de commande et qu’un numéro apparaît sur l’afficheur. La laveuse accède automatiquement à ce mode en cas de défaillance. Le code de défaillance est affiché à l’aide de , suivi d’un numéro sur l’afficheur numérique.
DÉPANNAGE FR Voici une liste de problèmes que vous pourriez rencontrer lors de l’utilisation de cet appareil, ainsi que certaines suggestions qui pourraient vous aider à les résoudre. Si vous avez toujours des problèmes, veuillez communiquer avec un technicien de service qualifié et autorisé de Fisher & Paykel. Résoudre les problèmes de fonctionnement PROBLÈME CAUSES POSSIBLES SOLUTIONS La laveuse ne s’allume pas L’alimentation n’est pas activée à la prise murale.
DÉPANNAGE Résoudre les problèmes de fonctionnement PROBLÈME CAUSES POSSIBLES SOLUTIONS La laveuse évacue l’eau pendant le remplissage Le tuyau d’évacuation est trop bas. Assurez-vous que le tuyau d’évacuation soit à une hauteur d’au moins 31 1/2 po (800 mm) à partir du niveau du sol (consultez la page 67). Le tuyau d’évacuation repose dans l’eau. Nettoyez le drain. Le tuyau d’évacuation est obstrué. Nettoyez le tuyau d’évacuation. Le filtre de pompe est obstrué.
DÉPANNAGE FR Résoudre les problèmes de fonctionnement PROBLÈME CAUSES POSSIBLES SOLUTIONS Petites flaques d’eau apparaissant sous la laveuse Fuite du tuyau d’alimentation ou du tuyau d’évacuation. Vérifiez que le(s) tuyau(x) d’alimentation et le tuyau d’évacuation sont correctement raccordés et non endommagés. Grande quantité de mousse. Possible fuite de mousse qui s’est ensuite dissoute. Le distributeur de détergent est obstrué.
DÉPANNAGE Résoudre les problèmes de fonctionnement PROBLÈME CAUSES POSSIBLES SOLUTIONS Articles très humides à la fin du cycle Cycle sélectionné inapproprié. Les cycles particulièrement courts ou délicats comportent des essorages plus courts pouvant se traduire par des articles plus humides à la fin du cycle. Vitesse d’essorage incorrecte sélectionnée pour la brassée. Sélectionnez une vitesse d’essorage plus rapide. La brassée est déséquilibrée.
DÉPANNAGE FR Résoudre les problèmes de lessive PROBLÈME CAUSES POSSIBLES SOLUTIONS Faux plis Surcharge de la laveuse. Ne surchargez pas la laveuse. Cycle incorrect pour le type de brassée. Utilisez le cycle ‘Perm Press’ ou ‘Delicate’ pour les articles froissables. La vitesse d’essorage est trop rapide. Sélectionnez une vitesse d’essorage moins rapide. Vêtements humides laissés dans la laveuse ou le panier à linge.
DÉPANNAGE Résoudre les problèmes de lessive PROBLÈME CAUSES POSSIBLES SOLUTIONS Transfert de teinture Des articles colorés sont lavés avec des articles blancs/de couleur pâle. Souvenez-vous de séparer les vêtements colorés des vêtements pâles. Des articles neufs ou dont les couleurs ne sont pas inaltérables n’ont pas été lavés séparément. Lavez séparément les articles dont les couleurs ne sont pas inaltérables et sélectionnez la température de lavage ‘Cold’.
GARANTIE LIMITÉE FR Lorsque vous achetez une nouvelle laveuse FabricSmart™ ou WashSmart™ de Fisher & Paykel destinée à un usage personnel ou celui d’un consommateur, vous bénéficiez automatiquement d’une garantie limitée de deux ans s’appliquant aux pièces et à la main-d’œuvre pour le service dans les 48 États continentaux des États-Unis, à Hawaï, en Alaska, à Washington DC et au Canada.
GARANTIE LIMITÉE Ces garanties limitées ne couvrent pas : A Les demandes de réparation pour tout problème non lié à une défectuosité du produit. Le coût de la demande de réparation sera facturé s’il se trouve que le problème n’est pas dû à une défectuosité du produit. Par exemple : 1 Correction d’une installation inappropriée du produit. 2 Explication du fonctionnement du produit.
GARANTIE LIMITÉE FR Comment obtenir du service Veuillez lire votre Guide d’utilisation. Si vous avez des questions concernant l’utilisation du produit, souhaitez trouver le nom d’un agent de service autorisé Fisher & Paykel local ou pensez que le produit est défectueux et désirez le faire réparer dans le cadre de cette garantie limitée, veuillez communiquer avec votre détaillant ou nous appeler au numéro suivant : États-Unis et Canada SANS FRAIS 1.888.9.FNP.USA (1.888.936.
GARANTIE LIMITÉE Remplir et conserver pour référence ultérieure : Modèle N° de série Date d’achat Acheteur Détaillant Ville État/Province Code postal Pays 106
www.fisherpaykel.com © Fisher & Paykel Appliances 2017. All rights reserved. The product specifications in this booklet apply to the specific products and models described at the date of issue. Under our policy of continuous product improvement, these specifications may change at any time. You should therefore check with your dealer to ensure this booklet correctly describes the product currently available. © Fisher & Paykel Appliances 2017. Tous droits réservés.