Product features and decoration may vary from the picture above. JEEP and the Jeep grille design are registered trademarks of DaimlerChrysler Corporation and are used under license. ©DaimlerChrysler Corporation Goodyear (and winged foot design) and Wrangler (for tires) are trademarks of The Goodyear Tire & Rubber Company, used with permission. Owner’s Manual with Assembly Instructions Please read this manual and save it with your original sales receipt.
Table of Contents A B C D E F G H I J K L M N O Important Information . . . . . . . . . . . . . . . . . . . . . . . . . . . . . . . . . . . . . . . . . . . . . . . . . . . . . . . . . . . . . . . . . . . . .2 Warnings and Cautions . . . . . . . . . . . . . . . . . . . . . . . . . . . . . . . . . . . . . . . . . . . . . . . . . . . . . . . . . . . . . . . . . . .3 Parts . . . . . . . . . . . . . . . . . . . . . . . . . . . . . . . . . . . . . . . . . . . . . . . . . . . . . . . . . . . . . . . . . . . . . .
B Warnings WARNING • Children can be harmed by small parts, sharp edges and sharp points in the vehicle’s unassembled state, or by electrical items. Care should be taken in unpacking and assembly of the vehicle. Children should not handle parts, including the battery, or help in assembly of the vehicle. • Keep small parts and plastic bags out of children’s reach. Dispose of plastic bags properly. • Adult supervision is required. Children do not have the judgement necessary to avoid many accidents.
C Parts • If you experience a problem with this product, or are missing a part, please call us at 1-800-348-0751, rather than return this product to the store. • Please identify all parts before assembly and save all packaging material until assembly is complete to ensure that no parts are discarded. • Metal parts have been coated with a lubricant to protect them during shipment. Wipe all metal parts with a paper towel to remove any excess lubricant.
Parts 11/2" x 1/4" Machine Screw - 2 Hood Latch – 2 Dashboard Knob – 2 #8 x 11/4" Screw – 10 #10 x 1/2" Screw – 2 #8 x 1" Screw – 11 #10 x 1" Screw – 2 Key Assembly Knob Plate #6 x 11/2" Screw – 4 * For your convenience, an extra .354 cap nut has been included. All Screws Shown Actual Size .
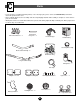
D Parts Diagram 33 29 15 7 15 28 33 36 32 32 10 35 21 31 3 31 10 20 23 37 38 30 37 24 10 19 17 18 22 16 13 27 12 10 14 6 11 10 13 4 8 9 5 25 26 1 34 2 3 6
Parts Diagram No. Part 1 2 3 4 5 6 7 8 9 10 11 12 13 14 15 16 17 18 19 Vehicle Body Steering Column .354 Cap Nut Hood Latch 12 Volt Battery Battery Retainer Light Cover Taillight Lens Taillight Housing #8 x 1" Screw Gas Cap Dash #10 x 1" Screw #10 x 1/2" Screw #8 x 11/4" Screw Knob Plate Dashboard Knob Microphone Key Assembly Quantity No.
E Battery Charging About Thermal Fuses WARNING Your Power Wheels® 12 volt battery is equipped with a built-in thermal fuse. The thermal fuse is a self-resetting safety device which automatically “trips” and shuts down operation of the vehicle if the vehicle is overloaded or the driving conditions too severe. Once a fuse has “tripped”, it will automatically reset itself after approximately 25 seconds and allow the vehicle to resume normal operations.
Battery Charging Important Notes • Your new battery must be charged for at least 18 hours before you use it in your vehicle for the first time. • You do not need to remove the battery from your vehicle to recharge it. • The battery must be upright while charging. • The charger is not a toy. • Do not short circuit the battery. • We recommend that you start charging your battery before beginning assembly of your new vehicle.
F 1 Assembly 3 Dash 1 2 2 Dash Knob Plate Pocket 1 Tab Key Assembly Channel Cover Microphone Cord T-End 2 1 • Position the dash on the vehicle body. Make sure the holes in the dash tabs align with the holes in the vehicle body and that the channel cover is captured by the dash. • Insert two #10 x 1" screws through the holes towards the rear of the dash (closest to the hood area) and into the vehicle body 1 .
Assembly 5 7 Hole Steering Wheel Tab Steering Column Cap Nut Steering Column “UP” Bottom View • Wipe the steering column with a paper towel to remove any excess lubricant. • Turn the vehicle body on its side. • Insert the straight end of the steering column up through the hole in the vehicle body wall and out through the hole in the dash. 6 End of Steering Column • Turn the vehicle body upright. • Position the steering wheel so that the spokes form a “Y” as shown.
Assembly 9 11 Wide Tab Hood Latch Lens Hole Wide Notch Lens Guard Hood Latch • Fit the wide notch in the side of a headlight lens under the wide tab on a lens guard. • Press firmly on the inside of the headlight lens to snap it into the lens guard. • Repeat this procedure to assemble the other headlight lens to the remaining lens guard. 10 Hole • Insert a hood latch into one of the holes in the vehicle body, near the hood area.
Assembly 13 #8 x 1" Screws #8 x 1" Screws Windshield Brackets 15 Hinge Pin Windshield Frame Front Half Windshield Bracket Lip of Bracket Slot • Fit the screw pegs on the windshield brackets into the holes in the top surface of the dash. Press firmly to fit the lip on each windshield bracket into the slot in the top of the dash. • Insert two #8 x 1" screws into each windshield bracket. • Tighten the screws with a Phillips screwdriver. Do not over-tighten.
Assembly 17 Short Seat Belt Strap 19 T-Loop (Pull through slot) Seat Seat Back Tabs Fastener End End T-Loops Tabs 11 Slot 3 PUSH HERE 2 Seat Slot Slot 1 • Turn the seat upside down. • Insert the fastener end of a short seat belt strap through the slot near the outer edge of the seat. Make sure the side of the seat belt with the fastener faces the outer edge of the seat.
Assembly 21 23 Sport Bar Bracket KCTM Light Rack - Back Half Tabs #6 x 11/2" Screws Ring Sport Bar Sport Bar Support Sport Bar KCTM Light Rack Front Half Side Leg • Using safety scissors, remove the sport bar brackets from the plastic connector. Dispose of the plastic connector. • Position the sport bar upright. • Position a sport bar bracket onto one of the sport bar side legs, as shown. • Fit the ring on a sport bar support against the end of the sport bar bracket.
Assembly 25 27 Sport Bar Taillight Housing PUSH HERE Side Fender Taillight Lens #8 x 1" Screws PULL HERE • Fit the sport bar and sport bar support legs into the holes in the vehicle body. • Push down firmly on a sport bar side leg while pulling up on the side fender to fit the sport bar into the vehicle body. • Repeat this procedure on the other side of the vehicle body. 26 • Using safety scissors, remove the taillight lenses and the taillight housings from the plastic connectors.
G Label Decoration Proper label application will help to keep the labels looking their best! When applying labels, keep the following guidelines in mind: • Wash your hands before applying the labels. • Before applying the labels, wipe the surface of the vehicle with a clean, dry cloth to remove any dust or oils. • Place the labels exactly as shown in the illustrations. • For best results, avoid repositioning a label once it has been applied to the vehicle.
H Battery Installation Important Note: Use only a Power Wheels® 12 volt battery. Use of any other battery will damage your vehicle. Make sure that you charge the battery for at least 18 hours using the enclosed Power Wheels® 12 volt charger before operating your vehicle for the first time. Charge the battery for at least 14 hours after each use of the vehicle. Never charge the battery longer than 30 hours. Failure to follow these instructions may damage your battery and will void your warranty.
Battery Care and Disposal Battery Installation 5 Care Hood Hood Latch Hood Latch • Lower the hood. • Lift the hood latches and fit the latch pegs onto the hood to close it. I Battery Care and Disposal Disposal • Your Power Wheels® battery is a sealed lead-acid battery. It must be recycled or disposed of in an environmentally sound manner. • Do not dispose of a lead-acid battery in your regular, household trash.
J Rules for Safe Driving • While driving across a steep slope, the vehicle may tilt and tip over. The wheels could lose traction, causing the vehicle to slip. • While driving up a steep incline, the motor may stop and the vehicle could roll backwards at an unsafe speed. WARNING • Adult supervision is required. Children do not have the judgement necessary to avoid many accidents. Be sure that children operating this vehicle can do so safely and that they are supervised at all times.
K How to Operate Your Vehicle To Back Up Beginner Use - Low Speed Drive As assembled, your vehicle is ready to roll in low speed (21/2 mph, maximum). It has been pre-set so it will only operate in low speed. After your child has mastered the basic skills of driving and understands the rules for safe driving, it’s time to remove the high speed lock-out screw to allow the vehicle to operate in low or high speed. See the instructions on page 22 to remove the high speed lock-out screw.
L How to Operate Your Vehicle Advanced Use - High Speed Drive • Check all screws, retainers and protective coverings regularly and tighten as required. Check plastic parts on a regular basis for cracks or broken pieces. • During snowy or rainy weather, the vehicle should be stored inside or under a protective cover. Remember to charge the battery at least once per month while your vehicle is not in regular use.
M Problems and Solutions Guide IMPORTANT! If you experience a problem with your vehicle, first check the Problems and Solutions Guide below. If you still experience a problem, please contact Power Wheels® Consumer Affairs, tollfree at 1-800-348-0751 between 8 AM and 5 PM (EST) Monday through Friday. Or, contact your local Power Wheels® authorized service center. For the location nearest you, please refer to the Authorized Service Center list beginning on page 27.
Problems and Solutions Guide Problem Vehicle was running but suddenly stopped Short run time (Less than 1 - 3 hours per charge) Possible Cause Solution Loose wire or loose connectors Check all wires and connectors. Make sure the motor harness connector is plugged into the battery, and that there are no loose wires around the motors. Tripped thermal fuse Each Power Wheels® 12 volt battery has a built-in thermal fuse.
Problems and Solutions Guide Problem Vehicle runs sluggishly Possible Cause Undercharged battery Solution Charge the battery. A new battery should have been charged for at least 18 hours before using the vehicle for the first time. After first-time use, recharge the battery for at least 14 hours after each use. Never charge the battery longer than 30 hours. Check all connectors. Make sure the charger connector is plugged into the battery, and that the charger is plugged into the wall.
Problems and Solutions Guide Problem When the foot pedal is pressed, the vehicle won’t run without a push Possible Cause Solution Loose wire or connector Check all wires around the motors and all connectors to make sure they are tight. “Dead Spot” on motor Contact your local Power Wheels® authorized service center for diagnosis and repair. Loud clacking or grinding noise from a motor-gearbox Broken gears Contact your local Power Wheels® authorized service center for diagnosis and repair.
N Bumper-to-Bumper* Limited Warranty *One year limited warranty from the date of purchase on the Power Wheels® vehicle. Six month limited warranty on the 12 volt battery. For the original purchaser, this one year limited warranty covers the Power Wheels® ride-on vehicle (purchased from Power Wheels®) against defects in materials and workmanship. The six month limited warranty applies only to the 12 volt battery included by Power Wheels® with the original purchase of the vehicle.
Authorized Service Centers DELAWARE SELBYVILLE - Ahern & Son, Inc., #2 S. Dupont Hwy Rt. 2, 19975, (302) 436-4100 WILMINGTON - Lyons Hardware Do-It Center, 2021 Kirkwood Highway, 19805, (302) 995-1260 DF MEXICO - S.E.G.E.S.A., Calz De Tlalpan 1172-A, CP3540 FLORIDA ATLANTIC BEACH - First Coast Repair, 25 Seminole Road, 32233, (904) 246-4616 CAPE CORAL - Family Hardware #0827 Do-It Express, 33904, (941) 542-6365 DELRAY BEACH - Mister FixIt, 209 S.E.
Authorized Service Centers MICHIGAN ALMONT - Almont Do It Center #421, 4545 Van Dyke, 48003, (810) 798-8922 BAY CITY - Bay Vac & Pedal, 805 Columbus Ave., 48708, (517) 892-7516 BRIGHTON - Complete Battery Source, 8023 W. Grand River, 48116, (810) 220-1050 DAVISON - Gill-Roy’s Hardware, 8405 East Davison, 48423, (810) 653-2288 DEARBORN - McNichols Electric Service, 1836 Grindley Park, 48124, (313) 563-7550 DETROIT - McNichols Electric Service, 13725 W.
Authorized Service Centers OKLAHOMA MC ALESTER - Quality Upholstery, 803 E. Gene Stipe Blvd., 74501, (918) 423-4747 OKLAHOMA CITY - Brand Appliance Repair, Co., 538 N. Pennsylvania Avenue, 73107, (405) 235-0583 OKLAHOMA CITY - Appliance Services By CK, 101 East Madison, 73105, (405) 5258862 OKLAHOMA CITY - Oklahoma Service Center, 1940 North May Avenue, 73107, (405) 946-9841 TULSA - H.L. Moss, Inc., 1714 E.
Do Not Return Your Vehicle to the Store If you are missing parts or need assistance, please call us toll-free: Power Wheels Consumer Affairs 1-800-348-0751 8 AM - 5 PM EST, Monday through Friday Over 400 Authorized Service Centers Or contact your local Power Wheels® Authorized Service Center. For the location nearest you, refer to the Authorized Service Center list in this manual. Fisher-Price, Power Wheels and Power Wheels by Fisher-Price are U.S. trademarks of Mattel, Inc. Fisher-Price, Inc.