e Instructions Model Numbers: 79638, B2875, C4630, C4634, C5936 f Instructions Numéros de modèle : 79638, B2875, C4630, C4634, C5936 S Instrucciones Número de modelo: 79638, B2875, C4630, C4634, C5936 e Product features and decoration may vary from the photo above. f Les caractéristiques du produit et les décorations peuvent varier par rapport à la photographie. S Las características y decoración del producto pueden variar de las mostradas arriba. e IMPORTANT! PLEASE KEEP FOR FUTURE REFERENCE.
e Warnings and Caution f Avertissements et mise en garde S Advertencias y precaución eWARNING fAVERTISSEMENT SADVERTENCIA e Prevent serious injury or death from falls or sliding out: • The child should be secured in the high chair at all times by the restraining system, either in the recline, semi-recline or upright position. The restraint belts must be adjusted to fit your child snugly. The tray is not designed to hold the child in the chair. • Always keep child in view while in the high chair.
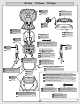
e Parts f Pièces S Piezas e Pad f Coussin S Almohadilla e Food Tray f Plateau pour aliments S Bandeja de alimentos e Toy f Jouet S Juguete e Seat Back f Dossier du siège S Respaldo e Base Tray f Plateau de base S Bandeja de base e Hinge Rod f Tige de support S Varilla de bisagra e Seat Bottom f Bas du siège S Asiento e #10 x 7/8" (2.2 cm) Black Screw f Vis noires no 10 de 2,2 cm S Tornillo negro No. 10 x 7/8" (2.
e Assembly f Assemblage S Ensamble e IMPORTANT! Before assembly and each use, inspect this product for damaged hardware, loose joints, missing parts or sharp edges. DO NOT use if any parts are missing or broken. Contact Fisher-Price® for replacement parts and instructions if needed. Never substitute parts. f IMPORTANT ! Avant l’assemblage ou chaque utilisation, vérifier que ce produit ne comporte pas de pièces endommagées ou manquantes, de joints lâches ou de bords tranchants.
e Assembly f Assemblage S Ensamble S •Alinear los orificios de los aros de plástico y de los tubos del asiento. •Introducir un tornillo No. 8 x 3/4" (1.9 cm) en cada aro de plástico y en los tubos del asiento, tal como se muestra. Ajustar los tornillos. •Empujar los tubos del asiento de adelante para atrás para verificar que están bien asegurados al asiento. Si los tubos se mueven, significa que no están bien ajustados.
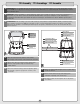
e Assembly f Assemblage S Ensamble e Seat Back Pin f Cheville du dossier S Clavija del respaldo e Seat Back Pin f Cheville du dossier S Clavija del respaldo e Hinge f Tige S Varilla e Opening f Cavité S Apertura e Opening f Cavité S Apertura e Hinge Rod f Tige de support S Varilla de bisagra 6 5 e Seat Bottom Assembly f Bas du siège S Unidad del asiento e #10 x 7/8" (2.2 cm) Black Screw f Vis noires no 10 de 2,2 cm S Tornillo negro No. 10 x 7/8" (2.2 cm) e •Turn the seat assembly face down.
e Assembly f Assemblage S Ensamble e #10 x 7/8" (2.2 cm) Black Screw - 2 f Vis noires no 10 de 2,2 cm - 2 S Tornillo negro No. 10 x 7/8" (2.
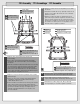
e Assembly f Assemblage S Ensamble e Seat Height Adjusters f Régleurs de la hauteur du siège S Ajustadores de la altura de la silla e Seat Assembly f Siège S Unidad de la silla e Position 4 f Position 4 S Posición 4 8 e Sockets f Logements S Zócalos e Press Lever f Appuyer sur le bouton S Presionar la palanca 9 e •While pressing the levers on the seat height adjusters, lift them to position 4 on the frame front legs, as shown.
e Assembly f Assemblage S Ensamble e Front Leg Holes f Trous des pattes avant S Orificios de las patas delanteras e Base f Base S Base e Screw Retainer - 2 f Anneaux pour vis – 2 S Sujetador de tornillo – 2 e Screw Retainers f Anneaux pour vis S Sujetadores de tornillo e #10 x 7/8" (2.2 cm) Black Screw - 2 f Vis noires no 10 de 2,2 cm - 2 S Tornillo negro No. 10 x 7/8" (2.2 cm) - 2 10 e •Insert the frame front legs into the other base. •Fit a screw retainer over a hole in a front leg.
e Assembly f Assemblage S Ensamble e Seat Height Adjusters f Régleurs de la hauteur du siège S Ajustadores de la altura de la silla e #8 x 3/4" (1.9 cm) Screw - 2 f Vis no 8 de 1,9 cm - 2 S Tornillo No. 8 x 3/4" (1.
e Assembly f Assemblage S Ensamble e Pad f Coussin S Almohadilla e Tabs f Pattes S Lengüetas e Elastic Loops f Boucles élastiques S Aros elásticos e Hole f Trou e Hole f Trou S Orificio S Orificio 13 e Elastic Loops f Boucles élastiques S Aros elásticos e Front View f Vue de l’avant S Vista anterior e Back and Bottom View f Vue de l’arrière et du dessous S Vista posterior e inferior S •Levantar la unidad en posición vertical.
e Assembly f Assemblage S Ensamble e Shoulder Portion f Partie pour l’épaule S Parte del hombro e Slot f Fente S Ranura e Crotch Belt f Courroie d’entrejambe S Cinturón de la entrepierna 14 e •Insert the crotch belt through the slot in the pad. Make sure the crotch belt is not twisted. f •Glisser la courroie d’entrejambe dans la fente du coussin. S •Introducir el cinturón de la entrepierna en la ranura de la almohadilla. Verificar que el cinturón no esté retorcido.
e Assembly f Assemblage S Ensamble e Handle f Poignée S Asa e Upper Shoulder Belt Slots f Fentes supérieures pour les courroies d’épaule S Ranuras superiores del cinturón de hombros e Shoulder Portion f Partie pour l’épaule S Parte del hombro e Elastic Loop f Boucle élastique S Aro elástico e Pad Strap f Courroie du coussin S Cinta de la almohadilla e Elastic Loop f Boucle élastique S Aro elástico e Tab f Patte S Lengüeta e Tab f Patte S Lengüeta 16 e Belt Ends f Extrémités de la courroie S Extremos
e Securing Your Child f Installation de l’enfant S Asegurar al bebé e IMPORTANT! Before each use, inspect this product for damaged hardware, loose joints, missing parts or sharp edges. DO NOT use if any parts are missing or broken. Contact Fisher-Price® for replacement parts and instructions if needed. Never substitute parts.
e Securing Your Child f Installation de l’enfant S Asegurar al bebé e Waist/Shoulder Belt e Waist/Shoulder Belt f Courroie ventrale et d’épaule f Courroie ventrale et d’épaule S Cinturón de la cintura/hombro S Cinturón de la cintura/hombro e Anchored End e Buckle f Extrémité fixe f Boucle S Extremo fijo S Hebilla A B e Free End f Extrémité libre Passant S Extremo libre 2 e Tighten f Serrer S Ajustar e To tighten the waist belts: Feed the anchored end of the waist belt up through the buckle to
e Securing Your Child f Installation de l’enfant S Asegurar al bebé e Hold Adjuster e Anchored End f Tenir le régleur e Buckle f Extrémité fixe S Sujetar el ajustador f Boucle S Extremo fijo S Hebilla e Pull Strap Down B f Tirer la courroie vers le bas A e Slide Adjuster Down f Glisser le régleur vers le bas S Deslizar el ajustador para abajo S Jalar la cinta para abajo e Free End f Extrémité libre Passant S Extremo libre 3 e Loosen f Desserrer S Desajustar e To loosen the waist belts: Fee
e Securing Your Child f Installation de l’enfant S Asegurar al bebé e Shoulder Portion f Partie pour l’épaule S Parte del hombro 5 6 e To change shoulder belt slots: •From the back of the high chair, push the shoulder portion of the waist/shoulder belts through the seat back slots. e •From the front of the high chair, pull the shoulder portion of the waist/shoulder belts out and then fit them back through the desired shoulder belt slots in the headrest pad, seat pad and the seat back.
e Using the Trays f Utilisation des plateaux S Usar las bandejas e Base Tray f Plateau de base eWARNING fAVERTISSEMENT SADVERTENCIA S Bandeja de la base e Prevent serious injury or death from falls or sliding out. The child should be secured in the high chair at all times by the restraining system, either in the recline, semi-recline or upright position. The restraint belts must be adjusted to fit your child snugly. The tray is not designed to hold the child in the chair.
e Using the Trays f Utilisation des plateaux S Usar las bandejas e Hint: The base tray can be adjusted for your child’s comfort two ways (see steps 8 and 9)! e Hint: The base tray can be removed two ways (see steps 10 and 11)! f Remarque : Le plateau de base peut être réglé de deux façons pour le confort de l’enfant (voir les étapes 8 et 9) ! f Remarque : Le plateau de base peut être enlevé de deux façons (voir les étapes 10 et 11) ! S Consejo: La bandeja de la base se puede ajustar en dos posiciones pa
e Using the Trays and Toy f Utilisation des plateaux et jouet S Usar las bandejas y juguete e Adjusting the Seat f Réglage du siège S Ajustar el asiento eWARNING fAVERTISSEMENT SADVERTENCIA e Food Tray f Plateau pour aliments S Bandeja de alimentos e Base Tray f Plateau de base S Bandeja de la base e Prevent serious injury or death from falls or sliding out. It is recommended that the high chair be used in the upright position only by children capable of sitting upright unassisted.
e Adjusting the Seat f Réglage du siège S Ajustar el asiento e Hint: Adjust the seat height to any of seven positions! e Hint: Adjust the seat angle to any of three positions: Upright, Semi-Recline or Recline. f Remarque : Régler la hauteur du siège à l’une des sept positions ! f Remarque : Régler l’angle du siège à l’une des trois positions : redressée, semi-inclinée ou inclinée. S Consejo: Ajustar la altura del asiento en una de las siete posiciones disponibles.
e Storage f Rangement S Almacenamiento e Pull Frame Release Latch e Base Tray f Plateau de base S Bandeja de la base f Tirer le verrou de déblocage e Hole S Jalar el seguro del armazón f Trou S Orificio e Peg 16 f Cheville 17 S Clavija e •With the legs all the way open, lower the seat to position 7 the lowest position). •Pull the frame release latches forward and push the rear legs toward the front legs.
e Care f Entretien e •This pad is machine washable. Wash the pad separately in cold water on the gentle cycle. Do not use bleach. Tumble dry separately on low heat and remove promptly. •The frame and base tray may be wiped clean using a mild cleaning solution and a damp cloth. Do not immerse the base tray. •The food tray and toy are dishwasher safe. Simply remove the food tray from the base tray and place in your dishwasher.
e Consumer Information f Service à la cliéntèle S Información para el consumidor United States Please call Fisher-Price® Consumer Relations, toll-free at 1-800-432-5437, 8 AM - 6 PM EST Monday through Friday. Hearing-impaired consumers using TTY/TDD equipment, please call 1-800-382-7470. Or, write to: Fisher-Price® Consumer Relations, 636 Girard Avenue, East Aurora, New York 14052 Canada Call 1-800-567-7724, or write to: Mattel Canada Inc., 6155 Freemont Blvd., Mississauga, Ontario L5R 3W2.