Product features and decoration may vary from the picture above. ™ ™ Owner’s Manual with Assembly Instructions Please read this manual and save it with your original sales receipt. For Model 78477 Tools needed for assembly: Phillips Screwdriver, Hammer, and Safety Scissors. Use only with Power Wheels® Type H 6 Volt (9.5 Amp./hr. - included or 12 Amp./hr. - not included) Batteries, Power Wheels® 30 Amp Fuses (included) and Power Wheels® Type H 12 Volt Charger (included).
Table of Contents A B C D E F G H I J K L M N O Important Information . . . . . . . . . . . . . . . . . . . . . . . . . . . . . . . . . . . . . . . . . . . . . . . . . . . . . . . . . . . . . . . . . . . . .2 Warnings . . . . . . . . . . . . . . . . . . . . . . . . . . . . . . . . . . . . . . . . . . . . . . . . . . . . . . . . . . . . . . . . . . . . . . . . . . . . . .3 Parts . . . . . . . . . . . . . . . . . . . . . . . . . . . . . . . . . . . . . . . . . . . . . . . . . . . . . . . . . . . . . . . . .
B Warnings WARNING • Children can be harmed by small parts, sharp edges and sharp points in the vehicle’s unassembled state, or by electrical items. Care should be taken in unpacking and assembly of the vehicle. Children should not handle parts, including the batteries, or help in assembly of the vehicle. • Keep small parts and plastic bags out of children’s reach. Dispose of plastic bags properly. • Adult supervision is required. Children do not have the judgement necessary to avoid many accidents.
C Parts • If you experience a problem with this product, or are missing a part, please call us at 1-800-348-0751, rather than return this product to the store. • Please identify all parts before assembly and save all packaging material until assembly is complete to ensure that no parts are discarded. • Metal parts have been coated with a lubricant to protect them during shipment. Wipe all metal parts with a paper towel to remove any excess lubricant.
Parts Rear Bumper Dash Knob – 2 Seat Brushguard Spacer Tube – 2 Cap Nut – 3* Knob Plate Key Assembly Dash Steering Column Hood Not Shown: Steering Wheel Hood Latch – 2 Label Sheet, Literature Bag 5 Steering Wheel Cap Brush Guard
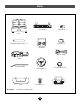
Parts Windshield Bracket – 2 Windshield Hinge Pin – 2 Water Jug Water Jug Holder Windshield Frame - Front Windshield Frame - Back Sport Bar Sport Bar Support - 2 Sport Bar Bracket Set Right Sidepipe Canopy Left Sidepipe 6
Parts Lights and Siren Microphone Cord Retainer #6 Washer - 2 #6 x 7/16" Screw – 2 These components are found in the Lights and Siren Box #10 x 1/2" Screw – 2 #8 x4" Screw – 2 #8 x 11/4" Screw – 10 11/2" x 1/4" Machine Screw - 2 #8 x 3/4" Screw – 6 #8 x 1" Screw – 14 All Screws Shown Actual Size 7 #6 x 11/2" Screw – 4 #10 x 1" Screw – 4
D Parts Diagram 47 33 49 37 28 47 33 32 36 32 33 35 15 10 31 10 21 15 23 24 3 10 20 22 19 17 27 13 16 18 39 10 40 12 11 14 45 8 38 29 30 31 6 8 9 13 4 10 5 10 25 26 1 44 48 50 43 41 46 34 48 51 50 13 42 7 2 3 8
Parts Diagram No. Part 1 2 3 4 5 6 7 8 9 10 11 12 13 14 15 16 17 18 19 20 21 22 23 24 25 26 27 Vehicle Body Steering Column .354 Cap Nut Hood Latch 6 Volt Battery Battery Retainer 30 Amp Fuse Taillight Lens Taillight Housing #8 x 1" Screw Gas Cap Dash #10 x 1" Screw #10 x 1/2" Screw Windshield Hinge Pin Knob Plate Dash Knob Microphone Key Assembly Steering Wheel Steering Wheel Cap Seat Long Seat Belt Strap Short Seat Belt Strap Headlight Lens Lens Guard Hood Quantity No.
E Battery Charging WARNING • The batteries must be handled by adults only. The batteries are heavy and contain sulfuric acid (electrolyte). Dropping the batteries could result in serious injury. • Never allow children to charge the batteries. Battery charging must be done by adults only. A child could be injured by the electricity involved in charging the batteries. • Use of the wrong type batteries, fuses or charger could cause a fire or explosion, resulting in serious injury.
Battery Charging • Your new batteries must be charged for at least 18 hours before you use them in your vehicle for the first time. • We recommend that you start charging your batteries before beginning assembly of your new vehicle. • The charger is not a toy. • Use only a Power Wheels® Type H 12 volt charger (120 VAC 60 Hz 28W with an output of 12 VDC 1200mA) to charge your Power Wheels® 6 volt batteries. • The batteries must be upright while charging. • Do not short circuit the batteries.
F 1 Assembly Do not omit any steps. Please set aside at least 45 minutes for assembly. 3 Rear of Vehicle Left Sidepipe 2 Dash 1 2 1 Tab Channel Cover Screw Pegs 1 Vehicle Body • Position the dash on the vehicle body. Make sure the holes in the dash tabs align with the holes in the vehicle body and that the channel cover is captured by the dash. • Insert two #10 x 1" screws through the holes towards the rear of the dash (closest to the hood area) and into the vehicle body 1 .
Assembly 5 7 Microphone Dash End of Steering Column Steering Rod Cap Nut Bottom View • Insert the end of the microphone cord though the hole under the dash and into the hood area. • Place the microphone in the dash pocket. 6 • Insert the end of the steering column through the hole in the steering rod. • Fit a cap nut onto the end of the steering column. • While supporting the steering column, tap the cap nut with a hammer to secure it on the steering column.
Assembly 9 11 Steering Wheel Slot Steering Wheel Cap Tab • Fit the steering wheel cap into the center of the steering wheel with the screw holes aligned. • Insert two #8 x 1" screws as shown. • Tighten the screws with a Phillips screwdriver. Do not over-tighten. 10 Wide Tab Wide Notch Grille • Fit the lens tabs on the back of a lens assembly into the headlight slots in the grille. • Press firmly to snap the lens assembly into the grille.
Assembly 13 15 Spacer Tube Windshield Brackets Lip of Bracket Slot • Fit a spacer tube between the grille and the back of the brush guard, as shown. • Insert a #8 x 4" screw through the brush guard and spacer tube and into the hole in the grille. • Tighten the screw with a Phillips screwdriver. Do not over-tighten. • Repeat this procedure on the other side of the grille. 14 Hood Latch • Fit the screw pegs on the windshield brackets into the holes in the top surface of the dash.
Assembly 17 19 Hinge Pin Windshield Frame Front Half Windshield Bracket Lights and Siren Battery Compartment Door 1.5V “AA” (LR6) x 4 • Rotate the front half of the windshield frame down so it lays flat on the vehicle body. • Working from the center of the vehicle, insert a hinge pin through the holes in the windshield frame and the holes in the windshield bracket, as shown. • Repeat this procedure to secure the front half of the windshield frame to the other windshield bracket.
Assembly 20 Lights and Siren 22 Battery Compartment Lights and Siren Cord Microphone Cord Lights and Siren Cord Front of Hood • Insert the lights and siren cord through the hole in the center of the hood. • Fit the lights and siren to the top of the hood. Make sure the battery compartment faces the front of the hood. • Insert two #6 x 7/16" screws with washers through the holes in the underside of the hood and into the lights and siren.
Assembly 24 Short Seat Belt Strap T-Loop (Pull through slot) 26 Seat Seat Back Tabs Fastener End End T-Loops Tabs 3 PUSH HERE 2 Seat Slot Slot 1 • Turn the seat upside down. • Insert the fastener end of a short seat belt strap through the slot near the outer edge of the seat. Make sure the side of the seat belt with the fastener faces the outer edge of the seat.
Assembly 28 30 Canopy Sleeves Sport Bar Bracket Ring Canopy Sleeves Tab Hole Tunnel Side Leg Canopy Sport Bar Support Sport Bar • Position the sport bar on its side so that the sport bar ends curve away from you. • Position the canopy opposite the sport bar with the netting facing away from you. • Slide the four canopy sleeves onto the sport bar. 29 Sport Bar • Using safety scissors, remove the sport bar brackets from the plastic connector. Dispose of the plastic connector.
Assembly 32 34 KCTM Light Rack - Back Half Sport Bar Tabs PUSH HERE Side Fender Sport Bar PULL HERE KCTM Light Rack - Front Half • Position the sport bar upright, as shown. • Fit and hold the front and back halves of the KCTM light rack against the sport bar. Make sure the two KCTM light rack halves are aligned, and that the screw holes in the KCTM light rack are aligned with the screw holes in the canopy and the sport bar.
Assembly 36 38 Taillight Lens Rear Bumper Light Plate Gas Cap Tether Taillight Housing • Using safety scissors, remove the taillight lenses and the taillight housings from the plastic connectors. Dispose of the plastic connectors. • Face the rear of the vehicle. • Fit a taillight lens inside a taillight housing. • Position the taillight housing with lens against a rear bumper light plate with the screw holes aligned.
G Label Decoration Proper label application will help to keep the labels looking their best! When applying labels, keep the following guidelines in mind: • Wash your hands before applying the labels. • Before applying the labels, wipe the surface of the vehicle with a clean, dry cloth to remove any dust or oils. • Place the labels exactly as shown in the illustrations. • For best results, avoid repositioning a label once it has been applied to the vehicle.
H Battery Installation Important Note: Use only Power Wheels® Type H batteries with Power Wheels® 30 amp fuses installed. Use of any other batteries or fuses will damage your vehicle. Make sure that you charge the batteries for at least 18 hours using the enclosed Power Wheels® 12 volt charger before operating your vehicle for the first time. Charge the batteries for at least 14 hours after each use of the vehicle. Never charge the batteries longer than 30 hours.
Battery Care and Disposal Battery Installation Care 5 If a battery leak develops, avoid contact with the leaking acid and place the damaged battery in a plastic bag. See information below for proper disposal. If acid comes in contact with skin or eyes, flush with cool water for at least 15 minutes and call a physician. If acid is internally ingested, give water, milk of magnesia or egg whites immediately. Never give emetics or induce vomiting. Call a physician.
J Rules for Safe Driving • While driving across a steep slope, the vehicle may tilt and tip over. The wheels could lose traction, causing the vehicle to slip. • While driving up a steep incline, the motor may stop and the vehicle could roll backwards at an unsafe speed. WARNING • Adult supervision is required. Children do not have the judgement necessary to avoid many accidents. Be sure that children operating this vehicle can do so safely and that they are supervised at all times.
K How to Operate Your Vehicle To Back Up Beginner Use - Low Speed Drive As assembled, your vehicle is ready to roll in low speed (21/2 mph, maximum). It has been pre-set so it will only operate in low speed. After your child has mastered the basic skills of driving and understands the rules for safe driving, it’s time to disconnect the high speed lock-out to allow the vehicle to operate in low or high speed. See the instructions on page 27 to disconnect the high speed lock-out.
L How to Operate Your Vehicle Advanced Use - High Speed Drive • Check all nuts, bolts, and their protective coverings regularly and tighten as required. Check plastic parts on a regular basis for cracks or broken pieces. • During snowy or rainy weather, the vehicle should be stored inside or under a protective cover. Remember to charge the batteries at least once per month while your vehicle is not in regular use.
M Problems and Solutions Guide IMPORTANT! If you experience a problem with your vehicle, first check the Problems and Solutions Guide below. If you still experience a problem, please contact Power Wheels® Consumer Affairs, tollfree at 1-800-348-0751 between 8 AM and 6 PM (EST) Monday through Friday. Or, contact your local Power Wheels® authorized service center. For the location nearest you, please refer to the Authorized Service Center list beginning on page 32.
Problems and Solutions Guide Problem Vehicle was running but suddenly stopped Short run time (Less than 1 - 3 hours per charge) Possible Cause Solution Loose wire or loose connectors Check all wires and connectors. Make sure the battery connector is tightly plugged into the motor harness connector, and that there are no loose wires around the motors. Wrong type or improperly installed fuse Make sure that the battery has properly installed Power Wheels® 30 amp fuses installed before charging.
Problems and Solutions Guide Problem Vehicle runs sluggishly Possible Cause Undercharged batteries Solution Charge the batteries. New batteries should have been charged for at least 18 hours before using the vehicle for the first time. After first-time use, recharge the batteries for at least 14 hours after each use. Never charge the batteries longer than 30 hours. Check all connectors.
Problems and Solutions Guide Problem When the foot pedal is pressed, the vehicle won’t run without a push Possible Cause Solution Loose wire or connector Check all wires around the motors and all connectors to make sure they are tight. “Dead Spot” on motor Contact your local Power Wheels® authorized service center for diagnosis and repair. Wrong type of fuse used Your vehicle requires Power Wheels® 30 amp fuses, one in each battery.
N Statement of Limited Warranty 90-day limited warranty for the Power Wheels® Ride-On Toy Vehicle A 6-month battery warranty applying only to those 6 volt batteries which were included by Power Wheels®, with the Power Wheels® vehicle when originally purchased. This limited warranty covers the Power Wheels® ride-on vehicle and the 6 volt batteries, purchased from Power Wheels® by the original purchaser, against defects in materials and workmanship.
Authorized Service Centers DENVER - Appliance Service, 4262 Lowell Blvd., 80211, (303) 458-1109, (800) 631-0941 (CO, WY only) DENVER (ENGLEWOOD) - Appliance Service, 3932 S.
Authorized Service Centers TANEYTOWN - MacHenry Services, 68 Frederick Street, 21787, (410) 756-6659, (800) 276-1301 WASHINGTON D.C. (BELTSVILLE) - Philips Consumer Electronics, 10800 Rhode Island Avenue, 20705, (301) 595-5330, (800) 438-9647 MASSACHUSETTS BOSTON (MEDFIELD) - Wills Hardware, 5 Janes Avenue, 02052, (508) 359-4381 BOSTON (WALTHAM) - Suburban Appliance Service Center, Inc., 271 Moody Street, 02154, (617) 893-6694 LOWELL - Lowell Appliance Service Center, Inc.
Authorized Service Centers DAYTON - Layer Electric, 603 South Ludlow Street, 45402, (937) 224-9608 DAYTON (NEW CARLISLE) - Ballweg Do-It Center, 3300 South Dayton, Lakeview Rd., 45344, (937) 849-1306 LIMA - Crouse Lumber Do-It Center, 333 E. Market Street, 45801, (419) 229-9070, (800) 826-9663 NEW BOSTON - True Value Toy Town, Rt. 52 & 139, 45662, (614) 456-5704 STRYKER - Short’s Hardware, 115 N.
Do Not Return Your Vehicle to the Store If you are missing parts or need assistance, please call us toll-free: Power Wheels Consumer Affairs 1-800-348-0751 8 AM - 6 PM EST, Monday through Friday Over 400 Authorized Service Centers Or contact your local Power Wheels® Authorized Service Center. For the location nearest you, refer to the Authorized Service Center list in this manual. Fisher-Price, Power Wheels and BARBIE are U.S. trademarks of Mattel, Inc.