CHM84 Side-to-side Lado a lado Head-to-toe Adelante hacia atrás IMPORTANT! Keep these instructions for future reference. Please read these instructions before assembly and use of this product. Product features and decorations may vary from photographs and diagrams. ¡IMPORTANTE! Guardar estas instrucciones para futura referencia. Leer estas instrucciones antes de ensamblar y usar este producto. Las características y decoración del producto pueden variar de las mostradas. fisher-price.
Consumer Information Información para el consumidor WARNING Prevent death: Keep seat fully reclined until child is at least 4 months old AND can hold head up without help. Young infants have limited head and neck control. If seat is too upright, infant’s head can drop forward and compress the airway, resulting in DEATH. Prevent serious injury or death from falls or strangling in the restraint system: • Never leave child unattended.
Consumer Information Información para el consumidor • Adult assembly is required. Tools needed for assembly: Allen wrench (included), Phillips screwdriver and safety scissors (both not included). • Requires two C (LR14) alkaline batteries (not included) for seat vibration. • Requires four D (LR20) alkaline batteries (not included) or AC adapter (included) (input 100 240 VAC, 50 - 60Hz, with an output of 6 VDC) for swing operation. • Always use the swing where there is adequate ventilation.
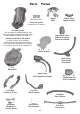
Parts Piezas Seat Peg (Attached to seat.) Clavija del asiento (Conectada en el asiento.) Mobile Móvil Seat with Soother (We recommend installing batteries into the soother before beginning assembly. See Soother Battery Installation on page 18). Asiento con unidad de vibraciones (Instalar las pilas en la unidad de vibraciones antes de empezar el montaje. Ver la sección de colocación de las pilas de la unidad de vibraciones en la página 18.
Parts Piezas M8 x 60 mm Screw – 4 (One of these screws is located in the lower frame retainer. You will need to remove it to assemble the lower frame to the upper frame.) Tornillo M8 x 60 mm – 4 (Uno de estos tornillos se encuentra en el retenedor de la parte inferior del armazón. Será necesario quitarlo para ensamblar la parte inferior del armazón a la parte superior.) M5 x 45 mm Screw – 1 (This screw is located in the upper seat tube retainer.
Assembly Montaje IMPORTANT! Before each use or assembly, inspect this product for damaged hardware, loose joints, missing parts or sharp edges. Do not use the product if any parts are missing, damaged or broken. Do not use accessories or replacement parts other than those approved by the manufacturer. ¡IMPORTANTE! Antes del montaje y de cada uso, revisar que el producto no tenga piezas dañadas, conexiones sueltas, piezas faltantes o bordes filosos. NO usar el producto si falta o está rota alguna pieza.
Assembly Montaje Rear Base Base trasera 3 • Turn the lower frame assembly over with the front base down. • Fit the rear base onto the lower frame. Hint: The rear base is designed to fit onto the lower frame one way. If it does not seem to fit, turn it around and try again. • Voltear la unidad de la parte inferior del armazón con la base delantera hacia abajo. • Ajustar la base trasera en la parte inferior del armazón.
Assembly Montaje Lower Frame Cover Cubierta de la parte inferior del armazón 5 • Turn lower frame assembly upright. • “Snap” the lower frame cover onto the front base and lower frame. • Poner la unidad de la parte inferior del armazón en posición vertical. • Ajustar la cubierta de la parte inferior del armazón en la base delantera y parte inferior del armazón.
Assembly sembly Montaje Upper Frame Parte superior del armazón 7 • Fit the upper frame tube into the lower frame tube. • Insertar el tubo del armazón superior en el tubo del armazón inferior. x1 8 • Insert an M8 x 60 mm screw into the lower frame tube retainer. Fully tighten the screw with the larger end of the Allen wrench. • Insertar un tornillo M8 x 60 mm en el retenedor del tubo del armazón inferior. Apretar por completo el tornillo con el extremo grande de la llave hexagonal.
Assembly 9 Montaje BACK VIEW VISTA DE ATRÁS • Plug the power cord from the upper frame tube into the power cord in the lower frame tube. • Enchufar el cable eléctrico del tubo del armazón superior en el cable eléctrico del tubo del armazón inferior. Mobile Móvil Mobile Dome Cúpula del móvil 10 • Fit the tabs on the mobile dome into the slots in the mobile. • Push near each tab to “snap” the mobile dome into place. • Ajustar las lengüetas de la cúpula del móvil en las ranuras del móvil.
Assembly Montaje Strap Cinta Mobile Móvil 11 FRONT VIEW VISTA DEL FRENTE • Fold the end of the strap on the upper frame and fit it into the slot on the mobile. • Tug on the mobile to be sure it is attached to the upper frame. • Doblar el extremo de la cinta del armazón superior e introducirlo en la ranura del móvil. • Jalar el móvil para asegurarse que está bien ajustado en el armazón superior.
Assembly Montaje Seat Peg Clavija del asiento 13 SIDE VIEW VISTA DEL LADO Remove this seat peg Quitar esta clavija de la silla IMPORTANT! The seat peg is attached to the seat for shipping. Remove it to use in the next step when assembling the seat to the seat tube. Using safety scissors, cut the plastic tie holding the seat peg to the seat. Properly dispose of the plastic tie. ¡IMPORTANTE! La clavija de la silla está conectada en la silla para el envío.
Assembly Montaje 15 IMPORTANT! A plastic tie is attached to the seat recline for shipping. Using safety scissors, cut the plastic tie at the top of the seat. Properly dispose of the plastic tie. ¡IMPORTANTE! Se incluye una atadura de plástico en el respaldo de la silla para el envío. Con unas tijeras de punta redonda, cortar la atadura de plástico en la parte de arriba de la silla. Desechar apropiadamente la atadura de plástico.
Assembly Montaje Upper Seat Tube Tubo de asiento superior Seat Tube Tubo de asiento 17 • Fit the seat tube into the upper seat tube. Hint: You may need the help of another adult for this assembly step. • Insertar el tubo del asiento inferior en el tubo del asiento superior. Atención: pedir la ayuda de otra persona para completar este paso de montaje. 18 x1 • Insert the M5 x 45 mm screw into the upper seat tube retainer and tighten with the smaller end of the Allen wrench.
Assembly Montaje Pad Almohadilla Soother Unidad de vibraciones 19 • Fit the large opening in the pad around the soother. Hint: Before completing this assembly step, please be sure you have installed batteries into the soother. • Ajustar el orificio grande de la almohadilla alrededor de la unidad de vibraciones. Atención: antes de completar este paso de montaje, instalar las pilas en la unidad de vibraciones.
Assembly 21 Montaje Lower Slots Ranuras inferiores Smaller Baby • Insert the ends of the shoulder belts through the lower slots in the pad. Bebé más pequeño • Insertar los extremos de los cinturones de hombro en las ranuras inferiores de la almohadilla. Upper Slots Ranuras superiores 22 Larger Baby • This product is shipped with the shoulder belts installed in the lower slots in the seat.
Assembly Montaje 23 • Fit the pad edges around the rim of the seat. • Ajustar los bordes de la almohadilla alrededor del borde del asiento. Body Support Soporte corporal 24 • Insert the restraint pad through the large slot, the waist belts through the lower slots and the shoulder belts through the upper slots in the body support.
Soother Battery Installation Colocación de las pilas de la unidad de vibraciones 1,5V x 2 C (LR14) For longer life, use alkaline batteries. Para una mayor duración, usar solo pilas alcalinas. BOTTOM VIEW VISTA DE ABAJO • Locate the soother battery compartment underneath the seat. • Loosen the screw in the battery compartment door with a Phillips screwdriver and remove the door. • Insert two, C (LR14) alkaline batteries into the battery compartment.
Swing Battery Box Installation Instalación de las pilas del columpio Install batteries in the swing battery box if you need to use this swing away from an electrical outlet. Instalar las pilas en el compartimento de pilas del columpio para usar este columpio donde no haya tomacorrientes eléctricos. 1,5V x 4 D (LR20) For longer life, use alkaline batteries. Para una mayor duración, usar solo pilas alcalinas. • Loosen the screws in the swing battery box cover with a Phillips screwdriver. Remove the cover.
Battery Safety Information Información de seguridad acerca de las pilas In exceptional circumstances, batteries may leak fluids that can cause a chemical burn injury or ruin your product. To avoid battery leakage: • Do not mix old and new batteries or batteries of different types: alkaline, standard (carbon-zinc) or rechargeable (nickel-cadmium). • Insert batteries as indicated inside the battery compartment. • Remove batteries during long periods of non-use.
Setup and Use Preparación y uso WARNING Prevent death: Keep seat fully reclined until child is at least 4 months old AND can hold head up without help. Young infants have limited head and neck control. If seat is too upright, infant’s head can drop forward and compress the airway, resulting in DEATH. Prevent serious injury or death from falls or strangling in the restraint system: • Never leave child unattended. • This product is not intended to replace a crib or bassinet for prolonged periods of sleep.
Restraint System Shoulder Belt Cinturón de hombro Waist Belt Cinturón de la cintura 1 Sistema de sujeción Shoulder Belt Cinturón de hombro Waist Belt Cinturón de la cintura Restraint Pad Almohadilla de sujeción • Place your child in the seat. Position the restraint pad between your child's legs. • Fit the end of each waist belt through the end of each shoulder belt. • Fasten the waist/shoulder belts to the restraint pad. Make sure you hear a "click" on both sides.
Restraint System 3 TIGHTEN APRETAR Sistema de sujeción LOOSEN AFLOJAR • To tighten the waist belts: Feed the anchored end of the belt up through the buckle to form a loop A . Pull the free end of the belt B . Repeat this procedure to tighten the other belt. • To loosen the waist belts: Feed the free end of the belt up through the buckle to form a loop A . Enlarge the loop by pulling on the end of the loop toward the buckle. Pull the anchored end of the belt to shorten the free end of the belt B .
Adjust Seat Motion Ajustar el movimiento de la silla Side-to-side Lado a lado Head-to-toe Adelante hacia atrás • While holding the sides of the swing seat, turn the seat to adjust the motion direction to side-to-side or head-to-toe. • Mientras sujeta los lados de la silla del columpio, voltear la silla para ajustar la dirección del movimiento de lado a lado o adelante hacia atrás.
Adjust Seat Position Ajustar la posición de la silla Upright Vertical Recline Reclinada SQUEEZE APRETAR • From behind the seat, squeeze and hold the seat position latch. - Lift the seat back to the upright position. - Lower the seat back to the recline position. • Release the latch. • De la parte trasera de la silla, mantener apretado el seguro de posición de la silla. - Levantar el respaldo a la posición vertical. - Bajar el respaldo a la posición reclinada. • Soltar el seguro.
Swing Battery Power Suministro de pilas del columpio Swing Battery Box Compartimento de pilas del columpio • Insert the pin on the battery box into the socket in the swing base. Note: The swing battery box does not power seat calming vibrations. The seat soother is powered separately with two, C (LR14) batteries. • The swing also operates on AC power. Instructions for swing AC power use are on the next page. • Insertar la clavija del compartimento de pilas en la conexión de la base del columpio.
Swing AC Power Uso del columpio con corriente alterna • Place the swing near a standard wall outlet. • Insert the AC adapter pin into the socket in the swing base. • Plug the AC adapter into the wall outlet. • Use the AC adapter only in a wall outlet. Do not plug the AC adapter into a ceiling outlet. IMPORTANT! AC power does not power seat calming vibrations. The seat soother is powered separately with two, C (LR14) batteries installed in the underside of the seat.
Swing Power, Music and Sounds Settings Encendido del columpio y opciones de música y sonidos Press the power button to turn swing power ON. Presionar el botón de encendido para ENCENDER el columpio. Press the swing speed buttons to adjust the swing speed. LED display lights up to indicate the speed setting. Presionar los botones del volumen para ajustar el volumen. Las luces LED se iluminan para indicar el nivel del volumen.
Calming Vibrations Vibraciones relajantes Power Button Botón de encendido • Press the power button on the soother to turn calming vibrations ON or OFF. Hint: Vibrations will time out after approximately 30 minutes. Press the power button again to restart. • Presionar el botón de encendido de la unidad de vibraciones para PRENDER o APAGAR las vibraciones relajantes. Atención: después de aproximadamente 30 minutos, las vibraciones se apagarán. Volver a presionar el botón para reiniciarlas.
Adults Note: If you use this product with the AC adapter, periodically examine the AC adapter for damage to the cord, housing or other parts that may result in the risk of fire, electric shock or injury. If the AC adapter is damaged, do not use the product with the AC adapter. Use batteries as the power source.
Consumer Information Información para el consumidor FCC STATEMENT (UNITED STATES ONLY) This equipment has been tested and found to comply with the limits for a Class B digital device, pursuant to Part 15 of the FCC rules. These limits are designed to provide reasonable protection against harmful interference in a residential installation.
CO SU CONSUMER ASSISTANCE SS S ATENCIÓN AL CLIENTE 1-800-432-5437 (US) Fisher-Price, Inc., 636 Girard Avenue, East Aurora, NY 14052. Hearing-impaired consumers/Clientes con problemas auditivos 1-800-382-7470. Centro de Servicio en México: 59-05-51-00 Ext. 5206 ó 01-800-463-59-89 MÉXICO Importado y distribuido por Mattel de México, S.A. de C.V., Miguel de Cervantes Saavedra No. 193, Pisos 10 y 11, Col. Granada, Delegación Miguel Hidalgo, C.P. 11520, México, D.F. R.F.C. MME-920701-NB3.