Y6965 BMD91 Please keep this instruction sheet for future reference, as it contains important information. Requires three AA (LR6) alkaline batteries (not included) for operation. Adult assembly is required. Tool required: Phillips screwdriver (not included). Wipe this toy with a clean, damp cloth. Do not immerse. This toy has no consumer serviceable parts. Do not take apart. fisher-price.
Consumer Information FCC Statement (United States Only) This equipment has been tested and found to comply with the limits for a Class B digital device, pursuant to Part 15 of the FCC Rules. These limits are designed to provide reasonable protection against harmful interference in a residential installation. This equipment generates, uses and can radiate radio frequency energy and, if not installed and used in accordance with the instructions, may cause harmful interference to radio communications.
Assembled Parts 2 Rear Fenders Rear Wheel Base Dash Side Base Windshield Side Panel (outside) Sid Side P Panell (inside) Trunk Roller Assembly Door Part not shown: Label Sheet Front End CAUTION #8 x ¾" (1,9 cm) Screw – 21 SHOWN ACTUAL SIZE Tighten all screws with a Phillips screwdriver. Do not over-tighten. This package contains small parts. For adult assembly only.
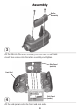
Assembly y Rear Fenders 1 Rear Wheel Base • Fit the rear fenders onto the rear wheel base. Push to “snap” each rear fender in place. Hint: Each rear fender is designed to fit one way. If it does not seem to fit, try the other rear fender. Trunk 2 • Fit the trunk into the slots in the rear wheel base. Push to “snap” into place.
Assembly Roller Assembly 3 • Fit the tabs on the roller assembly into the slots in the trunk. • Insert two screws into the roller assembly and tighten. Side Panel (outside) Front End Side Panel (inside) 4 • Fit the side panels onto the front and rear ends.
Assembly y 5 • Insert nine screws into the side panel and tighten. Side Base 6 BOTTOM VIEW • Carefully turn the car assembly over. • Fit the side base to the front and rear end of the car assembly.
Assembly 7 • Insert six screws into the side base and tighten. Door Peg 8 • Turn the car assembly upright. • Fit the peg on the door into the hole in the car. Push to “snap” in place.
Assembly 8 7 9 IMPORTANT! Apply labels 7 and 8 to windshield before completing the next step. • Apply labels exactly as shown in the illustration. Avoid repositioning a label after it has been applied. plied. Windshield Dash 10 • Fit the windshield onto the dash and push to “snap” in place. 11 • Fit the windshield on the dash into the slot in the front end.
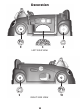
Assembly 12 BOTTOM VIEW • Carefully turn the car assembly over. • Insert four screws into front end and tighten. Decoration Apply labels exactly as shown in illustrations. Avoid repositioning a label after it has been applied.
Decoration 7 9 3 4 LEFT SIDE VIEW 5 RIGHT SIDE VIEW 10 10
Battery Installation 1,5V x 3 AA (LR6) • For longer life, use alkaline batteries. • Locate the battery compartment on the dashboard. Loosen the screw in the battery compartment door and remove the door. • Insert three AA (LR6) alkaline batteries. • Replace the battery compartment door and tighten the screw. • If this toy begins to operate erratically, you may need to reset the electronics. Slide the power/volume switch off and back on.
3 modes of play with fun sounds and lights! Pull the shifter up and down Turn the windshield wiper Drop balls in the ramp Turn the key Spin the roller Press the radio button Open and close the door Turn the steering wheel Press the horn • Slide the power/volume switch to ON with low volume , ON with high volume or OFF .