DFP09 Keep this instruction sheet for future reference, as it contains important information. Requires two C (LR14) alkaline batteries for soother operation and two AAA (LR03) alkaline batteries for remote operation (batteries not included). Adult assembly is required. Tool required for assembly: Phillips screwdriver (not included). fisher-price.
Consumer Information WARNING Prevent Entanglement Injury • Keep mobile out of baby’s reach. • Remove mobile portion of product from crib or playpen when baby begins to push up on hands and knees. • This product may not attach to all crib designs. Do not add additional strings or straps to attach to crib or playpen. IMPORTANT! Always attach all provided fasteners (strings, straps, clamps, etc.) tightly to a crib or playpen according to the instructions. Check frequently.
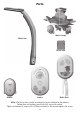
Parts Mobile Canopy Mobile Arm Battery Door Remote Soother Mobile Base Note: All of the screws used to assemble this toy are attached to the product. Follow these instructions carefully to fully secure the screws. Tighten and loosen all screws with a Phillips screwdriver. Do not over-tighten the screws.
Mobile Assembly/Setup Assembly step 1 is a one-time/permanent assembly. Steps 2-4 complete assembly/setup for mobile use. Mobile Arm Mobile Base 1 • "Snap" the mobile arm into the mobile base. Soother Mobile Canopy 1 2 2 • Fit the mobile canopy into the opening in the soother 1 , then slide the mobile canopy until you hear a "click" 2 . Hint: The mobile canopy is designed to fit onto the soother one way. If it does not seem to fit, turn it around and try again.
Mobile Assembly/Setup Battery Door 3 IMPORTANT! The battery door must be assembled to the soother for proper function. You may want to assemble the batteries in the soother before completing the assembly/setup. See the Battery Installation section. • Fit the battery door into the opening in the soother. Hint: The battery door is designed to fit one way. If it does not seem to fit, turn it around and try again. • Tighten the screws in the battery door.
Consumer Information FCC STATEMENT (UNITED STATES ONLY) This equipment has been tested and found to comply with the limits for a Class B digital device, pursuant to Part 15 of the FCC rules. These limits are designed to provide reasonable protection against harmful interference in a residential installation. This equipment generates uses and can radiate radio frequency energy and, if not installed and used in accordance with the instructions, may cause harmful interference to radio communications.
Battery Installation For longer life, uuse alkaline batteries. 1,5V x 2 C (LR14) Soother • Loosen the screws in the battery compartment door with a Phillips screwdriver and remove the door. • Insert two C (LR14) alkaline batteries. • Replace the battery compartment door and tighten the screws. IMPORTANT! Under normal use conditions, the batteries in the soother will require replacement more often than the batteries in the remote.
Mobile Crib Attachment Crib Top Rail Base Buckles 1 • Position the base so that the decorated side faces the inside of the crib. • Fit the base onto the crib top rail. • Make sure the top strap is hanging over the crib top rail. Pull the bottom strap through the crib rails. • Buckle the straps. Make sure you hear a “click”. PULL PULL 2 PUSH • Make sure the straps are tightened securely around the crib rail. Pull the free end of the strap to tighten on the rail.
Mobile Crib Attachment 3 • Tie the base strings to a crib spindle. Note: It is better the tie the strings in a knot than a bow, since a bow may be easily untied. Bottom of Base At Least 7 Inches (18 cm) Mattress 4 • If the distance between the base and the mattress is less than 7 Inches (18 cm), lower the crib mattress.
Remote Use Control Panel Use • Press the power button to turn the soother ON. Press the power button again to turn the soother OFF. • Press the motion button to turn mobile motion ON. Press the button again to turn motion and projection OFF. Press the motion button again to turn on motion only. Hint: The motion only works in crib mobile mode. In dresser top mode, the motion button will only turn projection lights on or off. • Press the projection button to turn projection lights ON.
Convert to Dresser Top Soother with ceiling projection! 3 Loosen the screws in the battery compartment door and remove the door. Slide the switch on the bottom of the soother. 1 4 2 Slide the mobile canopy over and lift to remove from the soother. While holding the switch down, remove the mobile arm from the soother. 5 Replace the battery compartment door and tighten the screws. Store the mobile arm and mobile canopy for future use.
Convert to Crib Mobile with canopy projection! 3 Replace the battery compartment door and tighten the screws. 1 Loosen the screws in the battery compartment door and remove the door. 4 “Snap” the mobile arm into the socket in the soother. 1 2 2 Fit the mobile canopy into the opening in the soother 1 , then slide the mobile canopy until you hear a "click" 2 .