G5912 Product features and decorations may vary from picture above. WARNING IMPORTANT! KEEP INSTRUCTIONS FOR FUTURE REFERENCE. Please read these instructions before assembly and use of this product. Adult assembly is required. Tool needed for battery installation: Phillips Screwdriver (not included). Requires four LR14 alkaline batteries for operation (not included). Weight Limit: 9 kg (20 lbs). fi www. e.
Warning and Caution Consumer Information Mattel UK Ltd, Vanwall Business Park, Maidenhead SL6 4UB. Helpline: 01628 500302. WARNING To prevent serious injury or death from falls and being strangled in the restraint system: - Always use the restraint system. - Not recommended for children who can sit up by themselves (6 months approximately, until 9 kg, 20 lbs). • Never leave child unattended. • It is dangerous to use this product on an elevated surface. AUSTRALIA Mattel Australia Pty. Ltd.
Parts Pad Seat Back Tube Frame Lower Swing Arm Assembly (with Restraint System) 3 Link Toys Front Tube 2 Frame Tubes #6 x 1.9 cm Screws - 4 NOTE: Tighten and loosen all screws with a Phillips screwdriver. Do not over-tighten the screws.
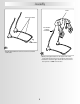
Assembly IMPORTANT! Before assembly, inspect this product for damaged hardware, loose joints, missing parts or sharp edges. DO NOT use if any parts are missing or broken. Contact Mattel for replacement parts and instructions if needed. Never substitute parts. Press Button on Front Tube Press Button on Lower Frame Tube 1 Upper Frame Tube 2 • Rotate the upper frame tube until it "snaps" into an upright position, as shown.
Assembly Frame Lower Frame Tubes Press Button on Upper Frame Tube Pull Front Tube 3 • Pull the front tube to be sure it is secure to each lower frame tube. 4 • While pressing the buttons on the upper frame tubes, insert them into the holes in the underside of the frame. • Continue to insert the upper frame tubes into the frame until you hear a "click" on both sides.
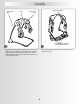
Assembly Upper Frame Tube Frame Upper Swing Arms Upper Frame Tube Lower Swing Arm Assembly (with Restraint System) 5 6 • Fit the lower swing arm assembly to the outer side of the upper swing arms. • Check to be sure the upper frame tubes are secure in the frame. If you can remove the upper frame tubes from the frame, you have not properly inserted the tubes into the frame. Remove the upper frame tubes from the frame and repeat Assembly step 4.
Assembly Seat Back Tube Buttons #6 x 1.9 cm Screws - 4 7 Shown Actual Size • Insert two #6 x 1.9 cm screws through the upper swing arm and into the lower swing arm. Tighten the screws. 8 Swing Arm Short Tubes • Position the seat back tube so that it curves toward the back of the swing. • While pressing the buttons on the seat back tube, fit the seat back tube into the short tubes on the swing arms. • Push the seat back tube until it “clicks” into place.
Assembly Pad Top Pocket Slot Slot Pad Lower Pocket Fastener Waist Belts 9 Seat Back Tube Seat Bottom Tube • Fit the top pocket on the pad over the seat back tube . • Lift the seat bottom tube and fit the lower pocket on the pad over the seat bottom tube . 10 • From behind the seat, insert the waist belts into the slots in the pad. • Push to fasten the restraint system to the pad. Assembly is now complete.
Battery Installation Hint: We recommend using alkaline batteries for longer battery life. 1.5V x 4 LR14 SHOWN ACTUAL SIZE Battery Holder 2 Battery Compartment Door • Open the battery holder. • Insert four LR14 alkaline batteries as indicated inside the battery holder. • Close the battery holder. 1 Battery Holder • Locate the battery compartment door on the frame. • Loosen the screws in the battery compartment door.
Battery Safety Information Set-Up & Use Batteries may leak fluids that can cause a chemical burn injury or ruin your product. To avoid battery leakage: • Do not mix old and new batteries or batteries of different types: alkaline, standard (carbon-zinc) or rechargeable (nickel-cadmium). • Insert batteries as indicated inside the battery compartment. • Remove batteries during long periods of non-use. Always remove exhausted batteries from the product. Dispose of batteries safely.
Set-Up & Use Securing Your Child Anchored End Restraint Waist Belt Free End Tighten Anchored End Free End 2 Loosen To tighten the restraint straps: • Feed the anchored end of the restraint strap up through the buckle to form a loop . Pull the free end of the restraint strap . Waist Belt To loosen the restraint straps: • Feed the free end of the restraint strap up through the buckle to form a loop . Enlarge the loop by pulling on the end of the loop toward the buckle.
Set-Up & Use Power Dial Starting the Swing Power Dial • Turn the power dial to any of eight settings. • Give the seat a light push to start the swinging motion. Adjust the swing power dial to the desired swing motion setting. Hint: As with most battery-powered swings, a heavier child will reduce the amount of swinging motion on all settings. In most cases, the low setting works best for a smaller child while the high setting works best for a larger child.
Set-Up & Use Hint: Your baby can enjoy lights and music with or without swinging. Baby Activated Lights and Music Switch Parent Activated Volume Dial Lights and Music Switch • Slide the lights and music switch to: When baby pulls either toy on the arch, one tune plays along with twinkling lights. On this setting, six tunes (approximately 10 minutes) play along with dancing lights. On this setting, music plays for about 10 minutes. Turns lights and music off.
Set-Up & Use Room-to-Room Portability WARNING • To prevent serious injury or death from falls and being strangled in the restraint system, always use the restraint system. • It is dangerous to use this product on an elevated surface. 3 Link Toys • Fit the link toys to either of the hanging toys on the swing. • Make sure your child is properly secured in the swing seat. • With baby facing forward and outward, lift the swing using the handle. • Carefully carry the swing to another room.
Take Along Lift Seat Back Lift Seat Bottom Seat Back Press Tabs 2 1 • Tip the swing backwards with the seat back down. • Press both tabs on the frame at the same time to release the frame base. • Lift the seat back and seat bottom together.
Take Along Lower Frame Tube Care • The frame, pad, liner and toys may be wiped clean using a mild cleaning solution and a damp cloth. Do not immerse the frame. • This product has no consumer serviceable parts. Do not take this product apart. IMPORTANT! Never use this product without the provided pad. 3 • Rotate the lower frame tube around to the top of frame, as shown. To set the swing back up for use: • Rotate the lower frame tube around until it snaps into place.