V8606 www.fisher-price.
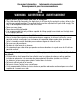
Consumer Information Información al consumidor Renseignements pour les consommateurs WARNING ADVERTENCIA AVERTISSEMENT Prevent serious injury or death from falls or sliding out: • The child should be secured in the high chair at all times by the restraint system, either in the reclining or upright position. The restraint belts must be adjusted to fit your child snugly. The tray is not designed to hold the child in the chair. • Never use near steps. • Never leave child unattended.
Consumer Information Información al consumidor Renseignements pour les consommateurs IMPORTANT! Please keep these instructions for future reference, as they contain important information. • Please read these instructions before assembly and use of this product. • Adult assembly is required. • Tool needed for assembly: Phillips screwdriver (not included). • Product features and decorations may vary from photographs. CAUTION PRECAUCIÓN MISE EN GARDE This package contains small parts in its unassembled state.
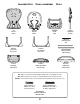
Assembled Parts Piezas ensambladas Pièces Pad Seat Back Seat Bottom 2 Frames Colchón Respaldo Asiento 2 armazones Coussin Dossier Siège 2 cadres Hinge Rod Varilla de bisagra Tige Back Base Front Base Base trasera Base delantera Base arrière Base avant 2 Seat Bottom Tubes 2 tubos del asiento 2 tubes du siège Footrest Food Tray Base Tray Reposapiés Bandeja de alimentos Bandeja base Repose-pieds Plateau à repas Plateau de base Note: Tighten or loosen all screws with a Phillips s
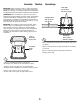
Assembly Montaje Assemblage Plastic Rings Aros de plástico Anneaux en plastique IMPORTANT! Before assembly and each use, inspect this product for damaged hardware, loose joints, missing parts or sharp edges. DO NOT use if any parts are missing or broken. Contact Fisher-Price® for replacement parts and instructions if needed. Never substitute parts. ¡IMPORTANTE! Antes del montaje y de cada uso, revisar que el producto no tenga piezas dañadas, conexiones sueltas, piezas faltantes o bordes filosos.
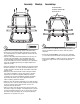
Assembly Montaje Assemblage Insert Screws Here Insertar los tornillos aquí Insérer les vis ici 4 3 • Insert two #10 x 2,2 cm black screws through the footrest and into the seat bottom. Tighten the screws. This may require extra force. • Align the holes in the plastic rings and the seat bottom tubes. • Insert a #8 x 1,9 cm screw through each plastic ring and into the seat bottom tubes, as shown. Tighten the screws. This may require extra force.
Assembly Montaje Assemblage Seat Back Pins Clavijas del respaldo del asiento Chevilles du dossier Hinge Bisagra Charnière Hinge Rod Varilla de bisagra Tige Slot Slot Ranura Ranura Fente Fente 6 Seat Bottom Assembly Unidad del asiento • Turn the seat assembly face down. • Insert the hinge rod through the hinge on the seat back and seat bottom, as shown. • Insert a #10 x 2,2 cm black screw into the hinge rod. Tighten the screw. • Set the seat assembly aside for Assembly step 9.
Assembly Montaje Assemblage • Jalar hacia afuera la pata del armazón en cada armazón para abrirlas. Asegurarse de que haga clic. • Colocar un armazón de modo que el lado decorado quede hacia afuera. • Ajustar el extremo de una base en la pata trasera de un armazón. • Ajustar un retenedor de tornillo sobre el orificio de la pata trasera, tal como se muestra. • Insertar un tornillo negro n° 10 x 2,2 cm en el retenedor y pata trasera. Apretar el tornillo.
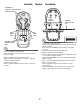
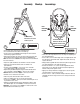
Assembly Montaje Assemblage Seat Assembly Unidad del asiento Siège Seat Height Adjusters Reguladores de altura de la silla Manettes de réglage de la hauteur du siège Position 4 Sockets Sockets Conexiones Conexiones Cavités Cavités Posición 4 Position 4 Press Lever 8 Presionar la palanca Seat Bottom Tubes Appuyer sur le levier Tubos del asiento 9 • While pressing the levers on the seat height adjusters, lift them to position 4 on the frame front legs, as shown.
Assembly Montaje Assemblage PUSH PUSH PRESIONAR PRESIONAR POUSSER POUSSER Screw Retainers Retenedores de tornillo Base Seat Bottom Tube Ends Fixations pour vis Base Extremos del tubo del asiento Base Extrémités du tube du siège 10 • Fit the frame front legs onto the remaining base. • Fit a screw retainer over a hole in the front leg. • Insert a #10 x 2,2 cm black screw through the screw retainer and front leg. Tighten the screw.
Assembly Montaje Assemblage Seat Height Adjuster Pad Regulador de altura del asiento Almohadilla Manette de réglage de la hauteur du siège Coussin Elastic Loops Aros elásticos Boucles élastiques Hole Hole Orificio Orificio Trou Trou FRONT VIEW VISTA ANTERIOR VUE DE L’AVANT Tabs Seat Bottom Tube Ends Lengüetas Extremos del tubo del asiento 12 Pattes Extrémités du tube du siège • Push each seat height adjuster to be sure they are completely on the seat bottom tubes.
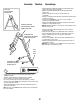
Assembly Montaje Assemblage Shoulder Portion Parte de los hombros Bretelle Slot Ranura Fente Crotch Belt Cinturón de la entrepierna Courroie d’entrejambe 15 14 • Insert the crotch belt through the slot in the pad. Make sure the crotch belt is not twisted. • Fold the top of the pad down. • Remove the shoulder portion of the waist/shoulder belts by feeding them through the slots in the seat back. • Introducir el cinturón de la entrepierna en la ranura de la almohadilla.
Assembly Montaje Assemblage Upper Shoulder Belt Slots Ranuras superiores del cinturón de hombro Fentes supérieures des courroies d’épaule Shoulder Portion Parte del hombro Bretelle Bottom Slots Ranuras inferiores Fentes inférieures 16 • Lift the top of the pad. • Thread the waist/shoulder belts through the bottom slots in the back of the seat pad. Lower Shoulder Belt Slots Ranuras inferiores del cinturón de hombro • Levantar la parte de arriba de la almohadilla.
Assembly Montaje Assemblage Secure Child Sistema de sujeción Comment installer l’enfant Elastic Loops Aros elásticos WARNING ADVERTENCIA AVERTISSEMENT Boucles élastiques Prevent serious injury or death from falls or sliding out: The child should be secured in the high chair at all times by the restraint system, either in the reclining or upright position. The restraint belts must be adjusted to fit your child snugly. The tray is not designed to hold the child in the chair.
Secure Child Sistema de sujeción Waist/Shoulder Belt Waist/Shoulder Belt Cinturón de la cintura/hombros Cinturón de la cintura/hombros Courroie abdominale/d’épaule Courroie abdominale/d’épaule Comment installer l’enfant 2 • Tighten each waist belt and shoulder belt so that the restraint system is snug against your child. Please refer to the next section for instructions to tighten the waist belts.
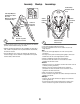
Secure Child Sistema de sujeción Anchored End Anchored End Extremo fijo Extremo fijo Extrémité fixe Extrémité fixe Extremo libre Extremo libre Extrémité libre Extrémité libre 3 Para apretar los cinturones de la cintura: • Introducir el extremo fijo del cinturón en la hebilla para formar un gancho A. • Jalar el extremo libre del cinturón de la cintura B. • Repetir este procedimiento para apretar el otro cinturón de la cintura.
Secure Child Sistema de sujeción Comment installer l’enfant Hold Adjuster Sujetar ajustador Tenir le régleur 4 Pull Down Strap Slide Adjuster Down Jalar cinturón hacia abajo Deslizar el ajustador hacia abajo Tirer sur la courroie Glisser le régleur vers le bas TIGHTEN LOOSEN APRETAR AFLOJAR SERRER DESSERRER 5 To change shoulder belt slots: • From the back of the high chair, push the shoulder portion of the waist/shoulder belts through the seat back slots.
Secure Child Sistema de sujeción Comment installer l’enfant Using the Trays Uso de las bandejas Utilisation des plateaux Shoulder Portion Parte de hombros WARNING ADVERTENCIA AVERTISSEMENT Bretelle Prevent serious injury or death from falls or sliding out: The child should be secured in the high chair at all times by the restraint system, either in the reclining or upright position. The restraint belts must be adjusted to fit your child snugly. The tray is not designed to hold the child in the chair.
Using the Trays Uso de las bandejas Utilisation des plateaux Base Tray Bandeja base Plateau de base Armrest Reposabrazo Accoudoir Armrest Reposabrazo Accoudoir Tab Lengüeta Patte 8 Slot Ranura Fente • While pushing the release bar on the front of the base tray, adjust the base tray forward or backward. • Mientras empuja la barra de sujeción del frente de la bandeja base, ajustar la bandeja base hacia adelante o atrás.
Using the Trays Uso de las bandejas Utilisation des plateaux Food Tray Bandeja de alimentos Plateau à repas Base Tray Bandeja base Plateau de base 9 10 • While pushing the release bar on the front of the base tray, pull the tray base towards you and remove. • Fit the food tray into the base tray, as shown. Hint: Before use, thoroughly wash all parts (the trays) that may contact food. The food tray is not microwave safe.
Adjusting the Seat Ajustar el asiento Réglage de la chaise haute Hint: Adjust the seat angle to any of three positions: Upright, Semi-Recline or Recline. WARNING ADVERTENCIA AVERTISSEMENT Atención: Ajustar el ángulo de la silla en una de tres posiciones: vertical, semi-reclinado o reclinado. Remarque : Régler l’inclinaison du dossier à l’une des trois positions : redressée, semi-inclinée ou inclinée.
Adjusting the Seat Ajustar el asiento Réglage de la chaise haute Storage Hint: Adjust the seat height to any of seven positions! Almacenamiento Rangement Pull Frame Release Latch Jalar el seguro del armazón Verrou de déblocage du cadre Atención: Ajustar la altura de la silla en una de siete posiciones.
Care Mantenimiento • The restraint system, frame, trays and tray toys may be wiped clean using a mild cleaning solution and a damp cloth. • The food tray is also top rack dishwasher safe (or use bottom rack - without using the drying cycle). • The pad is machine washable. Wash in cold water on the gentle cycle. Do not use bleach. Tumble dry separately on low heat and remove promptly. To remove the pad: • Remove the elastic loops from the tabs on the underside and back of the seat.
CONSUMER ASSISTANCE AYUDA AL CONSUMIDOR SERVICE À LA CLIENTÈLE 1-800-432-5437 (US & Canada) Fisher-Price, Inc., 636 Girard Avenue, East Aurora, NY 14052. Hearing-impaired consumers/Clientes con problemas auditivos/ Pour les malentendants : 1-800-382-7470. En México: 59-05-51-00 Ext. 5205 ó 01-800-463-59-89 CANADA Mattel Canada Inc., 6155 Freemont Blvd., Mississauga, Ontario L5R 3W2; www.service.mattel.com. MÉXICO Importado y distribuido por Mattel de México, S.A. de C.V.