® Fisher-Price Instructions Backyard Treehouse ™ Model Number: 75972 If you experience a problem with this product, or are missing a part, please call us at 1-800-432-KIDS, rather than return this product to the store. Please save these instructions for future reference. Adult assembly is required. No tools needed for assembly. Weight Limit: 300 lbs. The Fisher-Price® Backyard Treehouse™ is designed to easily attach to other Fisher-Price ® outdoor playsets equipped with a connecting feature.
WARNING Falls onto hard surfaces could result in head or other serious injuries. Never put on concrete, asphalt, wood, packed earth or any other hard surface. Carpet over hard floors may not prevent injury. CAUTION Please keep small parts and plastic bags out of children’s reach. Dispose of plastic bags properly. Important Safety Information • Do not climb on the Backyard Treehouse™ until it has been properly assembled by an adult. • Only five children should use the Backyard Treehouse™ at one time.
Placement and Play Area Surfacing Before assembling this product, select and prepare a play area. Select a Play Area Select an area on level ground at least 6 feet from any structure or obstruction such as a fence, garage, house, overhanging branches, washing lines or electrical lines. Prepare a Surface Following are guidelines from the Consumer Product Safety Commission’s Handbook for Public Playground Safety to minimize injuries that can result from falls.
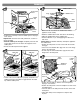
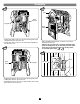
Parts If you experience a problem with this product, or are missing a part, please call us at 1-800-432-KIDS, rather than return this product to the store. Left Roof Right Roof Tree Top Shutter- 2 Fish e r-Pri c e ® Ladder Panel Table Top Back Panel Front Trunk Panel Ramp Safe Door Mailbox Door Not Shown: Vinyl Label - 2 Box of Chalk Platform Wall Panel Phone • Please save all packaging material until assembly is complete to ensure that no parts are discarded.
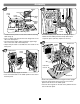
Assembly Upper Peg Chalkboard Safe Door Front Trunk Panel Front Trunk Panel Ladder Panel Lower Peg Lower Hinge Hole Slots Upper Hinge Hole • Position the front trunk panel on a flat surface with the inside facing up. Helpful Hint: The safe door may be difficult to attach to the front trunk panel. Place a cloth under the front trunk panel to protect the surface. Apply a small amount of liquid soap to the pegs on the safe door. • Position the safe door with the dial facing up.
Assembly Mailbox Label Front Trunk Panel Mailbox Door Pegs Hinge Holes Table Top Wall Panel Supports Tab Ladder Panel • Make sure the area where the mailbox label will be applied is clean and dry. • Bend the mailbox label in half and remove the backing. • Apply the mailbox label to the mailbox door. • For best adhesion, try to avoid applying the label more than once. Please Note: The mailbox label may already be applied to the mailbox door.
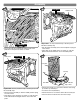
Assembly Shutter Back Panel Lower Peg Lower Hinge Hole Upper Peg Upper Hinge Hole Warning Label • Position the back panel on a flat surface with the warning label facing up. • Insert a shutter lower peg into the lower hinge hole on one side of the back panel. • Fit and snap the shutter upper peg into the upper hinge hole on the same side of the back panel. • Repeat this procedure to assemble the other shutter to the back panel.
Assembly Push Here Ladder Panel Long Tab Hooked Tab Hooked Tab Top View • Insert and snap the hooked tabs and long tab on the platform into the panel assembl, as shown. Wall Panel Helpful Hint: You may need the help of another person with this assembly step. • Turn the panel assembly so that the wall panel is laying on a flat surface. • Push down on the ladder panel, as shown, to snap the platform hooked tab into the slot in the ladder panel.
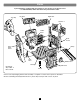
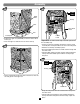
Assembly Push Here Right Roof Treetop Pull Here Tabs Front Trunk Panel Slot Treetop Ladder Panel • Position the right roof (labeled R) so that the flatter side is toward you. • Insert the right roof tabs into the slot in the treetop. Helpful Hint: You will need the help of another person with this assembly step. • Lift the roof/treetop assembly and lower it onto the panel assembly. The treetop should be over the front trunk panel. • Hold the roof/treetop assembly in place.
Assembly Push Here Roof Back Panel Long Tab Back Panel • Firmly push down on the roof to insert the long tab on the wall panel into the slot in the roof. • Firmly push down on the roof to snap the back panel into the slot in the roof. • Push and pull the back panel, as shown to secure the back panel in the roof. • Check to be sure the roof is securely attached to the panel assembly. Push up on the roof on all four sides. If the roof can be removed from one of the panels, re-read and repeat steps .
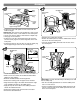
Connecting Maintenance Helpful Hint: There are two connecting areas to attach the ramp to the Backyard Treehouse™. You can connect the ramp to either of these areas and switch it whenever you like! You can also attach other Fisher-Price® outdoor playsets to these two areas on the Backyard Treehouse™. If the Fisher-Price® outdoor playset is equipped with a slide or walkway use the instructions below to attach it to the Backyard Treehouse™.
Fisher-Price knows . . . . little kids become big kids. E veryone knows little kids don’t stay that way for long. They grow out of things every day and into something else. But a backyard playset is one thing that needs to hold your child’s interest for more than a season. To make sure ours will be enjoyed for a long time, we’ve given them special features that make them toddler friendly as well as challenging for preschoolers.