V4340 www.fisher-price.com.
IMPORTANT! DANGER To prevent electric shock, do not immerse in water; wipe clean with damp cloth. WARNING To prevent strangulation with power cord, never place transmitter within reach of child. CAUTION This product cannot replace responsible adult supervision.
Consumer Information • For proper setup and use, please read these instructions. • Please keep this instruction sheet for future reference, as it contains important information. • Transmitter operates on AC current (use enclosed AC adaptor). • Receiver operates on AC current (use enclosed AC adaptors) or DC current (three “AAA” LR03 alkaline batteries, not included). • Adult assembly is required. • Tool needed for receiver battery installation: Phillips screwdriver (not included).
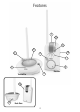
Features 7 8 9 2 1 10 6 11 5 4 3 Transmitter 13 12 Back View 4 Receiver
Features 1 Power Button 2 Nightlight – press to turn on a soft glow. 3 Channel Switch 4 Microphone 5 Power/Volume Dial 6 Power L.E.D. 7 Sound Lights (on front and back of receiver) – watch the light to see baby’s sounds. 8 Range Indicator – flashing light indicates the receiver is out of range. 9 Low Battery Indicator – flashing light indicates batteries need to be replaced or use the AC adaptor.
Assembly Antenna Antenna • Fit each antenna into the socket in the receiver and the transmitter. Turn the antennas to secure in place. IMPORTANT! This product is designed to operate properly with the antennas provided. To reduce the chance of potential radio interference to other users, assemble and use only the antennas provided. Care • Excess dirt in the transmitter microphone will hamper transmission of sound.
Receiver Battery Installation (Optional) 1,5V x 3 “AAA” (LR03) • Locate the battery compartment door on the back of the receiver. • Loosen the screw in the battery compartment door with a Phillips screwdriver. Remove the battery compartment door. • Insert three “AAA” (LR03) alkaline batteries into the battery compartment. Hint: We recommend using alkaline batteries for longer battery life. • Replace the battery compartment door. Tighten the screw with a Phillips screwdriver. Do not over-tighten.
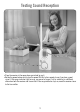
Testing Sound Reception Test transmitter and receiver reception each time you change location of use. Power Button • Place the transmitter in the room where you intend to use it. • Press the transmitter power button to turn the power ON (the button lights up). • Set the transmitter channel switch to the same channel as the receiver. Turn on a radio.
Testing Sound Reception Range Indicator Power/Volume Dial • Place the receiver in the room where you intend to use it. • Rotate the power/volume dial to turn the power ON. Wait a few seconds to see if you have a good signal. If the range indicator light turns on, you are out of range. First try switching to a different channel on both the receiver and transmitter. If the range indicator stays on, move the receiver closer to the transmitter.
Setup Night Light Timer Switch (Back Side of Transmitter) Power Button Channel Switch Night Light Button Channel Switch • Set the transmitter channel switch to the same channel as the receiver. • Place the transmitter in the same room with child. Point the microphone towards the crib/cot or play area. • Unwrap and fully extend the AC adaptor for best transmission. Insert the AC adaptor pin into the DC input jack on the transmitter and plug the power cord into a standard wall outlet.
Setup • Place the receiver where you can see and hear it. • Unwrap and fully extend the AC adaptor cord for best reception. Insert the AC adaptor pin into the DC input jack on the receiver and plug into a standard wall outlet. Note: To use battery power, refer to the Receiver Battery Installation section. • Turn the power/volume dial up to turn the power ON. The power light will light up. Adjust the volume as needed.
Problems & Solutions Problem Transmitter range indicator light flashes Solution Receiver is out of range of transmitter. Move receiver closer to transmitter. Note: Range varies depending on surrounding conditions such as noise levels, physical obstructions and signal interference. Transmitter power is off. Turn transmitter power on. Channel switches are on different channels. Make sure channel switches on both transmitter and receiver are set to same channel.