INSTRUCTION MANUAL AVL3211 32” * LCD High-definition Colour TV and Computer Monitor * Diagonal measure For best TV picture quality and channel selection connect to a digital cable or satellite receiver Help Line: 1-800-263-2244 Monday to Friday 9am-5pm (Eastern) www.sanyo.ca 604.L32HUK19-01 Ver. 1.
Important Information .........................................................................................................................................................1 Important Safety Precautions .............................................................................................................................................2 Preparations ......................................................................................................................................................
Important Information WARNING: TO REDUCE THE RISK OF FIRE OR ELECTRIC SHOCK, DO NOT EXPOSE THIS APPARATUS TO RAIN OR MOISTURE. The lightning flash with arrowhead symbol, within an equilateral triangle is intended to alert the user to the presence of uninsulated dangerous voltage within the product's enclosure that may be of sufficient magnitude to constitute a risk of electric shock to persons.
Important Safety Precautions Electrical energy can perform many useful functions, but it can also cause personal injuries and property damage if improperly handled. This product has been engineered and manufactured with the highest priority on safety. But IMPROPER USE CAN RESULT IN POTENTIAL ELECTRICAL SHOCK OR FIRE HAZARD. In order to prevent potential danger, please observe the following instructions when installing, operating and cleaning the product.
Important Safety Precautions (continued) 12. Stand---Use only with the cart, stand, tripod, bracket, or table specified by the manufacturer, or sold with the apparatus. Do not place the product on an unstable trolley, stand, tripod or table. Placing the product on an unstable base can cause the product to fall, resulting in serious personal injuries as well as damage to the product. When mounting the product on a wall, be sure to follow the manufacturer’s instructions.
Important Safety Precautions (continued) 22. Power source---This product is intended to be supplied by a listed power supply indicated on the marking label. If you are not sure of the type of power supply to your home, consult your product dealer or local power company. For added protection for this product during a lightning storm, or when it is left unattended and unused for long periods of time, unplug it from the wall outlet and disconnect the cable system.
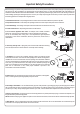
Preparations Using the Remote Control < Use the remote control by pointing it towards the remote sensor window of the set. Objects between the remote control and sensor window may prevent proper operation. Note: This illustration is for reference only. The remote sensor may be in different locations on different models. 30 Cautions regarding use of remote control 30 5m < Do not expose the remote control to shock.
Preparations (continued) Antenna Connection CABLE TV (CATV) CONNECTION A 75-ohm coaxial cable connector is built into the set for easy hookup. When connecting the 75- ohm coaxial cable to the set, screw the 75ohm cable to the ANT. Terminal. Some cable TV companies offer “premium pay channels”. Since the signals of these premium pay channels are scrambled, a cable TV converter/descrambler is generally provided to the subscriber by the cable TV company.
Identification of Controls Main Mainunit Unit(front (frontview) view) CH+ CH- Channel Up/Down VOL+ VOL- Volume Up/Down MENU Power Button MENU INPUT Power Indicator Select Input Source Signal Remote Sensor POWER Press this button to turn the unit ON from STANDBY mode. Press it again to turn the set back to STANDBY. SOURCE To access signal source select menu MENU Press this button to access the Menu main page.
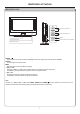
Identification of Controls (continued) Main Unit (rear view) HDMI 1 HDMI 2 HDMI 3 VGA PIC S- VIDEO RF HDMI 2 AV OUT RS-232 HDMI 1 HDMI 3 VGA PIC AV OUT RS-232 S- VIDEO RF HDMI interface 1/2/3 VGA input/Audio in Connect to the VGA /audio output sockets on your PC. COM port For service only. The user cannot operate the unit through the COM port. Component input Connect to the component and audio output sockets of a DVD player or Set-Top Box.
Identification of Controls (continued) Remote Control 1. POWER Turn the unit on or off 2. SOURCE To access source select menu 3. ADJUST To rectify the picture automatically in PC mode 4. MUTE To temporarily mute the sound 5.
Connections Cautions before connecting Carefully check the terminals for position and type before making any connections. The illustration of the external equipment may be different depending on your model. Loose connectors can result in image or colour problems. Make sure that all connectors are securely inserted into their terminals. Refer to the operating manual of the external device as well. When connecting an external device, turn the power off to avoid any issues.
Connections (continued) Connect a Camcorder OUT R AUDIO L IN VIDEO How to connect: Connect the Audio/Video cables between the Audio (L/R)/Video jacks on the unit and camcorder. To playback Camcorder 1. Turn on your TV , press SOURCE button on the remote control. 2. Press 5 or6 repeatedly to select AV2, and press3 or4 to confirm. 3. Turn on your camcorder and set it to output mode. (For details, refer to your camcorder user manual.) 4. Insert the tape into the camcorder and press Play button.
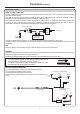
Connections (continued) Connect a DVD player or Set-Top Box Video cable Audio cable Cables are often color-coded to connectors. Connect red to red, white to white, etc. DVD player, STB, etc. AUDIO COMPONENT Pr L AUDIO R AV OUT R AUDIO L VIDEO Pb Y DVI S - VIDEO Rear of the DVD, STB How to connect a DVD Player using Component Video Connections: Connect the Video cable between the Y, Cb/Pb, Cr/Pr input jacks on the unit and Y, Pb, Pr output jacks on the DVD player.
Connections (continued) HDMI OUTPUT Connect a HDMI device HDMI cable Device with HDMI jack How to connect: Connect the HDMI cable between the HDMI input jack on the unit and HDMI output jack on the device. Note: If the external device has DVI output only, use a DVI to HDMI adapter cable to connect to the HDMI jack. Connect the audio cable to the VGA AUDIO IN jack on the TV rear. SOURCE To Play the Device 1. Turn on your TV , press SOURCE button on the remote control. 2.
Connections (continued) Connect a VCR (for recording) or external amplifier Video cable Audio cable Audio cable Cables are often color-coded to connectors. Connect red to red, white to white, etc. VCR for recording To Audio inputs ANT OUT AV OUT VIDEO L AUDIO R ANT IN AV IN VIDEO External Amplifier L AUDIO R Rear of the VCR How to connect: Connect the Audio/Video cables between the Audio (L/R)/Video jacks on the unit and VCR.
Basic Operations Turning the Unit On and Off Turning On Insert the power cord into the wall outlet. Press the Power button on the remote control, the unit will be turned on and you will be ready to use its features. Turning Off With the power on, press the Power button on the remote control to turn off the unit. Note: You can also use the Power button on the Control panel on the main unit. After you turn off the television, you should wait for some seconds to turn the television on again.
Basic Operations (continued) Changing Channels Using the Channel Buttons (CH+ or CH-) Press the CH+ or CH- to change channels. When you press the CH+ or CH-, the unit changes channels in sequence. You will see all the channels that the unit has memorized. You will not see channels that were skipped. Direct Accessing Channels Press the number buttons to go directly to a channel.
Memorizing the Channels Your TV can memorize and store all of the available channels. After the available channels are memorized, use CH+/- to scan through the channels. Selecting the TV Source Before you start AUTO SCAN, it is necessary to specify the type of signal source that is connect to the unit.(i.e., an antenna or cable system). 1 2 3 4 Press MENU to display the menu main page. TV - CHANNEL Press 3 or4 repeatedly to select TV-CHANNEL menu, and press6 to access.
Setting Picture Customizing the Picture 1 2 3 Press MENU to display the PICTURE menu , and press 6 to access. PICTURE CONTRAST BRIGHTNESS TINT SATURATION SHARPNESS COLOR TONE SCALE PICTURE MODE 3D NR :SEL Within the menu, use 5 ,6 ,3 or 4 to navigate or adjust. Press MENU button repeatedly to exit. Notes: The PICTURE MENU is shown as an example. The menu options may be different when the unit works in different mode.
Setting Sound Adjusting the Volume Using the volume buttons (VOL+ and VOL-) Press the VOL + or VOL- to increase or decrease the volume. Using the MUTE button At any time, you can temporarily cut off the sound using the MUTE button. 1 2 Press the MUTE button and the sound cuts off. To turn mute off, press the MUTE button again. Customizing the Sound 1 2 3 4 Press MENU to display the menu main page. Press 3 or4 repeatedly to select SOUND menu, and press 6 to access.
Setting Timer and System Setting Clock Time Making use of this function can set the current time for the TV. 1 2 Press MENU to display the menu main page. 3 Use 0-9 number buttons to input the current time. 4 Press MENU button repeatedly to exit. FUNCTION Press 3 or4 repeatedly to select FUNCTION menu, and Press 6 to access. Then the [ CLOCK ] item will be highlighted automatically.
Setting Timer and System (continued) Setting Sleep Timer Making use of this function allows you to have the set automatically turn off after a preset time. 1 2 3 4 5 Press MENU to display the menu main page. Press 3 or4 repeatedly to select FUNCTION menu, and press6 to access. Press 5 or6 repeatedly to select SLEEP TIMER item. Use3 or4 to select the amount of time; to turn off the timer, please select OFF . Press MENU button repeatedly to exit.
Viewing Closed Captions This TV has the capability to decode and display Closed Captioned television programs. Closed Caption will display text on the screen for hearing impaired viewers or it will translate and display text in another language. Note: The caption feature only works in TV, AV1,AV2 and SVIDEO modes. Not all the programs and videos will offer closed captioning. Setting Closed Caption 1 2 3 Press MENU to display the menu main page. 4 or4 Press 3 to select a desired option.
Setting Parental Control Parental Control This function allows TV programs to be restricted and TV usage to be controlled based on FCC data. It prevents children from watching violent or sexual scenes that may be harmful. Restriction of TV programs includes two ratings that contain information about the program: the MPAA rating and the TV Parental Guidelines. The MPAA rating is restricted by age. TV Parental Guidelines are restricted by age and content.
Setting Parental Control (continued) [2] TV Rating Rating content based V D FV L S TV-Y (All children) TV-Y7 (Direct to Older Children) age based TV-G (General Audience) TV-PG (Parental Guidance Suggested) TV-14 (Parents Strongly Cautioned) TV-MA (Mature Audience Only) Content Rating can be set but this Rating is not normally broadcast by TV Station. Content Rating can be set.
Setting Parental Control (continued) The Parental Control function enables parents to prevent their children from watching inappropriate programs on TV. To use Parental Control function, you first need to set your password. Password Setup 1 2 3 4 5 6 7 Press MENU to display the menu main page. Press 3 or4 repeatedly to select FUNCTION menu, and press6 to access. Use 5 or6 repeatedly to select PARENT CONTROL item, and then press3 or 4 to access. Now a password is required to input.
Setting Parental Control (continued) Canadian English Rating Setup 1 2 Input password to navigate to PARENT CONTROL sub-menu, press 5 or6 to highlight the ENGLISH-RATING item. Use3 or4 to select a desired rating that you would like to set.
Adjusting On-Screen Display Adjusting OSD Position 1 2 3 4 Press MENU to display the menu main page. Press 3 or4 repeatedly to select OSD menu, and press6 to access. Press 5 or 6 repeatedly to select OSD H-POSITION or OSD V-POSITION. OSD OSD OSD OSD OSD OSD LANGUAGE H-POSITION V-POSITION HALFTONE DURATION ENGLISH 50 44 50 15 SECONDS Press 3 or 4 to adjust the OSD position. :SEL :ADJ MENU:EXIT Adjusting OSD Halftone 1 2 3 4 Press MENU to display the menu main page.
Adjustment in PC (VGA)/YPBPR Mode Adjusting the Picture 1 2 Press MENU to display the PICTURE menu , and press 6 to access. 3 Press MENU button repeatedly to exit. Within the menu, use 5 ,6 ,3 or 4 to navigate or adjust. Option Function Picture Mode Selects picture mode. Contrast Adjusts image contrast. Choice/Remarks Brightness Color Mode Selects one of three automatic color adjustments.
Troubleshooting Before calling for repair service, check the following items for possible remedies to an encountered symptom. Symptoms Check item = Check that the No power AC power cord is plugged into the mains socket. = Unplug the power cord, wait for 60 seconds. Then re-insert plug into the mains socket and turn on the unit again. = Check video connections at the rear of the unit to see if it is properly connected to the unit. No picture = Adjust the contrast and brightness settings.
Care and Maintenance LCD Display panel information Important Information Regarding Use of Video Games, Computers, Captions or Other Fixed Image Displays. The extended use of fixed image program material can cause a permanent "shadow image" on the LCD panel. This background image is viewable on normal programs in the form of a stationary fixed image. This type of irreversible LCD panel deterioration can be limited by observing the following steps: A.
Specifications 31
SANYO COMFORT WARRANTY WARRANTY APPLICATION New, unused Sanyo Color Television products purchased in Canada through a Sanyo authorized dealer are warranted against manufacturing defects in materials and workmanship for ONE YEAR for parts and labor, from the date of purchase by the original retail purchaser for non-commercial use. This warranty only applies in favor of the original retail purchaser of the warranted product. SANYO CANADA INC.'S RESPONSIBILITY During the warranty period, SANYO Canada Inc.