Gold Bug Prospector’s Metal Detector Operating Manual FISHER RESEARCH LABORATORY
CONTENTS About Your Gold Bug ............................................................. pg. 1 Setting Up................................................................................. pg. 4 Hipmounting ............................................................................ pg. 6 Control Functions .................................................................... pg. 7 Operating Modes ................................................................... pg. 9 Turn On Procedure .....................
ABOUT YOUR DETECTOR The Fisher Gold Bug was conceived, designed, engineered and manufactured for one purpose: to find gold nuggets. And it's done just that for thousands of week-end and professional prospectors. So, if you're after gold, you've got the right detector. Here's why... Gold Sensitivity: Just about any metal detector will sound off over a large nugget. The problem is, most nuggets are small. The Gold Bug will respond solidly to nuggets not much bigger than the head of a pin.
ABOUT YOUR DETECTOR There's no reason why you can't use your Gold Bug for "coin shooting" in parks, relic hunting in ghost towns or on the beach. True, the Gold Bug was designed for prospecting, but if you're willing to dig up some junk with the good stuff, you'll probably find more and deeper targets than you could with a "trash discriminating" type of metal detector. This is especially true in highly mineralized soil or black sand. Now the rest is up to you.
ABOUT YOUR DETECTOR Detector stand Padded arm rest Foam grip Anodized aluminum upper stem Drop-in battery compartments Cable connector Snap button 7-foot search coil cable Lock nut Adjustable, ABS, fiberglass-reinforced, nylon lower stem Threshold control Velcro® straps Nylon wing nut Waterproof, ESI-shielded, elliptical search coil Figure 1.
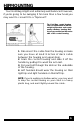
SETTING UP The Gold Bug comes to you just about ready to use. There are only three steps required: sliding the lower stem into the upper stem, connecting the loop coil to the control housing and adjusting the angle of the search coil. Take a look at page 3 and familiarize yourself with the parts of the Gold Bug before proceeding. 1. Unpack your new Gold Bug carefully. Save the carton and inserts –they may come in handy for future storage or shipment. 2. Take a look inside the locknut on the upper stem.
SETTING UP REMEMBER: THE LONGER THE SHAFT, THE MORE YOU WILL HAVE TO BEND YOUR ELBOW AND THE SOONER YOUR ARM WILL GET TIRED. THE GOLD BUG IS BALANCED FOR COMFORTABLE SEARCHING IN A TIGHT SEMICIRCLE AROUND THE FRONT OF THE OPERATOR. 5. With the stem length properly adjusted, wrap the loop cable tightly around the upper stem and secure it with the two Velcro straps. Connect the cable connector to the control housing.
HIPMOUNTING Your Gold Bug is light and extremely well balanced however, if you're going to be swinging it for more than a few hours you may want to convert it to a "hipmount". The Gold Bug control housing can be hipmounted to reduce weight on the stem and create nearly effortless hunting. Belt loops are provided on the underside of the control housing. 1. Disconnect the cable from the housing or make sure you have at least 8 inches of slack cable between the housing and upper stem. 2.
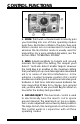
CONTROL FUNCTIONS 1. MODE: This thumb activated switch instantly puts your Gold Bug into one of three operating modes: Auto-Tune, No-Motion or Motion. The Auto-Tune and Motion modes are recommended for searching whereas the No-Motion mode is usually used for pinpointing. For a more detailed discussion, see The section titled "OPERATING MODES". 2. SENS: Adjusts sensitivity to targets and ground minerals. the higher the setting, the deeper you'll detect. You'll also detect smaller targets.
CONTROL FUNCTIONS 4. VOLUME: Turns the power on and controls the signal response volume. Normally set at 10 unless you're wearing headphones (strongly recommended) in which case the volume should be lowered to a comfortable level when the Gold Bug is responding to a large or shallow target. 5. HEADPHONES: This jack accepts most mono and stereo headphones with 1/4" plugs. When using a headphone with a "Stereo/Mono" switch, put it in the "Stereo" position. 6.
OPERATING MODES The Gold Bug has three operating modes, each with its own advantages and disadvantages in any given situation. However with practice and proper use of the SENSITIVITY and GROUND ADJUST controls, you can use any mode in just about any situation. 1. MOTION MODE: In this mode the search coil must be moving, at least slightly, to detect a target. This is the easiest mode to use under moderate soil conditions.
TURN ON PROCEDURE 1. Set your controls as follows: MODE = Auto-Tune SENS = 7 GROUND REJECT = 5 2. Hold the search coil waist high, away from any nearby metal. 3. Turn the volume on to 10. A short loud squawk is normal so if you're wearing headphones, start the volume at zero and let the audio settle down before increasing it to a comfortable level when the coil is passed over a large or shallow target. 4. With the coil still in the air, rotate the THRESHOLD control until you hear a very faint hum.
GROUND REJECT PROCEDURE AUTO-TUNE MODE GROUND REJECTION 1. With your controls still set as described in the TURN ON procedure, lower the search coil to an inch or two above the ground. One of three things will happen to the threshold tone as the coil is lowered: 1) The tone will get louder and then return to normal as the Auto-Tune circuit takes over. (When you raise the coil, the tone will fade.) 2) The tone will fade and then return to normal. (When you raise the coil the tone will get louder.
GROUND REJECT PROCEDURE NO-MOTION MODE GROUND REJECTION 1. Hold the coil 6 to 10 inches off the ground. Push and hold the RETUNE button a couple of seconds to reset the threshold tone. 2. Lower and raise the coil and tune as in the AUTOTUNE GROUND REJECTION instructions for a minimal change in the Audio Threshold tone. Note that unlike the Auto-Tune mode, when the tone changes when you lower the coil, it stays changed until you raise it again or until you are properly tuned. 3.
GROUND REJECT PROCEDURE MOTION MODE GROUND REJECTION 1. Tune as you did in the Auto-Tune mode for a minimum response to the ground. This time however you won't have an Audio Threshold Tone to guide you. Instead, the Gold Bug will start out silently but respond with a "beep" as the coil approaches or leaves the ground. 2. You'll have to lower the coil faster than you did in either of the other two modes, making the procedure a little more difficult, particularly in mineralized ground.
SEARCHING 1. We recommend that you start searching in the Auto-Tune mode at a sensitivity level of about 7. 2. Recheck your ground adjustment frequently by raising and lowering the search coil. In many nugget bearing areas, ground mineralization can change drastically in a matter of a few feet. 3. Keep the search coil moving at a comfortable rate. Remember that the Gold Bug is a motion detector and responds only when the search coil (or the target) is moving in the Auto-Tune or Motion modes. 4.
SEARCHING 8. As you gain confidence you'll probably want to increase your sensitivity level. That's fine. The Gold Bug is extremely sensitive to very tiny bits of gold at maximum sensitivity. Just a couple notes of caution: 1) The higher the sensitivity the more false signals you'll have to live with. 2) You'll have to reset your GROUND REJECT control when you increase sensitivity and you'll have to recheck it more often. You may also have to readjust your THRESHOLD control. Figure 6.
PINPOINTING AUTO-TUNE AND MOTION MODE PINPOINTING Pinpointing in either the Motion or Auto-Tune mode is a little tricky since you'll lose the audio target response if you stop moving the search coil. With practice however, you'll be able to zero in on most targets quickly and accurately. 1. Once a buried target is indicated by the "beep" of the Gold Bug, continue sweeping the search coil from side-to-side in a narrower and narrower search pattern. 2.
PINPOINTING NO-MOTION MODE PINPOINTING Pinpointing is even more precise in the No-Motion mode. You don't have to keep the search coil moving and the VCO (Voltage Controlled Oscillator) circuitry responds to the target with a more distinct increase in pitch as well as volume. For very faint targets or in extremely mineralized ground you may have to re-ground adjust the Gold Bug when you switch to the No-Motion mode. For most situations however the following simple procedure is adequate. 1.
TARGET RECOVERY The moment of truth! But not so fast... you may have "pinpointed" a target but that doesn't mean that you can reach down and pick up a nugget. Even if it's lying on top of the ground you're going to have to determine which of those pebbles is really a gold nugget. And if you have to dig for it you'll have to determine which handful of dirt is paydirt. But the worst part is that most of your targets won't be gold. They'll be nails, junk, hot rocks, etc.
TARGET RECOVERY 5. If you have to dig for your target, repeat step four with handfuls of dirt as you dig. 6. Recheck and repinpoint the target area with the Gold Bug if you can't find your target. Be sure to recheck the soil you've already removed. 7. Once you've recovered your target, check the area once again to make sure you're not leaving a second target behind. 8. Scrape all loose dirt back in the hole and move on only after the area appears as it was before you got there.
OPERATING TIPS 1. We've already said it but it bears repeating: take your time, overlap your sweeps, keep your coil close to the ground, recheck your ground adjustment often and dig all targets. 2. Use good headphones: Your Gold Bug will detect small, deep nuggets other detectors have missed. But to hear the very faintest target responses, you'll need headphones. 3. Bury a small nugget and check it at different depths, sensitivity levels and in each operating mode.
FALSE SIGNALS A false signal occurs when something that shouldn't, sounds like a good target. For example the Gold Bug may detect metal in your boots if you swing the search coil too close to your feet. Here's some other sources of false signals and what to do about them. 1. HOT ROCKS: Mineralized rocks that respcnd like metal. SOLUTIONS: Most hot rocks seem to be on top of the ground so you can just kick them out of the way and recheck the ground beneath them.
FALSE SIGNALS nugget country and with practice you'll be able to recognize a lot of it. Nails for example will respond with two beeps across the length of the nail (end to end), but only one beep when the search coil is swept at right angles to the length of the nail. Also, most trash is shallow and comes in bigger sizes than nuggets. Hence it will sound different especially in the Auto Tune Mode.
BATTERY REPLACEMENT Two nine volt transistor batteries are located in separate compartments at the rear of the housing. When it's time to replace batteries, always replace both of them. 1. To open, press gently down on the battery door latch. The doors are hinged, do not attempt to completely remove them. 2. Tilt the housing gently and the batteries will slide out. 3. Insert the new batteries. Make sure the contact end goes in first and that you match the polarity markings on the control housing. 4.
MAINTENANCE Your Gold Bug doesn't require a lot of care but there are a few things you should do to keep it in peak operating condition. 1. If you're not going to be using it for awhile, take the batteries out. Acid damage caused by leaking batteries can be severe. 2. Avoid extreme temperatures. Don't leave it inside a closed car sitting in the sun. Even worse, the trunk of a car. 3. If you "scrub" the search coil on the ground, you'll eventually wear through the bottom. Replacement coils are expensive.
TREASURE HUNTER’S CODE OF ETHICS LETS PRESERVE OUR TREASURED SPORT! Laws governing the use of metal detectors are becoming more and more common. In many countries, the use of metal detectors is illegal or severely restricted. Don’t let this happen in your country! ALWAYS get permission to hunt on private property. ALWAYS leave a site cleaner than you found it. Take at least some trash with you or, if you can, take it all.
Where To Use Your Metal Detector In The U.S. National Forest and Federal Lands—Metal detecting is allowed only by special permit acquired from the federal government. Each area has a district office. Corps of Engineers, Lakes, Shorelines and Lands—Permission has been granted only on predisturbed sites, such as beaches and attached swimming areas. New Corps lakes and lands must be okayed by the main office of the Army Corps of Engineers. Each area has a district office.
SPECIFICATIONS 1 Length 2 ............................. Extended ............................................ 55” Collapsed ......................................... 46” Weight 2 ............................. Complete ..................................... 2.9 Ibs. Control Housing ........................ 1.0 Ibs. Handle and Coil ........................ 1.9 Ibs. Frequency ........................ VLF Search ............................... 19.2 K H z Audio Target Response ..................................
SPECIFICATIONS NOTES 1. Subject to improvement or modification without notice. 2. Approximate. 3. Voltage controlled Oscillator. Volume and frequency increase as target is approached. This effect is most pronounced in the No-Motion mode. 4. The Gold Bug is a "motion" detector in the Auto-Tune and Motion modes. The search coil must be moving at least slightly to detect a target. 5. 14" elliptical, 6-1/2" elliptical, and 3-3/4" diameter coils optional. 6.
29
QUALITY Fisher detectors are renowned for their quality. Each detector is hand crafted in the USA with pride PERFORMANCE Treasure Hunters worldwide rely on Fisher. Our detectors are durable, dependable, and search deeper.. REPUTATION Fisher produced the first patented metal detector in 1931. For over 70 years, the Fisher logo has been a mark of excellence.