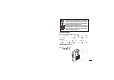
INSTRUCTION MANUAL M-1060C M-1110C Compact Cassette Recorder M-1060C M-1110C 1AD6P1P0718-R M-1060C/M-1110C, Issue Number 1 ENGLISH Printed in China
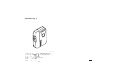
CONTROLS (Fig. 1) Fig. 1 1. 2. 3. 4. 5. 6.
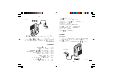
-E2Fig. 2 EXT DC3V AC 120V 7. Compartimiento de cintas 8. Compartimiento de las pilas (panel negro) 9. Botón de reajuste y contador de la cinta (únicamente M-1110C) Botón de grabación (REC) Botón de reproducción (PLAY) Enchufe externo CC 3 V (EXT DC 3V) Botón de avance rápido/señal sonora (FFWD/CUE) Botón de rebobinado/inspección (REW/REV) Botón de detención (STOP) Interruptor de pausa (PAUSE) 10. 11. 12. 13. 14. 15. 16. ENERGÍA AC adaptor Connect the included AC adaptor (Part No.
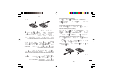
Battery Install two “AA” batteries (not supplied) as shown in Fig. 3. Observe proper polarity. • If you are not going to use the unit with batteries for one month or more, remove the batteries. Fig. 3 Battery replacement When the BATT/OPR indicator (M-1110C only) does not light during operation or is lit dimly, replace the batteries. • When replacing the batteries, use two new batteries of the same type. Do not mix a used battery with a new one or mix different types of batteries.
IMPORTANT NOTE: SPENT NICKEL-CADMIUM RECHARGEABLE BATTERY MUST BE RECYCLED OR DISPOSED OF PROPERLY IN COMPLIANCE WITH ALL APPLICABLE LAWS. FOR DETAILED BATTERY RECYCLING INFORMATION, CONTACT THE RECHARGEABLE BATTERY RECYCLING CORPORATION AT 1-800-822-8837. CONNECTIONS External microphone (M-1110C only) Connect an external microphone (not supplied) to the MIC jack. (The built-in microphone is automatically disconnected.) Earphone Connect an earphone (not supplied) to the EAR jack for private listening.
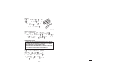
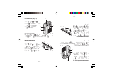
1. Introduzca una cinta como se indica en la Fig. 6. 2. Presione el botón del contador de la cinta para adjustar el contadora “000”. El contador muestra la posición relativa de la cinta. (únicamente M-1110C) 3. Ponga el interruptor VAS en ON u OFF. (únicamente M-1110C) 4. Presione el botón REC. (El b o t ó n P L AY s e a c o p l a r á simultáneamente.) VAS ON: Grabación de voces Fig. 6 activada (únicamente M1110C) Cuando comience a hablar, el aparato comenzará a grabar.
-E6- Avance rápido o rebobinado Presione el botón FFWD/CUE o REW/REV cuando ningún otro botón se encuentra presionado. Presione el botón STOP cuando alcance el punto deseado o el final de la cinta. Fig. 7 Funcionamiento de detención temporal (todos los modos) Desplace el interruptor PAUSE hacia la derecha. Desplácelo hacia la izquierda para reanudar la operación. Safeguards against accidental erasure (Fig. 7) To protect side A, break out tab (1). To protect side B, break out tab (2).
REPRODUCCIÓN (Fig. 8) 2 1. Ponga la cinta como se indica en la Fig. 6. 2. Presione el botón PLAY y ajuste el control VOLUME. 3. Presione el botón STOP para detener la reproducción. 3 1 Fig. 9 2 2 1 Señal sonora e inspección Fig. 8 Mientras está reproduciendo, presione y mantenga el botón FFWD/CUE o REW/REV. Suelte el botón cuando alcance el punto deseado. La reproducción continua.
SANYO SERVICE PLUS LIMITED WARRANTY DICTATION PRODUCTS ONLY OBLIGATIONS In order to obtain factory warranty service for Sanyo Dictation Products, call the toll-free number below. The unit must be packed in the original carton or a well-padded sturdy carton in order to avoid shipping damage. Note: Do not return this unit to the retail store for service.
21605 Plummer Street Chatsworth, CA 91311 21605 Plummer Street Chatsworth, CA 91311 -S9- -E9-