L8MV5/US, L8MW5/US (VMC-8618, 8613 GB) 2001. 2. 23 INSTRUCTION MANUAL VMC-8618 VMC-8613 Color Video Monitor About this manual • Before installing and using this unit, please read this manual carefully. Be sure to keep it handy for later reference. • This manual gives basic connections and operating instructions for 2 models.
L8MV5/US, L8MW5/US (VMC-8618, 8613 GB) 2001. 2. 23 SANYO INDUSTRIAL VIDEO VIDEO MONITOR LIMITED WARRANTY OBLIGATIONS In order to obtain warranty service, the product must be delivered to and picked up from an Authorized Sanyo Service Center at the user’s expense, unless specifically stated otherwise in this warranty. The names and addresses of Authorized Sanyo Service Centers may be obtained by calling the toll-free number listed below.
L8MV5/US, L8MW5/US (VMC-8618, 8613 GB) 2001. 2. 23 INFORMATION TO USER FCC COMPLIANCE STATEMENT WARNING: TO REDUCE THE RISK OF FIRE OR ELECTRIC SHOCK, DO NOT EXPOSE THIS PRODUCT TO RAIN OR MOISTURE. DO NOT INSERT ANY METALLIC OBJECT THROUGH THE VENTILATION GRILLS. FCC INFORMATION: THIS EQUIPMENT HAS BEEN TESTED AND FOUND TO COMPLY WITH THE LIMITS FOR A CLASS A DIGITAL DEVICE, PURSUANT TO PART 15 OF THE FCC RULES.
L8MV5/US, L8MW5/US (VMC-8618, 8613 GB) 2001. 2. 23 IMPORTANT SAFEGUARDS 1. READ INSTRUCTIONS -- All the safety and operating 12. LIGHTNING -- For added protection for video monitor or instructions should be read before the appliance is operated. equipment during a lightning storm, or when it is left unattended and unused for long periods of time, unplug it from the wall outlet and disconnect the antenna or cable system.
L8MV5/US, L8MW5/US (VMC-8618, 8613 GB) 2001. 2. 23 PRECAUTION CONTENTS If an abnormality does occur, turn the power switch off and unplug the unit. Have a qualified technician perform any repairs. Do not use the monitor if it makes a strange noise, emits a strange odor, or if smoke comes out from it If used under these conditions, the monitor may cause a fire or electric shock. Immediately unplug it and wait to make sure no more smoke comes from it. Then take it to the dealer for service.
PARTS NAMES Front Panel 1 Speaker When the monitor selector button (A, B or Y/C) is pressed, the speaker lets you hear the sound from the components which are connected to the terminals at the rear of the monitor. (Use components which produce audio output.) 2 On-screen display button (OSD) When this button is pressed, the menu screen appears on the monitor screen.
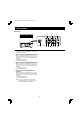
L8MV5/US, L8MW5/US (VMC-8618, 8613 GB) 2001. 2. 23 PARTS NAMES Rear Panel 2 1 1 AC INPUT socket Connect the AC power cord (supplied) securely to this socket and to a wall outlet. 2 Rear A terminals (AUDIO/VIDEO A terminals) When the monitor A selector button at the front of the monitor is pressed, the audio and video signals from the component which is connected to these terminals can be monitored.
L8MV5/US, L8MW5/US (VMC-8618, 8613 GB) 2001. 2. 23 CONNECTION Before making any connection, make sure all the devices are turned off. Before making the connections, please refer to the instruction manual accompanying each device. If the devices are not connected properly, that may cause a fire and/or damages.
BASIC OPERATION 1 Press the POWER button to turn on the power. ON: The power is turned on (the POWER indicator is lit). The signals from the channel (A, B or Y/C) which was being used when the power was last turned off will be input. OFF: The power is turned off (the POWER indicator is off). Note: If the power for the connected components is not turned on, or if a problem with operation has occurred, “VIDEO LOSS” will appear on the screen. If this happens, check the component concerned.
ADJUST THE OSD MENU ITEM Open the menu screen (press the OSD button), use the cursor buttons to select the desired menu item, and then press the ENTER button. BRIGHTNESS adjustment 1 Select “3. BRIGHTNESS 75%” and then press the ENTER button. 2 Use the cursor (l) and (j) buttons to adjust the brightness of the picture. Note: The setting characters which are displayed on each adjustment screen (such as 50%) may not display correctly (dropout) in some cases.
L8MV5/US, L8MW5/US (VMC-8618, 8613 GB) 2001. 2. 23 ADJUST THE OSD MENU ITEM VOLUME adjustment Menu screen language setting 1 Select “6. VOLUME 50%” and then press the ENTER button. 1 Select “8. LANGUAGE” and then press the ENTER button. 2 Use the cursor (l) and (j) buttons to adjust the sound volume. 2 Use the cursor (l) and (j) buttons to select the display language. • Only the menu screen and setting screen languages will be changed. (See page 11.
ADJUST THE OSD MENU ITEM Displaying characters such as for setting location on the monitor screen (Refer to “CHARACTERS TABLE”.) 5. Press the ENTER button, and then use the cursor l (j) button to select “D”. Note: If there is no signal being input from the input terminals selected (A, B or Y/C) at the rear of the monitor, the title cannot be set for those terminals. 1 Select “9. TITLE ON” and then press the ENTER button. 3 14 2l52.113 822 23226 cRc98744 249.924 825.202 249.924 8î879 8230.628î879 8230.
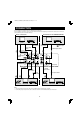
LANGUAGE SCREEN TABLE English Menu Title/channel Automatic title/ channel selection Title settings COLOR adjustment TINT adjustment BRIGHTNESS adjustment CONTRAST adjustment SHARPNESS adjustment VOLUME adjustment DWELL TIME setting Français Deutsch
LANGUAGE SCREEN TABLE Español Menu Title/channel Automatic title/ channel selection Title settings COLOR adjustment TINT adjustment BRIGHTNESS adjustment CONTRAST adjustment SHARPNESS adjustment VOLUME adjustment DWELL TIME setting Italiano Russian
L8MV5/US, L8MW5/US (VMC-8618, 8613 GB) 2001. 2. 23 TROUBLESHOOTING Solutions to common problems related to your monitor are describe here. If none of the solutions presented here solve the problem, unplug the monitor and consult a SANYO-authorized dealer or service center for assistance. Problems No picture with the power on No sound. Points to be checked Measures (Remedy) Is the video signal being output from the connected component? Set the connected component correctly.
L8MV5/US, L8MW5/US (VMC-8618, 8613 GB) 2001. 2. 23 SPECIFICATIONS VMC-8613 Color system VMC-8618 PAL/NTSC, selected automatically Picture tube 13 inch 18 inch Resolution More than 750 TV lines More than 800 TV lines Input terminals S-VIDEO signal (VIDEO C) Separate Y/C signal, mini-DIN connector (1) Y signal: 1.0 Vp-p, 75 Ω negative sync C signal: 0.286 Vp-p, 75 Ω negative sync, bridge connection possible Video signal (VIDEO A, B) Composite sync signal, 1.