
User Guide

Pickup Installation, Cont’d.
7. Thread the pickup wire through the hole you drilled earlier.
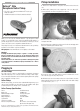
8. Fasten the biscuit/pickup assembly to the cone. Tighten this screw just
enough to prevent the biscuit assembly from freely rotating on top of the
cone. Do not over tighten the screw or you may short out the pickup!
9. Remove the barrel from the jack and thread the pickup wire through it.
Passive Pickup
Solder the center wire to the tip terminal and the shield wire to the
sleeve terminal.
Active Pickup
Thread the pickup wire through the strain relief hole at the end of the
circuit board. Solder the signal wire to the “IN” pad and the shield wire
to the “G” pad. Be careful not to burn the solder pads! If the pads are
overheated, they may lift off the circuit board.
10. Fasten the shielding cap to the jack.
Jack Installation Where to Locate Jack?
Metal Body Instrument
For a metal instrument with a stick that runs the length of the body into the
tailblock, we recommend that you place the jack on the treble side lower
bout. Use a center punch at the chosen location and use a sharp 3/8” (9.5
mm) brad-point drill. For best results, use a drill press and clamp the
instrument securely to prevent the drill from wandering or distorting the
shape of the hole.
Wooden Body Instrument
For most wooden instruments, locate the jack at the endblock, centered
below the tailpiece. Drill a 3/16” (4.8mm) hole and enlarge it to 15/32”
(12mm) with a 15/32” tapered reamer. Note that if the instrument has a ring
(“soundwell”) inside the sound chamber, you may have to drill through it to
accommodate the jack.
Battery Installation
for the Active Pickup
You may locate the included battery clip on any flat surface inside the
instrument. Clean the area where you plan to mount the battery clip with
denatured alcohol, remove the release film from the sticky-back adhesive
and firmly fasten the battery clip inside the instrument. Battery life is approx.
11,000 hours. Under normal conditions the battery will last several years
between changes.
A set of adhesive backed clips has been provided to secure the pickup wire
and battery leads inside the guitar. Remove the plastic film from the back
of each clip to expose the adhesive and fasten to the sides or back of the
instrument.
514-000-015 Rev A 3-05
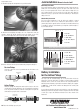
Pickup Signal
to Tip
Shield to
Sleeve
2 3 4 5 6
1
2 3 4 5
1
Metal Body Instrument Jack Location
Wooden Body Instrument Jack Location
1 - 3/8” Nut
2 - 3/8” Star
Washer
3 - Guitar Body
4 - 3/8”
Dress Washer
5 - 3/8” Nut
1 - 15/32” Nut
2 - 15/32”
Washer
3 - 15/32” Star Washer
4 - Guitar Endblock
5 - 3/8”
Dress Washer
6 - 3/8” Nut
Fishman Transducers, Inc.
340 Fordham Road Wilmington, MA 01887
www.fishman.com
REV . 2.3
PJ FISHMAN
+
G
IN
R
-
Pickup Signal
to "IN"
Pickup Shield
to Ground ("G"
)