
Operation Manual


11. Questions and answers
Important: Always turn off the energy source and let the pressure cooker cool off before you attempt to elimina-
te a problem.
Questions and answers
42
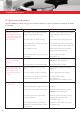
Problem Possible reason How to correct the problem
When the cooker is
building pressure, steam
escapes longer than usual
from under the lid handle
(theEuromatic).
The cooker is not closed properly. (The
indicator in the lid handle is red.)
The heat source is not high enough.
The cooking zone is not the right size for
the pressure cooker.
The lid handle is loose.
TheFisslerEuromaticoritso-ringisdirty
or damaged.
Close the cooker properly. (See Chapter
4) (The indicator in the lid handle is
green.)
Set the heat source at its highest level.
Place the pressure cooker on a cooking
zone with the right size. (See Chapter 5)
Tighten the fastening screw of the lid
handle on the inside of the lid.
Clean or replace the part.
(See Chapter 13)
Nosteamescapeswhen
the cooker is building
pressure.
Too little liquid was placed in the cooker.
The heat source is not set high enough.
Add the minimum amount of liquid
(200-300 ml). (See Chapter 5)
Set the heat source on high.
Steam and/or drops of
water escape at the edge
of the lid before the
cooking indicator begins
to rise.
The silicone gasket is not properly in
place.
The silicone gasket is dirty or damaged.
The cooker is not closed properly. (The
indicator in the lid handle is red).
Insert the silicone gasket properly. (See
Chapter 5)
Clean or replace the silicone gasket.
Close the cooker properly.
(See Chapter 4)
(The indicator in the lid handle is green).
The cooking indicator
does not rise.
Steam is escaping near the lid handle.
Steam is escaping at the edge of the lid.
Too little liquid was placed in the cooker.
The control valve unit is not attached
correctly and firmly.
TheO-ring,valvebaseseal,orsilicone
membrane is missing, defective, or incor-
rectly attached.
See above.
See above.
Add the minimum amount of liquid
(200-300 ml). (See Chapter 5)
Attach the control valve unit correctly
and tighten the fastening screw.
(See Chapter 10)
Replacethesealorattachitcorrectly.
(See Chapter 12)