
Product Specifications


CAUTION: IF THE
OVEN BURNER DOES
NOT IGNITE WITHIN 20
TO 60 SECONDS AFTER
THE PILOT IS LIGHTED,
TURN THE OVEN TEMP
CONTROL TO OFF AND
WAIT FOR POWER TO BE
RESTORED. DO NOT
ATTEMPT TO RELIGHT
THE PILOT AGAIN.
13
The pan and grill may be removed
from the broiler rack by lifting up on
the front of the broiler pan so it will
clear the “pan keeper,” then pull
forward slightly and using hot pads or
mittens, with both hands lift the
broiler pan and grill free of the broiler
rack. The “broiler rack” may be
removed from and returned to the
broiler section in the same manner as
removing an oven rack. To return the
pan and grill to the broiler rack, pull
the broiler rack out to the stop
position. Insert the pan and grill into
t
he recessed section of the broiler
r
ack making certain that the “pan
keeper” pins clear the front edge of
t
he broiler rack. Slide the pan and
grill in place under the pan retainers.
Push the pan and rack to the rear of
the broiler compartment. Close the
broiler door.
Oven and Griddle Burners
These concealed burners use
automatic re-ignition flame-sensing
ignitors to ignite a gas pilot. You
don’t have to place the griddle control
or oven control dial in any special
“LITE” position – just use in the
same manner as a regular oven
control dial. When the control knob is
“ON” the sparking will start
immediately and stop automatically
as soon as the pilot lite is ignited. The
oven/griddle burner will then come
on within 20 seconds to 60 seconds
after the sparking has stopped. The
main burner is ignited by the pilot lite
and cycles on and off as heat is
needed or desired temperature is
reached. The pilot lite is turned off
when the control dial is turned to the
OFF position.
When either the oven control or
griddle control dial is turned on,
all
electrodes will spark at a rate of
about 1
1
/2 sparks per second. When
any top burner knob is placed in the
“LITE” position, all electrodes will
spark at a rate of about 2
1
/2 sparks
a second. This is normal.
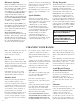
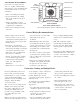
To light oven pilot manually in the
event of a power failure: (You light
the pilot, not the burner.)
• 1. CAUTION: Make certain the
oven is cool when manually
lighting oven pilot.
•
2. Open broiler door. Oven pilot is
located on the left side of the oven
burner at the back of the burner.
See Figure 13.
If the oven does not function properly
when the power is restored, or at any
other time, call a serviceman to
determine the source of the problem.
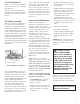
PAN RETAINER
PAN “KEEPER”
BROILER RACK
BROILER PAN AND GRILL
DO NOT ATTEMPT TO SERVICE
THE RANGE YOURSELF.
Oven Rack Removal
Pull the oven rack forward and lift up
o
n the front of the rack so it will clear
the rack keeper.
To replace the oven rack, guide the
angled rear portion of the rack under
the rack keeper and slide the rack to
the rear.
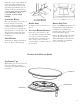
Gas Broiler Assembly
Each gas oven has a gas broiler below
the oven. A broiler pan and grill are
held in place by a uniquely fashioned
broiler rack. See Figure 15. To open the
broiler, gently lift up and pull forward
on the “drop-down” broiler door. Use a
hot pad or “range mitten” to grasp the
broiler pan and gradually pull forward.
It will reach a temporary “stop.”
Continue to pull forward and the broiler
rack will pull out along with the broiler
pan and grill to expose the entire broiler
grill surface.
FIG. 15 BROILER ASSEMBLY
•
3. Hold a lighted match and reach
t
hrough the broiler compartment to
t
he oven pilot.
•
4
.
W
hile holding the lighted match
near the tip of the pilot assembly,
turn the oven control dial to an
“ON” position. Immediately remove
your hand from the broiler
compartment after the pilot gas
ignites. From 20 to 60 seconds after
the pilot ignites, gas will flow to the
oven burner and the burner will
ignite.
•
5. Close the broiler door.
•
6. Set desired temperature.
•
7. When cooking is finished, turn
the Oven Temp Control to “OFF”.
This will shut off all gas to the
oven.
NOTE: Whenever electrical power is
off, you will have to light the pilot
manually each time you want to use
the oven.