
Product Specifications
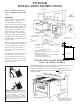
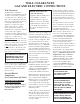
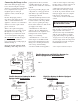
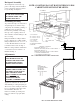
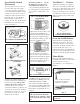
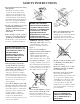
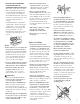

FIG. 9 PRESSURE REGULATOR
CONVERSION
FIG. 13
FIG. 12 VARI-FLAME™
CENTER SIMMER BURNER
FIG. 10 STANDARD BURNER
CONVERSION
LP GAS SETTING
Tighten orifice hoods for surface and
oven burners approximately two
complete turns and adjust air shutters.
The gas pressure regulator must be
set to the LP gas setting to provide 10
inches water column pressure.
NAT. GAS SETTING
Unscrew orifice hoods for surface
and oven burners approximately two
complete turns and adjust air shutters.
The gas pressure regulator must be
set to the NAT. setting to provide 4
inches water column pressure.
Oven/Griddle Control
(Thermostat)
The oven pilot gas selector screw is
l
ocated on this control. To change
oven pilot gas setting: (A) Remove
oven control knob by pulling straight
out. The oven gas selector screw is
found in the lower left hand corner
indicating “LP” or “N”. (B) These
letters will appear upside down
reading “N” and “LP”. (C) Rotate the
adjustment screw tab to the proper
setting. See Figure 8.
LP
N
All ranges are equipped with a gas
pressure regulator for controlling gas
pressure in the range.
The pressure
regulator must not be removed. To
convert from one gas to another,
perform the following: (1) Remove the
convertor cap on top of the regulator.
(2) Invert the convertor cap, or invert
the selector pin on the cap. (3) Re-
install the cap. See Fig. 9.
Top burners have LOW, MEDIUM,
and HIGH positions. Adjust gas and
air mixture in the HIGH position. To
adjust LOW turn knob to LOW,
remove knob and while holding the
valve stem in the LOW setting with a
pair of pliers turn the adjusting screw
until a flame of approximately
1
/8” is
obtained.
High flames on surface burners are
inefficient and unsafe. The flame
should always be adjusted so that it
is no larger than the bottom of the
pan.
Pilot is out when control dial
is “OFF.” Spark electrode is
directly above “CHUTE.”
Vari-Flame™ . . . FiveStar
Standard front burners are equipped
w
ith a true center-simmer feature that
is factory set. The burner orifice hoods
a
re black for NAT. gas and brass for
LP. gas. If the range is to be converted
from NAT. gas to LP. or vice versa call
800-251-7224 for proper orifices and
instructions.
Oven and Griddle Burners
These burners are supplied gas by
automatic safety valves. The safety
valve orifice must be set for the gas
being used. See Figure 10. This valve
is located at the base of the oven
burner in the broiler compartment and
at the base of the griddle burner in the
burner box under the griddle assembly.
Flame Height
Improper flame height is inefficient
and unsafe. The flame on these burners
should be blue in color and
approximately 1
1
/4” in height. See
Figure 13.
FIG. 8 PILOT GAS SELECTOR KEY
FIG. 11 TOP BURNER LOCATION
NEVER USE THE OVEN FOR
STORAGE
7
Front View
Harper-Wyman
Regulator
1”
3 / 8
1 1/4” OVEN BURNER
FLAME HEIGHT
3/4” GRIDDLE BURNER
FLAME HEIGHT
BURNER PAN
LPG
NAT
Converter
Cap
P
ointer
Oven pilot selector key
switches from LP to NAT
(
vice versa).
Standard top burners . . . Be sure
t
he shipping screws have been
r
emoved from the burners
.
The
correct positioning should place the
t
op of the burner head approximately
3/8” below the cooking surface. See
Fig. 11.
Maxitrol
Regulator
LPG
NAT