Flair Puck & Smart Vent IN-HOME INSTALL GUIDE CENTRAL SYSTEMS questions? flair.
★ Read First ● Initially, during Setup, keep all Flair Pucks and Smart Vents in the same room. This will ensure devices are in good range to be discovered by Flair, and that you can verify the light bar pattern on a Smart Vent when it’s discovered. Flair devices can be installed in rooms after Setup. If you plan to wire Smart Vents to AC power, complete Setup with batteries. You’ll remove the batteries prior to installing in the duct.
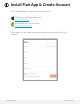
① Install Flair App & Create Account First, download the Flair app to your mobile device. iOS app from the Apple App Store: https://flair.co/ios Android app from the Play Store: https://flair.co/android Next, open the Flair App and use your email address to create your Flair account. support@flair.co flair.
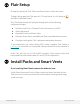
② Flair Setup During Setup, keep all Flair Pucks and Smart Vents in the same room. To begin Setup, open the Flair app click “Create Home”, or click the plus and select “Add new Home”.
④ Check Signal Range All Smart Vents and Sensor Pucks need to connect to a Gateway Puck. If Sensor Pucks or Smart Vents are offline or have weak signal, try moving a Gateway closer, adding a Gateway Puck to the system, or converting a Sensor Puck to a Gateway Puck (see below). If a Gateway Puck is offline or has weak signal, try moving it closer to the router. Use the following steps to check signal strength and device status. 1.
Appendix A: Smart Vent Power Options Each Smart Vent includes 2 c-cell batteries for power. These batteries can last up to four years with regular use. You can also power the Smart Vent using 24 VAC power or 12V DC power. Flair Setup will guide you through assembling Smart Vents with batteries. Wiring is done after Setup. Instructions on how to wire to AC power are included in the box with each Smart Vent.
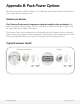
Appendix B: Puck Power Options Each Puck includes a USB AC adapter, 5 ft. USB cable, two Lithium Metal AAA batteries, a Puck door, and an adhesive strip. Gateway vs Sensor Flair Gateway Pucks need to be powered using the supplied cable and adapter (see options below for hiding cables). The Flair USB cable is a specialized cable. Contact Flair for using alternate or longer USB cables. Flair Sensor Pucks can use batteries for a streamlined install.
Flair Puck USB Mount Flair’s USB Mount adapter (available for purchase at flair.co ) allows for a Puck to fit snugly to walls for an elegant and secure placement. Mount where temperature is accurate and reliable. support@flair.co flair.
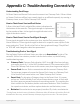
Appendix C: Troubleshooting Connectivity Understanding Puck Range All Smart Vents and Sensor Pucks need to connect to a Gateway Puck. If Smart Vents or Sensor Pucks are offline, have a weak signal, or go offline frequently, try moving a Gateway closer, or see “Add a Gateway Puck” below. How to Check Smart Vent and Puck Status A Smart Vent and Puck’s online/offline status is displayed at the bottom of the room tile.
Add a Gateway Puck If Sensor Pucks are going offline, they may be too far from a Gateway Puck. To boost signal strength in the Flair network, you can add another Gateway Puck, or convert an existing Sensor Puck to a Gateway. To convert a Sensor Puck to a Gateway Puck: 1. Plug in the Puck to be used as the additional Gateway to power using the supplied Flair cable and adapter 2. In the Puck’s gear menu, select “Forget WiFi”. Let the Puck restart 3. In the Puck’s gear menu, select Make Gateway.
Appendix D: Vent Light Patterns When batteries are inserted, the Smart Vent will open and close its louvers, displaying a light pattern of 3 illuminated lights, followed by 2. Then, the lights will turn off. During Setup, lights will cycle in a pattern until the Smart Vent pairs with a Gateway Puck. This can take up to 5 minutes. After 30 minutes with no pairing, lights will turn off to save battery life. Turn on Setup Mode to restart Discovery.
© Standard Euler, Inc. Flair Homeowner Central Install Guide v1.