
Installation Guide


③ Install Pucks and Smart Vents
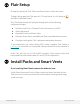
② Flair Setup
During Setup, keep all Flair Pucks and Smart Vents in the same room.
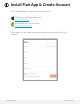
To begin Setup, open the Flair app click “Create Home”, or click the plus
and select “Add new Home”.
The Flair Setup wizard will lead you through each of the following
configuration steps:
● Make the first Puck a Gateway Puck and connect it to WiFi
● Add a thermostat
● Assemble Pucks and Smart Vents
● Discover Smart Vents and additional Pucks and add them to rooms
● Configure settings for Flair’s advanced automation features
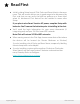
If you experience any issues during WiFi setup, complete Flair Setup at
my.flair.co in a browser on a computer/laptop connected to the customer’s
home WiFi.
Note: Flair will not see 5.0 GHz WiFi networks. Most routers have dual
band capability to broadcast both 2.4 and 5.0 GHz frequencies.
If you’re wiring Smart Vents, remove the batteries now.
Install Smart Vents and Pucks in their respective rooms, but don’t attach
Pucks just yet, as they may need to be moved when checking signal range
in the next step.
support@flair.co flair.co/contact