
Owner manual


12. Reattach the wheels and torque everything to the specifications defined by the vehicle’s manufacturer.
13. Verify that there is clearance around the coil-over shock and that the suspension does not bind at all,
even when wheels are turned to full lock position.
14. Remove the jack stands and carefully place the car on the ground to check clearances again. Lightly
bounce the vehicle at each corner to verify that there are not any clearance issues.
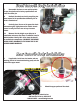
15. Measure the ride height as you did prior to installation and ensure that there is sufficient travel in both
directions. Ideally, 60% of the shock stroke is available for compression. Adjust the ride height only with the
weight of the vehicle fully off of the tires.
THE WARRANTY IS VOID AND DOES NOT COVER DAMAGE TO THE SHOCK
DUE TO INCORRECT RIDE HEIGHT OR BY MAKING RIDE HEIGHT ADJUSTMENTS WITHOUT THE TIRES RAISED OFF THE
GROUND.
Raise or lower the ride height by adjusting the spring nut to achieve the desired ride height. If it is at
the extreme top or bottom of the threads, then you may need a softer or heavier spring.
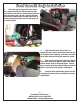
16. Once ride height is correct, spin the lock nut
up to the bottom of the spring nut and lock them
together using the two spanner wrenches.
17. Have your front end realigned upon completion
of installation.
Custom Coil Over Installation
11
Flaming River Industries,Inc.
800 Poertner Dr. Berea, Ohio 44017
1-800-648-8022 • www.amingriver.com