
Owner manual

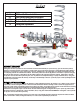


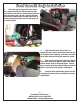

12. Install the spring onto the shock, putting the
small end of the spring over the shock body and down
onto the spring seat.
13. For GM Kits: Install the shock with the T-bar
on top of the lower control arm with the adjustment
knobs facing out toward the spindle utilizing the 3/8”
bolts and nylock nuts. Before tightening, ensure that
the shock is centered in the lower control arm.
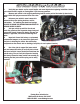
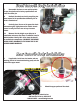
14. For Mustang II Kits: If necessary, drill out the lower control arm bolt holes to the appropriate size de-
pending on the shock style selected. If applicable, insert the bearing in a twisting motion. It may be necessary
to press the bearings into the shock. If so, do not press on the ball; press only on the race surrounding the ball.
Install snap rings on both sides of each bearing and ensure they are fully seated in the loops.
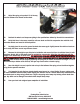
15. Jack the control arm up very slowly until the
shock stud extends through the factory mount while
vertically rotating the assembly and making sure that
the shock is not binding. You may need to also rotate
the spring until it is properly located in the factory
recesses.
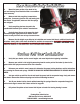
16. Install the upper stud bushing, washer and nut.
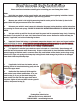
17. Reassemble the lower a-arm and the spindle.
Torque the spindle nut to factory specifications and
insert the cotter pin.
3
Flaming River Industries,Inc.
800 Poertner Dr. Berea, Ohio 44017
1-800-648-8022 • www.amingriver.com
GM Front Coil Over Installation