
Owner manual
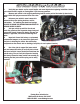


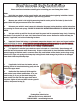

3. Use a floor jack to support the lower control
arm, remove the cotter pin from the lower ball joint
and loosen the ball joint nut. Remove the ball joint stud
from the spindle using a tie rod / ball joint separator.
Carefully and slowly release the lower control arm as-
sembly by lowering the floor jack until the spring can
be safely removed.
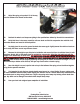
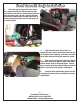
Front Smooth Body Installation
4. Fully extend the shock and put the T-bar
through the lower control arm and insert the bolts but
do not tighten them completely at this time. The knobs
on the shock should be facing out toward the spindle.
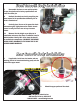
5. Slide the coil spring over the shock and align it
in the lower control arm. Align the upper shock mount
and the factory spring in the spring bucket. Jack the
lower control arm up very slowly, making sure that the
shock is not binding as the spring is compressed.
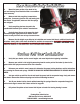
6. Install the upper stud bushing, washer and nut
and tighten the two control arm shock bolts to factory
specifications.
6
Flaming River Industries,Inc.
800 Poertner Dr. Berea, Ohio 44017
1-800-648-8022 • www.amingriver.com