58-62 Impala Rack & Pinion Cradle Kit
58-62 Impala Note: For safety disconnect battery cables and ensure that the vehicle is properly supported by jack stands. Before painting or powder coating of the cradle, we recommend that you pre-fit the entire system to ensure proper fitment for your application.
Qty Part Number Description 100759 Assembly, Power Rack and Cradle 1 Bolt -3/8-16x4.5” 3/8”-16 Grade 8 Bolt 4.5” Long 5 FR1612/FR1613 Assembly, Power Steering Pump 1 Bracket.
1958 - 1962 Impala Cradle and Shaft Assembly 3 Flaming River Industries 1-800-648-8022 FRxxxx Rev.
Color Verification To Be Completed Before Disassembly Before disconnecting the turn signal connector, verify the factory wiring colors and turn signal operation. The use of a wiring diagram is recommended. This will be used when connecting the new Flaming River Steering Column.
Original System Removal 4) Remove the bolts retaining the column dash mounting bracket and floor mounting plate. Dash Mounting Bracket Floor Mounting Bracket 5) Remove the bolt that retains the coupler to the factory intermediate shaft. Spread the flange and then slide the column off of the shaft and remove the column from the car. 6) 5 Flaming River Industries 1-800-648-8022 FRxxxx Rev.A 12/15/10 Remove the bolt that retains the rag joint to the factory steering box.
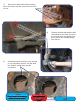
) Remove the bolts that hold the steering box to the frame, and then remove the box from the car. 8) 9) Remove the bolts that hold the idler arm bracket to the frame, the outer tie rod ends from the spindle arms, then remove the steering linkage from the car. Grind down lip on the driver’s side chassis so it is completely smooth.
Flaming River Rack and Pinion Installation 1) Install the rack and pinion cradle by sliding it into place between the frame rails. Using the new hardware, install the three (3) 3/8” bolts on the drivers side using the original holes from the steering gear box. On the passenger side use the bottom idler arm bolt and hole just to the rear of the idler arm and use the (2) 3/8” bolts and tighten all the bolts and nuts to 40-45 ft. lbs..
Flaming River Rack and Pinion Installation 3) Install the OEM inner tie rod end into the Flaming River Travel Bar. Note: If using the original parts some adjustment of the tie rod assembly may be required when connecting the to the spindle arm and the travel bar. Travel Bar OEM Inner Tie Rod End 4) To install the outer tie rod end into the spindles you must load the front sus- pension. Securely place jack stands un der the lower control arms and lowering the car onto the jack stands.
Flaming River Tilt Column Installation 1) Install the original column mounting bracket onto the new Flaming River Tilt Column. OEM Column Dash Mount 2) Slide new tilt column through the split ring of the new aluminum floor mount. Split Ring Column Tube 9 Flaming River Industries 1-800-648-8022 FRxxxx Rev.
Flaming River Tilt Column Installation 4) Place the column through the firewall and under the dash, tighten the mounting screws under the dash and using the new hardware provided fasten the floor mount to the firewall. 5) Replace the factory dash bezel using the screws that were removed earlier.
Universal Joint Installation 1) Using a 3/4” wooden dowel rod, mock up the steering shaft to obtain the correct shaft lengths and u-joint angle. 2) Once the correct shaft lengths are obtained, install shafts and u-joints snugging down each set screw so that it leaves a mark in the shaft. 3) Remove the shafts and using a 1/4” drill bit, dimple each mark left by the set screws. 4) Re-install the shafts and u-joints using a red thread locker on the set screw threads.
Power Steering Pump Bracket Power Steering Lines (FR1610 Not included in Kit) Included in the FR1610 kit is a ½” feed line that connects from the remote reservoir to the power steering pump. This is attached using the 2 stainless steel hose clamps. The 3/8” Double Crimped Pressure Line will attach the pressure port of the powersteering pump and to the pressure side of your steering gear. AN fittings with o-rings are included to complete the installation.
Power Steering Bleeding Procedure 1) Raise the front wheels off the ground and support the vehicle on jack stands. 2) Turn the steering wheel to the left lock and fill the reservoir and let the vehicle sit for 2 minutes. 3) WITH THE ENGINE OFF - Rotate the steering wheel lock to lock 20-25 times, while rotating the wheel have someone monitor the fluid level and fill as necessary.