Quick Start Guide FINDER SZ05-EN-A02 WARNING 1. Hot! Avoid touching the heating nozzle in operation. 2. Moving parts in printer may cause injury. Do not wear gloves or other sources of entanglement in operation. USER GUIDE The User Guide is in the USB stick.
Kit Contents 3D Printer Filament Spool Quick Start Guide After-sales Service Card Power Adapter Power Cable USB Cable USB Stick Filament Guide Tube Screwdriver Unclogging Pin Tool Wrench GREASE Allen Wrench Solid Glue PTFE Tube 01 Grease
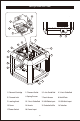
Getting to Know Your Finder 16 13 14 15 17 18 1 3 4 5 2 6 10 7 8 9 11 12 1. Filament Cartridge 2. Filament Outlet 3. Y-Axis Guide Rod 4. X-Axis Guide Rod 5. Filament Inlet 6. Spring Presser 7. Touch Screen 8. Build Plate 9. Leveling Knob 10. Z-Axis Guide Rod 11. USB Cable Input 12. USB Stick Input 13. Servo 14. Nozzle 15. Turbofan Baffle 16. Turbofan 17. Power Switch 18.
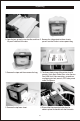
Unpacking 1. Open the box, grasp the two handles and then 2. Remove the side protective foam sheets, lift your Finder out of the box. you will see the Finder in a transparent bag. 3. Remove the tape and then remove the bag. 5. The foam sheet on top of the printer should contain: Quick Start Guide, After-sales Service Card, USB stick, Allen wrenches, screwdriver, unclogging pin tool, wrench, PTFE tube, power cable and grease. 5. Remove the top foam sheet. 6.
7. Use scissors to cut the four buckles that hold the rods in place. 8. Take the protective foam for filament out of the Finder. You will see a spool of PLA filament inside. 9. Lift the build plate up with care. 10. Remove the protective foam underneath. It should contain: power adaoter, USB cable, solid glue, filament guide tube. 11. Congratulations! You've unpacked your printer. Please keep the kit and packing for future use.
Hardware Assembly 1. Take out the filament cartridge in the rear of Finder, where you will place the filament spool. 2. Insert the filament into the guide tube and thread the guide tube through the filament outlet. Place the spool of filament in the cartridge. 3. Put the filament cartridge back to the Finder. 4. Press the spring presser, and insert the filament into the filament intake. Then release the spring presser. 5.
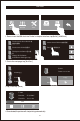
Leveling Build Platform How to change language HOME Build Language Preheat Filament Level Home Setting Status About Manual Tools 简体中文 English WiFi English Wlan hotspot 日本語 Extruder Calibration 繁體中文 Start to Leveling Build Platform Please wait while the extruder and platform finish initial movements... Screw three nuts under the platform anticlockwise until you can’t tighten them any more, then tap [OK] button. OK 1. Tap [Tools] - [Level] on your Finder touch screen.
Confirm Are you sure you can’t tighten these three nuts any more? Yes Verifying the distance between nozzle and plate... No Wait 2. Tap [Yes] if you can't tighten all the nuts any more, or tap [No] to continue tightening. After selecting [Yes], the extruder will move towards the first point and the plate will move up and down to verify the distance between nozzle and plate. Distance Too Big Distance Too Small Unscrew corresponding nut under platform clockwise until hearing a steady beep.
Loading / Changing Filament HOME Build Preheat Filament Level Home Setting Status About Manual Tools 1. Tap [Tools] and then tap [Filament] and [Load] to load filament. I’m heating up... 100% 220℃ / 220℃ Extruder Load Unload Cancel 2. The extruder will automatically heat up. Once heated, filament will be drawn through the extruder. Continue extruding until the extruder provides a steady flow of filament. Changing Filament Do not pull out the filament with force as it will damage the gears.
First Print Build Preheat Tools 1. Please insert the USB stick into Finder. In the print interface, tap [Build]-[USB Stick]. Finder Quick Start Guide 快 速启动指南 Instructional Video 教学视频 Finder Use Guide 说明书 Test Files 测试文件 Flashprint software 切片软 件 Happy 3D Software Installation Package Hap... 2. Turn to the next page, tap [Test files]. .. F-test Total: 1 hr 11 min Leveling.g F-test.gx Build F-40mm_Box.gx Delete 3. Tap [F-test file]-[Build].
Scan QR to Get More After-Sales Support After-Sales Service: support@ff3dp.com Amazon.com orders only: 597891915@qq.com Tel: +86 579 82273989 Web: www.flashforge.com Add: 2/F, No.