
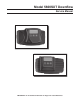
User Manual


Page 5
Start-Up Instructions
The water softener should be installed with the inlet, outlet, and drain connections made in accordance with the
manufacturer’s recommendations, and to meet applicable plumbing codes.
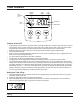
Turn the manual regeneraton knob slowly in a clockwise direction until the program micro switch lifts on top of 1.
the first set of pins. Allow the drive motor to move the piston to the first regeneration step and stop. Each time
the program switch position changes, the valve will advance to the next regeneration step. Always allow the
motor to stop before moving to the next set of pins or spaces.
NOTE: For electronic valves, please refer to the manual regeneration part of the timer operation
section. If the valve came with a separate electronic timer service manual, refer to the timer operation
section of the electronic timer service manual.
Position the valve to backwash. Ensure the drain line flow remains steady for 10 minutes or until the water 2.
runs clear (see above).
Position the valve to the brine / slow rinse position. Ensure the unit is drawing water from the brine tank (this 3.
step may need to be repeated).
Position the valve to the rapid rinse position. Check the drain line flow, and run for 5 minutes or until the water 4.
runs clear.
Position the valve to the start of the brine tank fill cycle. Ensure water goes into the brine tank at the desired 5.
rate. The brine valve drive cam will hold the valve in this position to fill the brine tank for the first regeneration.
Replace control box cover.6.
Put salt in the brine tank. 7.
NOTE: Do not use granulated or rock salt.