
Troubleshooting Guide

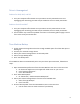
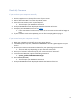
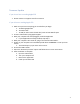
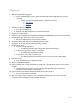
Table Of Contents
4
7. Peel the black tape off the original SSD.
8. Using the blue T5 screwdriver, unmount the two black screws on either side of the
original SSD.
9. Place the wedge on its side at the base of the original SSD, then slide the SSD towards
you and use the wedge to pry up the original SSD.
10. Slide the Feather M17 in the socket and ensure it is inserted all the way.
11. Put back the two black screws on either side of the SSD.
12. Replace the black tape.
13. Place the panel back onto the bottom of the computer at an angle, focusing on the
hinge end of the computer, aligning all hinge edges.
14. Gently slide the back cover toward the trackpad side of the computer, about ½ inch
from the hinge.
15. Let the panel rest on the computer and slide it toward the hinge, catching hooks
underneath on the middle, right, and left sides, fitting into place. Everything should be
perfectly aligned at this point and almost appear as finished.
16. Press down in the middle of the back cover, then on both the right and left sides,
hearing all four clips pop back into place, securing the back panel to the computer.
17. Return the back panel screws making sure to return each to its original location.
18. Power on your computer and let it turn on normally.
a. If your backup was originally running High Sierra:
i. Plug in your external backup and restore your data using Migration
Assistant.
b. If your backup was originally running on Mojave or a newer macOS:
i. Upgrade your computer to the macOS to match your backup and then
plug in your external backup and restore your data using Migration
Assistant.
Drive Doesn’t Fit
Solution 1
• Make sure you have the correct drive for your computer. Use our compatibility
chart/EMC checker (page 12) to find your specific device compatibility using your model,
year, and EMC.
Solution 2
• Make sure your new SSD is securely mounted into its rest and no adapters are still
mounted form your previously installed SSD.