
User guide

INSTALLATION INSTRUCTIONS
06-04-09 99185 Page 1 of 3
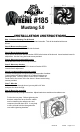
#185
Step 1: Remove Existing Fan & Shroud
Separate radiator overflow bottle from shroud and set aside. This will be installed with a new
shroud.
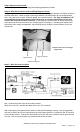
17
1
/
2
"
21
3
/
8
"
4
1
/
8
" DEPTH
Must ang 5.0
Step 2: Mount overflow bottle
Mount bracket number 35234 to left side of shroud.
Step 3: Mount bottom brackets
Mount spacer and bottom bracket number 35235 to the bottom of the shroud. Leave brackets loose for
adjustment. Use the 2 long hex head screws provided.
Step 4: Mount top bracket with inserts
Mount bracket number 35233 to top of shroud.
Step 5: Mount top bracket
Mount top bracket number 35232 to inserts of bracket 35233.
Leave loose for adjustment.
Step 6: Locate mounting point for control
Locate a mounting point for control near passenger side of radiator.
Control needs to be placed within 18" of radiator inlet hose on
passenger side. You may want to mount next to radiator on
fender well or the corner of the fan shroud. Mount control using
screws provided
Step 7: Wire fan
Route motor wires through shroud, you may drill a 1/4" hole
and pass the wires through.
Step 8: Mount fan assembly
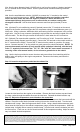
Mount fan assembly and tighten brackets. Adjust brackets to seal shroud to radiator core.
Put the fan into place. Before tightening the
brackets, adjust the fan so that the rubber
seal is contacting the radiator core and
compress the seal about 50%. It may help
to have a friend hold the fan against the
core while tightening brackets.