
Instruction Manual

Part numbers:
# 314 - 14" fan
# 316 - 16" fan
# 318 - 18" fan
Each kit includes
(1) fan, motor & bracket assembly
(4) 3/8 - 16 x 1.25” bolts
(4) 3/8 - 16 x 6” bolts
(8) 3/8 - 16 star nuts
(8) flat washers
(2) “L” brackets
(1) nylon bolt kit
(1) instruction sheet
.
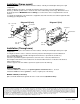
Fan, motor &
bracket assembly
Flat washer
“L” bracket
Diagram A
3/16” Through core
mounting holes
Frame mounting
slots
3/8 - 16 x 6 bolt
Lock nuts
rev. 05-05 99908
1. Insert the 6” bolts through washer and “L” bracket. Attach a lock nut to the bolt. This will be used to locate the height of
the bracket for mounting. Insert bolt and “L” bracket assembly into threaded motor and bracket assembly. (See diagram A)
2. This unit is designed to push or pull air and can be mounted vertically or horizontally.
IMPORTANT: It is not necessary to flip the fan blade or reverse the polarity to change to push or pull configura-
tions. Typically puller fans are more efficient at moving air than pusher fans.
To “push” air from the front of the radiator:
Attach the “L” brackets to the ends of the square threaded struts so that the electric fan motor is facing the radiator. (See
diagram B) Use the bolts and washer supplied to attach the “L” brackets. (See diagram A)
To “pull” air from the back of the radiator:
Attach the “L” brackets to the ends of the square threaded struts so that the electric fan blade is facing the radiator. (See
diagram C) Use the bolts and washers supplied to attach the “L” brackets. (See diagram A)
Adjustable Fan Assembly
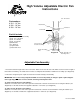
High Volume Adjustable Electric Fan
Instructions