
Installation Guide


08.14.2017 | Page 8
Flexco Floors | 1401 E. 6th St. - Tuscumbia, AL 35674
P: 866.955.8291 | F: 419.436.4302 | excooors.com | Made in the USA
TECHNICAL DATA SHEET
RUBBER STAIR TREADS, RISERS & STRINGERS
Distinct Designs
riser along scribe mark, creating a slight
undercut. Ensure that riser fits the step
snugly against stringers and stair tread
below without over-compressing riser
material. Avoid over-compressing toe to
avoid premature wear and damage.
The seam between the leading edge of
the stair tread and the stair riser should
be treated using one of the following
methods.
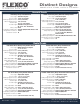
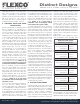
SCRIBED SEAM METHOD
When butting stair tread and riser seams
using the Scribed Seam Method, ensure
that the stair tread above and below the
riser, as well as the riser itself, have been
trimmed and fit the step snuggly. Ensure
the stair tread below the riser is in place
prior to scribing the riser to ensure a tight
fit to the leading edge of the stair tread
above.
Overlap the stair tread above the riser
with the riser while ensuring that riser
toe is not over-compressed. Using the
leading edge of the stair tread as a guide,
use a divider or a marking tool to scribe
the riser. Use a suitable knife to trim riser
along the scribe mark.
OVERLAPPING SEAM METHOD
When overlapping stair tread and riser
seams, ensure that the stair tread and
riser have been trimmed and fit the
step snuggly. Risers do not normally
require trimming on the top edge prior
to installation when overlapping seams.
However, if the top edge of the riser
extends up to or over the height of the
step, trim riser to 1/4" - 1/2" from the top
of the step to allow space for the EN-610
Epoxy Nose Filler Adhesive.
7. STANDARD TREAD & RISER
INSTALLATION
Ensure step substrate is suitably prepared
prior to installation, as manufacturer is
not responsible for substrates that have
not been properly prepared and tested
for moisture. When using the Excelsior
TP-620 Pressure Sensitive Tape Adhesive
or the C-630 Contact Adhesive, be sure
to a clean dusty and/or cementitious
substrates with a damp mop or sponge
prior to installation to remove dust, dirt
and debris.
Ensure adhesive is approved for use with
stair tread material and that proper trowel
type and size is used, as manufacturer is
not responsible for any and all adhesion
issues related to improper adhesive
selection or usage.
Prior to installing adhesive, ensure all
stair treads and risers have been trimmed
and all stringer materials have been
installed. Clean the underside of the
stair tread with a clean rag or towel and
denatured alcohol or equivalent solvent
adhesive remover. Failure to do so may
result in adhesion issues due to mold-
release chemical contamination. Apply
adhesive according to instructions for
specific product in use. Be sure to follow
instructions based on substrate porosity
(porous or non-porous). See chart below
for reference.
When installing adhesive on steps, be sure
to leave a 1/2" - 3/4" space on either side of
step nose to accommodate the Excelsior
EN-610 Epoxy Nose Filler Adhesive and
avoid adhesive cross-contamination. Prior
to installing the stair tread into adhesive,
apply a 1/4" - 1/2" bead of the EN-610 to
the interior nose of the stair tread. All stair
treads must have the EN-610 installed
in the stair nose. Failure to do so may
result in premature wear and damage
which could compromise egress safety.
When using the overlapping seam
method, use Excelsior TP-620 1" tape to
adhere the back side of the stair tread
nose to the top of the riser below, in order
to provide a tight seam and prevent a
possible tripping hazard.
Roll material with a hand roller or equivalent
within 15 minutes of installation, crossing
in a perpendicular direction after initial roll.
Do not wait until completing the entire
installation before rolling as the adhesive
may have surpassed the open time and
cured. Roll and cross roll a second time
approximately 30 minutes after the initial
rolling Visually inspect installation to
ensure that material has not shifted and
that adhesive has not been squeezed out
of joints or compressed onto surface.
Replace trowels and/or applicators at
recommended intervals to maintain
proper trowel ridge and spread rate.
When installing into adhesive using a
wet-set method, avoid walking, kneeling
or working on material until adhesive
has cured for light foot traffic. Working
on material that is installed into wet
adhesive could cause adhesive to
displace. When working off of material
is not possible, use a kneeling board or
equivalent to disperse weight evenly and
prevent adhesive displacement.
Periodically lift material to ensure proper
adhesive transfer and ensure adhesive
has not surpassed the open time –
adhesive should cover 90% of the stair
tread and riser. Clean excessive adhesive
or adhesive residue from the surface of
the material using a clean cloth or mop
and a solution of warm water and a pH
neutral cleaner. Do not use abrasive or
solvent based cleaners.
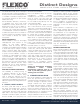
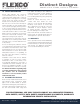
To prevent movement, dust, dirt, debris
Adhesive Porous Non-Porous
AW-510 160 sq. ft. N/A
EN-610 25 - 50 lin. ft. / Cartridge
TP-620 164 lin. ft. / Roll
C-630 20 - 40 sq. ft. / Pail
MS-700 160 sq. ft. 235 sq. ft.
EW-710 160 sq. ft. 235 sq. ft.
Adhesive Coverage Rates (Per Gallon)
Overlapping Seam Method
Scribed Seam Method