
Installation Guide

08.14.2017 | Page 9
Flexco Floors | 1401 E. 6th St. - Tuscumbia, AL 35674
P: 866.955.8291 | F: 419.436.4302 | excooors.com | Made in the USA
TECHNICAL DATA SHEET
RUBBER STAIR TREADS, RISERS & STRINGERS
Distinct Designs
and topical moisture in or around seams,
tape seams together after installation
using a multi-purpose masking tape
intended for flooring and hard surfaces.
Pay close attention to open times to
avoid adhesion issues. This may require
installing material in smaller sections.
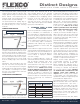
8. ONE-PIECE TREAD AND RISER
INSTALLATION
Ensure step substrate is suitably prepared
prior to installation, as manufacturer is
not responsible for substrates that have
not been properly prepared and tested
for moisture. When using the Excelsior
TP-620 Pressure Sensitive Tape Adhesive
or the C-630 Contact Adhesive, be sure
to a clean dusty and/or cementitious
substrates with a damp mop or sponge
prior to installation to remove dust, dirt
and debris. Ensure adhesive is approved
for use with stair tread material and that
proper trowel type and size is used,
as manufacturer is not responsible for
any and all adhesion issues related to
improper adhesive selection or usage.
Ensure all materials have been trimmed
and all stringer materials have been
installed. Clean the underside of the one-
piece tread & riser with a clean rag or
towel and denatured alcohol or equivalent
solvent adhesive remover. Failure to do
so may result in adhesion issues due to
mold-release chemical contamination.
Prior to installing one-piece tread and
risers, the Flexco #195 Cove Stick Fillet
must be installed at the joint where the
back of the step meets the step riser.
Install #195 Cove Stick Fillet using the
Excelsior TP-620 1" Tape or the Excelsior
C-630 Contact Adhesive. All one-piece
tread & risers must be installed with Cove
Stick Fillet. Failure to do so may result
in premature wear and damage to the
tread and or riser.
To ease one-piece tread & riser installation,
use the Excelsior TP-620 Pressure
Sensitive Tape Adhesive to install material.
Use 1" TP-620 tape to adhere tread nose,
4" TP-620 tape to install riser portion and
9 1/2" TP-620 tape to install tread portion.
Install TP-620 directly stair tread to ease
installation. Be sure to leave a 1/2" - 3/4"
space on either side of stair tread nose
to accommodate the EN-610 Epoxy Nose
Filler Adhesive and avoid adhesive cross-
contamination. Prior to installing the stair
tread into adhesive, apply a 1/4" - 1/2"
bead of the EN-610 Epoxy Nose Filler
Adhesive to the interior nose of the stair
tread. Failure to do so may result in
premature wear and damage which
could compromise egress safety.
To install stair treads, remove protective
paper from TP-620 on the tread nose and
stair tread portion of the one-piece tread
& riser and install treads onto step. Once
the tread and tread nose are properly
placed, remove the protective paper from
the TP-620 on the riser portion of the one-
piece tread & riser and form riser material
up the step rise, ensuring there is full
contact with the cove stick. If riser does
not make full contact with cove stick, the
cove area of the one-piece tread & riser
could become damaged over time.
To prevent movement, dust, dirt, debris
and topical moisture in or around seams,
tape seams together after installation
using a multi-purpose masking tape
intended for flooring and hard surfaces.
Roll material with a hand roller or equivalent
within 30 minutes of installation, crossing
in a perpendicular direction after initial roll.
Visually inspect installation to ensure that
material has not shifted during installation.
Carefully position riser to ensure that riser
is flush with all step surfaces. If using the
Scribed Seam Method, ensure that riser
fits snugly under the stair tread above
without over-compressing material.
Roll material with a hand roller or equivalent
within 30 minutes of installation, crossing
in a perpendicular direction after initial roll.
Visually inspect installation to ensure that
material has not shifted and that adhesive
has not been squeezed out of joints or
compressed onto surface.
9. BUTTING STAIR TREADS
Extended length steps may require that
stair treads be butted together to create
a uniform appearance. Prior to installing
treads that are intended to be butted
together, confirm material installation
pattern per design specifications or work
order, especially when installing profiled
treads. If patterns need to be centered or
aligned, ensure that stair treads are long
enough to allow for trimming on either
side of tread and seam. If possible, try to
align seam in line with handrails or other
fixtures in order to disguise the seam.
Flexco stair treads have a an acceptable
level of thickness variation from tread to
tread. For this reason, stair treads that
are intended to be butted together may
need to be sanded, undercut, or shimmed
in order match the thickness of adjacent
treads. When butting patterned or profiled
stair treads, treads should be trimmed so
that the center of the pattern or profile is
at the seam.
Butting stair tread installations require
more preparation than standard stair
tread installation. If stair treads need to
be immediately accessible, The Excelsior
TP-620 should be used to install treads.
AW-510 Acrylic Wet-Set
Light Foot Traffic:
Heavy / Rolling Traffic:
Maintenance:
24 Hours
48 Hours
72 Hours
EN-610 Epoxy Nose Filler
Foot Traffic:
Heavy / Rolling Traffic:
Maintenance:
8-12 Hours
24 Hours
48 Hours
TP-620 Pressure-Sensitive Tape
Foot Traffic:
Heavy / Rolling Traffic:
Maintenance:
Immediate
Immediate
Immediate
C-630 Contact Adhesive
Foot Traffic:
Heavy / Rolling Traffic:
Maintenance:
Immediate
Immediate
72 Hours
MS-700 Modified Silane Wet-Set
Foot Traffic:
Heavy / Rolling Traffic:
Maintenance:
8-12 Hours
24-48 Hours
48 Hours
EW-710 Epoxy Wet-Set
Foot Traffic:
Heavy / Rolling Traffic:
Maintenance:
8-12 Hours
24-48 Hours
48 Hours
Adhesive Traffic Limits