
Installation Guide


09.12.2017 | Page 5
Flexco Floors | 1401 E. 6th St. - Tuscumbia, AL 35674
P: 800.633.3151 | flexcofloors.com | Made in the USA
TECHNICAL DATA SHEET
STATIC CONTROL TILE
ESD Vinyl
proper trowel ridge and spread rate.
Periodically lift material to ensure proper
adhesive transfer and ensure adhesive
has not surpassed the open time –
adhesive should cover 90% of tile. Roll
material with a 3 section, 100 lb. roller
within 15 minutes after installation of the
tile section, crossing in a perpendicular
direction after initial roll. Use a hand roller
in areas that cannot be reached with
larger roller. Do not wait until completing
the entire installation before rolling as
the adhesive may have surpassed the
open time and cured. Roll and cross roll
a second time approximately 30 minutes
after the initial rolling
Visually inspect installation to ensure
that material has not shifted and that
adhesive has not been squeezed out
of joints or compressed onto surface.
Clean excessive adhesive or adhesive
residue from the surface of the material
per adhesive recommendations. Do not
apply abrasive or solvent based cleaners
directly to flooring material.
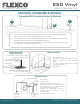
7. FLASH COVE INSTALLATION
Prior to creating and installing a flash
cove, measure desired flash cove height
and install appropriate Flexco Cove Cap
at desired height. Using the Excelsior
C-630 Contact Adhesive or 1” Excelsior
TP-620 Pressure Sensitive Tape, install
the appropriate Flexco Cove Stick Filler
directly to wall-floor joint to provide the
desired radius for the flash cove.
A minimum of 6" of material must cove up
the wall and a minimum of 6" of material
must be installed on the floor, depending
on flooring specification or work detail.
While bending material to desired radius,
measure and cut flash cove to meet cove
cap, ensuring there is full contact with
the cove stick. If flash cove does not
make full contact with cove stick, cove
and/or material could become damaged
over time. Cut all difficult fill pieces prior
to spreading adhesive. Use the Butterfly
Method for creating outside corners.
Using the Excelsior C-630 Contact
Adhesive or 4” – 9.5” Excelsior TP-
620 Pressure Sensitive Tape, install the
material directly to the cove stick and the
wall and roll using a hand roller.
8. HEAT WELD INSTALLATION
Ensure that adhesive has cured for
recommended period of time prior to
beginning heat-welding. Use chart below
for reference.
Prior to cutting heat-welding groove,
ensure gap between seams is free
of adhesive, dust, dirt, debris and
contaminates. When using electric
grooving machine blade to cut groove
depth at 66% of the total thickness of
the tile (~1/16” deep for 2.5mm material).
When using a hand grooving or electric
grooving machine, test groove depth on
scrap material to ensure proper depth is
achieved. While grooving, ensure removal
is split between each side of the roll, 50%
per side. Hand-grooving may be required
near walls, protrusion and other obstacles.
Remove any and all loose pieces of flooring
as well as any other debris from groove
prior to welding. Using a hot air welding
gun, insert the Flexco Vinyl Welding Rod
through the 4mm welding tip and into the
center of the routed groove or seam. Prior
to welding, test weld on scrap material
to ensure temperature settings and
welding speeds are correct and achieve a
successful bond.
Do not allow foot traffic or trim welding
bead until welding bead has completely
cooled. To trim seam, use a clean, sharp
quarter-moon spatula knife and a clean
trim plate or a Crain Mozart trimmer. After
one hour, trim seam again with a quarter-
moon spatula knife to create a smooth,
level seam surface. If seam imperfections
are observed, use a hot air gun to smooth
out imperfections.
9. INITIAL MAINTENANCE
Ensure that adhesive has cured for
recommended period of time prior to
conducting initial maintenance. Remove
any protective coverings prior to cleaning.
Sweep, dust mop and/or vacuum flooring
to remove any dirt, dust or debris.
Mix 2-4 ounces of Excelsior NC-900 All
Purpose Cleaner per gallon of clean,
potable water. Use a clean mop to apply
cleaning solution to floor and let stand for
5-10 minutes.
If using a low-speed floor buffer (180 –
360 RPM), buff floor while wet using a
3M 5300 Blue Cleaning Pad. If flooring is
heavily soiled, an additional cleaning may
be required.
Use an auto-scrubber, wet vacuum or
clean mop to remove any and all excess
cleaning solution. Rinse area with clean,
cool water and allow floor to dry entirely.
Ensure flooring area is clean and that all
cleaning residue has been removed (this
may require additional rinsing) and allow
floor to dry entirely.
Once dry, use a low-speed floor buffer
or swing single disc scrubber (180 – 360
RPM) to scrub floor while dry using 3M
5100 Red Cleaning Pad. Use an auto-
scrubber, wet vacuum or clean mop to
rinse area with clean, cool water and
allow floor to dry entirely.
Once dry, buff/burnish flooring using a
low-speed floor buffer or swing single disc
scrubber (180 – 360 RPM) and a 3M 4100
White Super Polish Pad. If a higher sheen
is desired, continue to burnish flooring
using a 1500 RPM Burnishing Machine
with a 3M 3100 Aqua Burnishing Pad.
Do not use detergents, abrasive cleaners
or “mop and shine” type products, as
they will dull the finish and sheen of the
flooring material. Do not use vacuums that
have a beater bar or electric brooms with
hard plastic bottoms or no padding, as
this may cause discoloration, scratching
and loss of sheen.
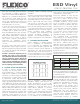
Adhesive Heat-Weld Limits
ASD-800 Acrylic ESD: 24 Hours
USD-810 Urethane ESD: 24 Hours
ASD-800 Acrylic ESD
Light Foot Traffic:
Heavy / Rolling Traffic:
Maintenance:
24 Hours
48 Hours
72 Hours
USD-810 Urethane ESD
Foot Traffic:
Heavy / Rolling Traffic:
Maintenance:
8-12 Hours
24-48 Hours
48 Hours
Adhesive Traffic Limits