Install Instructions FlexStone Shower Base Models: FLXSBR6032 FLXSBL6032 For missing items or returns do not return to store. Please call 877-941-3662 (Monday through Friday 8:00 AM – 5:00 PM MST) FlexStoneProducts.
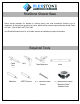
FlexStone Shower Base Please inspect packages for damage or missing pieces, and read instructions carefully prior to installation. If you have any questions or issues, please call our customer support Monday through Friday 8:00 AM – 5:00 PM MST at 877-941-3662. Visit FlexStoneProducts.com for up-to-date manuals and additional product information. Required Tools Caulk Gun Adhesive FlexStoneProducts.
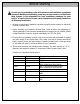
Before Starting Consult your local building codes with questions on installation compliance standards. Building and plumbing codes may vary by location, and FlexStone Bath Systems is not responsible for code compliance standards for your project. If required by local code, use a competent and licensed plumber for all plumbing installation. 1. Be sure to read these installation instructions carefully before starting to install the FlexStone Shower Base. 2.
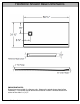
FlexStone Shower Base Dimensions IMPORTANT NOTE: Dimensions are provided for reference only. Measure the actual shower base before installation. This includes overall dimensions and drain location. Allowed tolerance for center of the drain is +/-1/2". FlexStoneProducts.
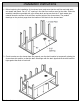
Installation Instructions 1. Before beginning the installation of the shower base, make sure that the sub-floor and stud walls are square and plumb. Cut a 5” x 5” opening in the sub-floor to allow room for the drain. Follow the assembly instructions provided with your shower drain and ensure that the 2” drain waste pipe extends above the surface of the sub-floor and the height of the shower base. The product drawings on the previous page show the location of the drain for the shower base. 2.
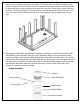
3. Ensure that the sub-floor is clear of debris and completely flat and level. The entire bottom of the base must be in contact with a flat, level surface. The shower base will not drain properly if the subfloor surface is not level. Place a level on the threshold and nailing flanges of the shower base to ensure the base is level before gluing the base to the sub-floor. Use a pencil to mark each stud at the top of the nailing flange. Do not use shims to level the shower base.
5. Apply adhesive to the floor beneath the shower base. Apply enough adhesive to support the entire bottom of the shower base. This will add additional stability and prevent the base from shifting position. 6. We strongly recommend using a licensed plumber to connect the drain assembly to the drain pipe. If your selected drain is a glue-in style, apply the appropriate glue to the drain pipe and the inside surface of the lower drain body.
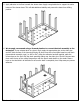
7. Drill 3/16” pilot holes near the top of the nailing flange at all stud locations. After drilling the pilot holes, apply a small amount of silicone to the pilot holes and use 1 ½” stainless steel screws to secure the shower base to the studs. Be careful not to overtighten the screws, as this can crack the nailing flange. If a gap exists between the shower base and a wall stud, use wooden shims to fill the gap before installing the screws. Trim all shims at the same height as the nailing flange.
CLEANING AND MAINTENANCE Care and maintenance of your FlexStone shower base is easy using common household cleaners. Clean with a soft sponge or cloth, and a mild, non-abrasive cleaner. Often, warm soapy water and a sponge will be adequate for regular maintenance. Avoid using abrasive or gritty cleaners, which may damage the surface of the shower base. Use of these agents will also void the warranty. PLEASE WAIT AT LEAST 24 HOURS BEFORE USING YOUR NEW SHOWER BASE.
PACKAGE CONTENTS: PRODUCT TYPE FLEXSTONE SHOWER BASE PACKAGED DATE FlexStoneProducts.