Install Instructions 2-panel shower kits Splendor Series Elegance Series SSK40407821 SSK48367821 (reversible left or right) Neo-Angle/Neo-Round Models: Rectangular 2-wall Models: For missing items or returns do not return to store. Please call 877-941-3662 (Monday through Friday 8:00 AM – 5:00 PM MST) FlexStoneProducts.
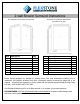
-wall Shower Surround Instructions Neo-Angle/Neo-Round Models: SSK40407821 Item A B C D E F I J Description Back wall panel Side wall panel Left wall front mitered trim Left wall top mitered trim Right wall front mitered trim Right wall top mitered trim Corner shelf with bracket Inside corner reinforcement Rectangular 2-wall Models: SSK48367821 (reversible left or right) Qty 1 1 1 1 1 1 1 1 Item A B C D E F I J Description Back wall panel Side wall panel Left wall front mitered trim Left wall top mit
Required Tools x8 x2 Helpful Tools FlexStone offers an installation kit that includes eight cartridges of Performance Pro Adhesive and two cartridges of Performance Pro Color-Tinted 100% Silicone. Select retailers include this in FlexStone kits, while others offer it for purchase separately. Before Starting Consult your local building codes with questions on installation compliance standards.
Install Instructions INSTALLATION OF INSIDE CORNER REINFORCEMENT (J). 1.1) Flashing Tape Corner Reinforcements go behind the panels in the back vertical corners for added leak protection. This tape has been cut to length, matching the height of the panels of your kit. 1.2) Apply a generous bead of adhesive onto both walls about 3/4 inch away from the corner. Fold the flashing tape at the center crease with the print side together, then press the tape into the corner using a taping or putty type blade.
NOTE: You will be able to fine tune your panel to a more accurate fit after the holes are cut and your panel can be firmly pushed into the 3.2) For each hole to be cut, measure the vertical distance between the center of the plumbing fixture and the shower base. Measure the horizontal distance between the center of the fixture and the installed back wall panel. Mark the center of the fixtures on the face of the panel. 3.3) Using a drill, make a small pilot hole in marked locations.
4.1) Note the height of the shower head. Decide if top trims will be installed above or below shower head/escutcheon, keeping in mind that trims can overlap panels from ½” to 2-1/2”. Mark a level line at desired height of the top of the trim on the back wall (above the back wall panel). 4.2) Place horizontal left wall top mitered trim (Item D) in place, push into the corner against back wall panel, then level it. Mark a level line on the wall on the top side of the trim molding near the outer end.
5 INSTALLATION OF CORNER SHELF (I). NOTE: Corner shelf includes a folding-triangle metal bracket with screw holes which is designed to mount directly to the FlexStone wall panels. Be sure to peel away protective masking from the installation area before securing the bracket. 5.1) Position corner shelf bracket in desired corner at desired height. Use a level to mark level lines in pencil. Adjust alignment to include a slight forward slope for water runoff. 5.
PACKAGE CONTENTS KIT TYPE SPLENDOR 2-PANEL KIT CONTENTS BACK WALL PANEL LEFT WALL FRONT MITERED TRIM SIDE WALL PANEL LEFT WALL TOP MITERED TRIM CORNER SHELF BRACKET RIGHT WALL FRONT MITERED TRIM CORNER SHELF CLAMSHELL RIGHT WALL TOP MITERED TRIM INSIDE CORNER REINFORCEMENT KIT TYPE ELEGANCE 2-PANEL KIT CONTENTS BACK WALL PANEL LEFT WALL FRONT MITERED TRIM SIDE WALL PANEL LEFT WALL TOP MITERED TRIM CORNER SHELF BRACKET RIGHT WALL FRONT MITERED TRIM CORNER SHELF CLAMSHELL RIGHT WALL TOP MITERE