3-Panel Shower Kit Install Instructions For missing items or returns do not return to store. Please call 877-941-3662 (Monday – Friday 8:00 a.m. – 5:00 p.m MT) V.
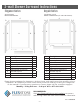
3-wall Shower Surround Instructions Elegance Series Royale Series Alcove Shower Model:FSSK48367831 G D C Tub/Shower 3-wall Model: FSSK60367831 (for tubs OR showers) B D F A G C E B B A I I J Item Description A B C D E F G I J Back wall panel Side wall panel Left wall front mitered trim Left wall top mitered trim Right wall front mitered trim Right wall top mitered trim Back wall top trim Corner shelf with bracket Inside corner reinforcement F J K Qty K Item Description 1 A 2 1
Required Tools Helpful Tools Installation Kit FlexStone offers an installation kit that includes eight cartridges of Performance Pro Adhesive and two cartridges of Performance Pro Color-Tinted 100% Silicone. Select retailers include this in FlexStone kits, while others offer it for purchase separately. x8 Construction Adhesive x2 100% Silicone Before Starting Consult your local building codes with questions on installation compliance standards.
Install Instructions 1. Installation of Inside Corner Reinforcements (J) A. Flashing Tape Corner Reinforcements go behind the panels in the back vertical corners for added leak protection. This tape has been cut to length, matching the height of the panels of your kit. B. Apply a generous bead of adhesive onto both walls about 3/4 inch away from the corner. Fold the flashing tape at the center crease with the print side together, then press the tape into the corner using a taping or putty type blade.
3. Installation of Wet/Plumbing Wall Panel (B) NOTE: You will be able to fine tune your panel to a more accurate fit after the holes are cut and your panel can be firmly pushed into the corner. B. For each hole to be cut, measure the vertical distance between the center of the plumbing fixture and the shower base. Measure the horizontal distance between the center of the fixture and the installed back wall panel. Mark the center of the fixtures on the face of the panel. C.
5. Installation of Tub Leg Filler Panels (K) A. Tub Leg Filler panels (K) are installed from the floor to the bottom of the side walls next to the skirt of the tub, only when the side walls extend beyond the tub. First trim the height to fit from floor to the bottom of the side wall panel. For a professional look, filler panel should match the contour of the tub. You can scribe the contour with a compass, or by hand, and cut with a jig saw or utility knife.
. Installation of Side Wall Trims (C,D,E,F) NOTE: Vertical trim moldings are designed to be installed either: 1) resting on top of the shower base threshold, or 2) outside the threshold and running down to the floor. Depending on the size of your alcove opening, you may even choose to contour cut the trim moldings to overlap the threshold partially. A. Place horizontal left wall top mitered trim (Item D) in place, push into the corner against back wall trim piece, then level it.
. Installation of Corner Shelf (I) NOTE: Corner shelf includes a folding-triangle metal bracket with screw holes which is designed to mount directly to the FlexStone wall panels. Be sure to peel away protective masking from the installation area before securing the bracket. A. Position corner shelf bracket in desired corner at desired height. Use a level to mark level lines in pencil. Adjust the alignment to include a slight forward slope for water runoff. B.
This Page is Intentionally Left Blank. V.
Package Contents Kit Type: Elegance 3-Panel Kit Contents: Back Wall Panel Left Wall Front Mitered Trim Left Side Wall Panel Left Wall Top Mitered Trim Right Side Wall Panel Right Wall Front Mitered Trim Corner-Shelf Bracket Right Wall Top Mitered Trim Corner Shelf Clamshell Back Wall Top Trim 2 Inside Corner Reinforcements Kit Type: Royale 3-Panel Kit Contents: Back Wall Panel Left Wall Front Mitered Trim Left Side Wall Panel Left Wall Top Mitered Trim Right Side Wall Panel Right Wall Front