
Installation Guide
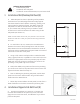

Install Instructions
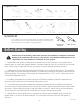
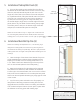
1. Installation of Inside Corner Reinforcements (J)
A. Flashing Tape Corner Reinforcements go behind the
panels in the back vertical corners for added leak protection.
This tape has been cut to length, matching the height of the
panels of your kit.
B. Apply a bead of adhesive onto both walls about 3/4 inch
away from the corner. Fold the ashing tape at the center
crease with the print side together, then press the tape into
the corner using a taping or putty type blade. Using the same
blade, atten out the tape to create a at, smooth inside cor-
ner. Wipe away any excess adhesive.
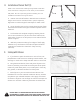
2. Installation of Back Wall Panels (A)
A. The back panel must be t to both the left and right corners,
and to the tub or shower base. Keep in mind that walls may
not be square or plumb, so you will want to measure width of
the alcove at both the bottom and top of the alcove prior to
trimming panel. (See TIP on right for a technique for achieving
good fit measurements.) Trim the panel to size with a
utility knife, jigsaw, or power plane and dry t until a tight t
is achieved.
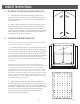
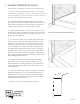
TIP: Draw a vertical plumb line directly on the middle of the
sheetrock from top to bottom of wall. Now draw a horizontal level
line crossing the plumb line about halfway up the wall. Record
measurements left from the vertical line to corner at top, middle
and bottom (L1, L2, L3), then right from the vertical line to corner
(R1, R2, R3.) Now record measurements down from the horizontal
line to the tub (D1, D2, D3.) Transfer these measurements to your
back wall panel (A). These 9 measurements will account for out of
plumb walls AND out of level tubs!
B. When satised with the t, peel protective masking back
from the edges of the panel (approx. 4") and clean burs from any
rough edges. Apply adhesive in lines or dollops to the back of
the panel in a pattern every 4 to 6 inches. Use approximately
one 10oz tube per 12 square feet following the adhesive
directions on the tube. Push the panel in place, lightly
pounding to achieve good bond.
NOTE: It is not necessary to cut the top edges of panels to be level,
as they will be covered by trim moldings.
– 3 –
L1
L2
L3
R1
R2
R3
D1 D2 D3
Vertical Plumb Line
V.4 03/2022