
User Manual

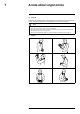
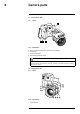
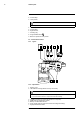
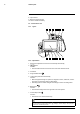

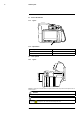
Table Of Contents
- 1 Disclaimers
- 2 Safety information
- 3 Notice to user
- 4 Customer help
- 5 Introduction
- 6 Quick start guide
- 7 A note about ergonomics
- 8 Camera parts
- 9 Screen elements
- 10 Navigating the menu system
- 11 Handling the camera
- 11.1 Charging the battery
- 11.2 Turning on the camera
- 11.3 Turning off the camera
- 11.4 Adjusting the viewfinder’s dioptric correction
- 11.5 Adjusting the angle of the lens
- 11.6 Adjusting the infrared camera focus manually
- 11.7 Autofocusing the infrared camera
- 11.8 Continuous autofocus
- 11.9 Operating the laser pointer
- 11.10 Using the digital zoom function
- 11.11 Assigning functions to the programmable buttons
- 11.12 Using the camera lamp as a flash
- 11.13 Changing lenses
- 11.14 Using the close-up lens
- 11.15 Changing the viewfinder eyecup
- 11.16 Calibrating the compass
- 12 Saving and working with images
- 13 Achieving a good image
- 14 Working with image modes
- 15 Working with measurement tools
- 15.1 General
- 15.2 Adding/removing measurement tools
- 15.3 Working with user presets
- 15.4 Resizing or moving a measurement tool
- 15.5 Changing object parameters
- 15.6 Displaying values in the result table and displaying a graph
- 15.7 Creating and setting up a difference calculation
- 15.8 Setting a measurement alarm
- 16 Working with color alarms and isotherms
- 17 Annotating images
- 18 Programming the camera (time lapse)
- 19 Recording video clips
- 20 Screening alarm
- 21 Pairing Bluetooth devices
- 22 Configuring Wi-Fi
- 23 Changing settings
- 24 Technical data
- 24.1 Online field-of-view calculator
- 24.2 Note about technical data
- 24.3 Note about authoritative versions
- 24.4 FLIR T1020 12°
- 24.5 FLIR T1020 28°
- 24.6 FLIR T1020 45°
- 24.7 FLIR T1030sc 12°
- 24.8 FLIR T1030sc 28°
- 24.9 FLIR T1030sc 45°
- 24.10 FLIR T1040 12°
- 24.11 FLIR T1040 28°
- 24.12 FLIR T1040 45°
- 24.13 FLIR T1050sc 12°
- 24.14 FLIR T1050sc 28°
- 24.15 FLIR T1050sc 45°
- 25 Mechanical drawings
- 26 Cleaning the camera
- 27 Application examples
- 28 About FLIR Systems
- 29 Glossary
- 30 Thermographic measurement techniques
- 31 History of infrared technology
- 32 Theory of thermography
- 33 The measurement formula
- 34 Emissivity tables

Camera parts
8
8. button.
Function:
• Push to switch between automatic and manual image adjustment mode.
9. Image archive button
.
Function:
• Push to open the image archive.
• Push and hold for more than 2 seconds to perform a manual calibration.
10. Touch-screen LCD.
11. Power indicator.
12. On/off button
.
Function:
• Push and release to turn on the camera.
• Push and hold for more than 0.2 second to turn off the camera.
8.5 Neck strap attachment points
8.5.1 Figure
8.6 Battery condition LED indicator
8.6.1 Figure
8.6.2 Explanation
Type of signal Explanation
The green LED flashes twice per second. The battery is being charged.
The green LED glows continuously. The battery is fully charged.
#T559954; r.28105/28105; en-US
17