
User Guide
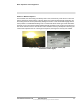
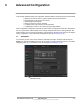
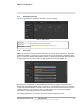
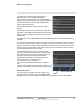
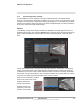
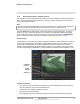
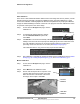
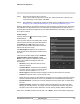

Table Of Contents
- Table of Contents
- Camera Installation
- Basic Operation and Configuration
- Advanced Configuration

427-1065-00-12 Revision 130 November 2019 38
This document does not contain any export-controlled information.
Advanced Configuration
Auto Calibration
If the scene is well ordered and without random motion from things such as trees, shrubs, or small
animals, and access is limited to people (the calibration target), then Auto calibration is a good
choice. Auto calibration relearning adjusts the detection size parameters as people (the calibration
target) are detected walking in all areas of the scene. The progress of the auto calibration is shown
as a percent in the top left corner of the image.
Step 1 On the camera’s Analytics web page, click the
Calibrate icon.
Step 2 To automatically calibrate detection settings,
from the Calibration Mode drop-down list,
select Auto.
Step 3 Click Relearn. The camera automatically calibrates the depth of the FoV based on people
walking in the scene. Be sure that people are walking along the entire vertical axis of the
FoV until calibration is finished. The On-Screen Display shows the progress as a
percentage in the lower left corner of the video (see Analytics Page, pg. 37).
If the calibration takes too long, the scene may require manual calibration.
Step 4 After calibration is complete set up detection areas and check calibration. Refer to Global
Settings, pg. 39, Creating Analytics Regions, pg. 40, and Check Calibration, pg. 41.
Manual Calibration
Step 1 On the camera’s Analytics web page, click the
Calibrate icon.
Step 2 Select Manual for the Calibration mode.
Step 3 Set the near size aspect ratio for a person. Have
a person walk around at the bottom of the area.
Select the blue box at the bottom of the screen
and drag to fit the subject. Click Save.
1
2 3
1
2
3. Near Size
Calibration
4. Far Size
Calibration
Figure 3-2: Manual Calibration