U SE R G U I D E Third Generation For Android and iOS
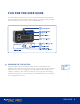
FLIR ONE PRO USER GUIDE The FLIR ONE Pro allows you to see the world in a whole new way, with a unique blend of thermal and visible imaging. This User Guide provides the information you will need to use the FLIR ONE Pro. CHARGING THE FLIR ONE PRO Plug the USB-C end of the power cable into the FLIR ONE Pro and plug the other end into a 1A power source. The Charge Indicator LED will blink while the device is charging. The FLIR ONE Pro will charge to full capacity in about 1 hour.
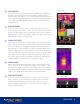
FLIR ONE APP FLIR ONE APP The latest version of the FLIR ONE app is available on the Apple App Store for iOS and Google Play Store for Android. Download and install the app, then start it. Turn on the FLIR ONE Pro and connect it to your phone. If the FLIR ONE Pro is turned off, the app will prompt you to attach your FLIR ONE Pro camera before you can view the camera feature.
MY GALLERY Captured images and video may be viewed and edited by selecting the thumbnail image in the lower left corner of the screen. Images and videos may be shared through text messaging or email and may be edited by changing the color palette or the temperature scale. While an image is being viewed, it is possible to swipe up or down to reveal the visible image that is used for MSX® blending.
SPOT METERS AND REGIONS OF INTEREST (ROI) SPOT METERS AND ROIs When using spot meters and regions of interest, the FLIR ONE Pro will display a temperature average (in degrees C or F) on the image. The accuracy of the Spot Meter(s) depends on many factors, including the distance from the object, the ambient temperature, and the emissivity of the material being observed. Users are encouraged to learn more about the science of Thermography from www.infraredtraining.com.
AUTOMATIC CALIBRATION The camera has a mechanical shutter inside that periodically activates and allows the thermal camera to do a calibration or image refresh. When the shutter activates, the image will freeze for a brief period. When the camera first turns on, and periodically thereafter, the app will perform an automatic calibration to provide an optimal image. It is also possible to manually activate the shutter by tapping the Calibration icon in the upper right on the main screen.
EMISSIVITY When the Spot Meter is enabled, the temperature displayed is affected by many factors, including a property of the target material known as Emissivity. This property is a relative rating of how well a material emits or radiates thermal energy. Some materials are more emissive than others; glossy or reflective materials like metals tend to be poor emitters. For most materials, the default “matte” setting is a fair approximation.