
Manual
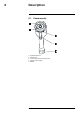
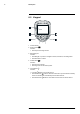
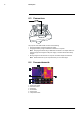
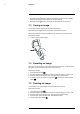
Table Of Contents
- 1 Disclaimers
- 2 Safety information
- 3 Notice to user
- 4 Customer help
- 5 Quick Start Guide
- 6 Description
- 7 Operation
- 7.1 Charging the battery
- 7.2 Turning on and turning off the camera
- 7.3 Saving an image
- 7.4 Recalling an image
- 7.5 Deleting an image
- 7.6 Deleting all images
- 7.7 Measuring a temperature using a spotmeter
- 7.8 Measuring the hottest temperature within an area
- 7.9 Measuring the coldest temperature within an area
- 7.10 Hiding measurement tools
- 7.11 Changing the color palette
- 7.12 Working with color alarms
- 7.13 Changing image mode
- 7.14 Changing the temperature scale mode
- 7.15 Changing the camera temperature range
- 7.16 Setting the emissivity as a surface property
- 7.17 Setting the emissivity as a custom material
- 7.18 Changing the emissivity as a custom value
- 7.19 Changing the reflected apparent temperature
- 7.20 Changing the distance between the object and the camera
- 7.21 Performing a non-uniformity correction (NUC)
- 7.22 Configuring Wi-Fi
- 7.23 Changing the settings
- 7.24 Updating the camera
- 8 Mechanical drawings
- 9 CE Declaration of conformity
- 10 Cleaning the camera
- 11 Application examples
- 12 Thermographic measurement techniques
- 13 About calibration
- 13.1 Introduction
- 13.2 Definition—what is calibration?
- 13.3 Camera calibration at FLIR Systems
- 13.4 The differences between a calibration performed by a user and that performed directly at FLIR Systems
- 13.5 Calibration, verification and adjustment
- 13.6 Non-uniformity correction
- 13.7 Thermal image adjustment (thermal tuning)
- 14 About FLIR Systems

Operation
7
7.1 Charging the battery
WARNING
Make sure that you install the socket-outlet near the equipment and that it is easy to get access to.
7.1.1 Charging the battery using the FLIR power supply
Follow this procedure:
1. Connect the power supply to a wall outlet.
2. Connect the power supply cable to the USB connector on the camera.
NOTE
The charging time for a fully depleted battery is 2 hours.
7.1.2 Charging the battery using the FLIR stand-alone battery charger.
Follow this procedure:
1. Connect the stand-alone battery charger to a wall outlet.
2. Remove the battery from the camera.
3. Put the battery into the stand-alone battery charger.
NOTE
• The charging time for a fully depleted battery is 2 hours.
• The battery is being charged when the blue LED is flashing.
• The battery is fully charged when the blue LED is continuous.
7.1.3 Charging the battery using a USB cable
Follow this procedure:
1. Connect the camera to a computer using a USB cable.
NOTE
• To charge the camera, the computer must be turned on.
• Charging the camera using a USB cable connected to a computer takes considerably longer than
using the FLIR power supply or the FLIR stand-alone battery charger.
7.2 Turning on and turning off the camera
• Push the button to turn on the camera.
#T559828; r. AQ/75691/75691; en-US
12