
Manual
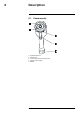
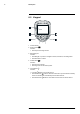
Table Of Contents
- 1 Disclaimers
- 2 Safety information
- 3 Notice to user
- 4 Customer help
- 5 Quick Start Guide
- 6 Description
- 7 Operation
- 7.1 Charging the battery
- 7.2 Turning on and turning off the camera
- 7.3 Saving an image
- 7.4 Recalling an image
- 7.5 Deleting an image
- 7.6 Deleting all images
- 7.7 Measuring a temperature using a spotmeter
- 7.8 Measuring the hottest temperature within an area
- 7.9 Measuring the coldest temperature within an area
- 7.10 Hiding measurement tools
- 7.11 Changing the color palette
- 7.12 Working with color alarms
- 7.13 Changing image mode
- 7.14 Changing the temperature scale mode
- 7.15 Changing the camera temperature range
- 7.16 Setting the emissivity as a surface property
- 7.17 Setting the emissivity as a custom material
- 7.18 Changing the emissivity as a custom value
- 7.19 Changing the reflected apparent temperature
- 7.20 Changing the distance between the object and the camera
- 7.21 Performing a non-uniformity correction (NUC)
- 7.22 Configuring Wi-Fi
- 7.23 Changing the settings
- 7.24 Updating the camera
- 8 Mechanical drawings
- 9 CE Declaration of conformity
- 10 Cleaning the camera
- 11 Application examples
- 12 Thermographic measurement techniques
- 13 About calibration
- 13.1 Introduction
- 13.2 Definition—what is calibration?
- 13.3 Camera calibration at FLIR Systems
- 13.4 The differences between a calibration performed by a user and that performed directly at FLIR Systems
- 13.5 Calibration, verification and adjustment
- 13.6 Non-uniformity correction
- 13.7 Thermal image adjustment (thermal tuning)
- 14 About FLIR Systems

Operation
7
7.11 Changing the color palette
You can change the color palette that the camera uses to display different temperatures.
A different palette can make it easier to analyze an image.
Follow this procedure:
1. Push the center of the navigation pad. This displays a toolbar.
2. On the toolbar, select Color
. This displays a toolbar.
3. On the toolbar, select a new color palette.
7.12 Working with color alarms
By using color alarms (isotherms), anomalies can easily be discovered in an infrared im-
age. The isotherm command applies a contrasting color to all pixels with a temperature
above or below the specified temperature level.
This table explains the different color alarms (isotherms).
Color alarm
Image
Below alarm
Above alarm
Follow this procedure:
1. Push the center of the navigation pad. This displays a toolbar.
2. On the toolbar, select Color
. This displays a toolbar.
3. On the toolbar, select the type of alarm:
• Below alarm
.
• Above alarm
.
4. Push the center of the navigation pad. The threshold temperature is displayed at the
bottom of the screen.
5. To change the threshold temperature, push the navigation pad up/down.
#T559828; r. AQ/75691/75691; en-US
15