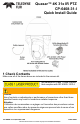
Quasar™ 4K 31x IR PTZ CP-6408-31-I Quick Install Guide 1 Check Contents Make sure all of the items above are included in the camera kit. This camera is a Class 1 Laser Product that complies with IEC 60825-1:2014. Caution Use of controls or adjustments or performance of procedures other than those specified herein may result in hazardous radiation exposure.
Prepare to Install the Camera 2.1 Install FLIR Discovery Network Assistant Download the FLIR Discovery Network Assistant (DNA) tool to a computer on the same VLAN to which you will connect the camera, and then unzip the file. The DNA tool does not require a license to use and is a free download from www.teledyneflir.com > Products > Security > Visible Security Cameras > Quasar 4K IR PTZ Cameras. 2.2 Perform a Bench Test (Optional) You can test the camera or configure it for networking before mounting it.
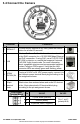
.4 Connect the Camera Connectors Connector Connection DEFAULT To reset factory defaults at any time, press the Default button for at least 20 seconds. 2 LAN Attach a Cat 5e or Cat 6 cable from the network switch to the RJ45 connector for a 10/100/1000 Mbps Ethernet and PoE connection. If using PoE, use a FLIR CP-POE4P-60W-xx injector or a switch that supports Universal PoE 60W 4 pair forced mode. For more information about compatible injectors and recommended switches, contact Teledyne FLIR support.
14-Pin Alarm/Audio I/O Terminal Block Pin Definition Pin Definition 1 Audio-Out 8 Not used 2 Ground (Audio I/O) 9 Alarm-In 4 3 Alarm-Out A1 10 Alarm-In 3 4 Alarm-Out A2 11 Alarm-In 2 5 Alarm-Out B1 12 Alarm-In 1 6 Alarm-Out B2 13 Ground (Alarm I/O) 7 Not used 14 Audio-In Warning! This product contains a battery that is soldered to the PCB. There is a risk of explosion if the battery is replaced by an incorrect type. Do not replace the battery.
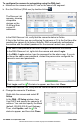
To configure the camera for networking using the DNA tool: a. Make sure the camera and the PC are on the same LAN segment. b. Run the DNA tool (DNA.exe) by double-clicking . The Discover List appears, showing compatible devices on the VLAN and their current IP addresses. In the DNA Discover List, verify that the camera's status is Online.
4.2 Change Video Format (Optional) By default, NTSC is the camera's video format. To change the camera's video format to PAL using the DNA tool: a. In the DNA Discover List, right-click the camera and select Change Video Format. b. In the Change Video Format window, select PAL. c. Click Update, wait for Ok status to appear, and then click Close. For more information about using the DNA tool to configure one or more cameras, see the DNA User Guide. While the software is open, click the Help icon . 4.
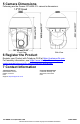
5 Camera Dimensions Following are the Quasar CP-6408-31-I camera’s dimensions. Front View Side View 6 Register the Product Register your Product with Teledyne FLIR at https://customer.flir.com. For warranty information, see https://www.teledyneflir.com/supportcenter/warranty/security/flir-security-product-warranties/. 7 Contact Information Teledyne FLIR LLC 6769 Hollister Avenue Goleta, CA 93117 USA Support: https://support.flir.com/ Corporate Headquarters 27700 SW Parkway Ave.