
CP-6408-31-I-Quick-Install-Guide


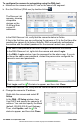

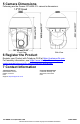
Table Of Contents

CP-6408-31-I QIG Rev 120
June 2021
This document does not contain any export-controlled information.
2 Prepare to Install the Camera
2.1 Install FLIR Discovery Network Assistant
Download the FLIR Discovery Network Assistant (DNA) tool to a computer on the
same VLAN to which you will connect the camera, and then unzip the file. The
DNA tool does not require a license to use and is a free download from
www.teledyneflir.com > Products > Security > Visible Security Cameras > Quasar
4K IR PTZ Cameras.
2.2 Perform a Bench Test (Optional)
You can test the camera or configure it for networking before mounting it. Follow
the instructions in 3.4 Connect the Camera and 4.1 Configure for Networking, and
then continue with 2.3 Select a Location.
2.3 Select a Location
Select a suitable location to mount the camera.
For advice on positioning and orienting the camera and the optional wash system,
see the camera's installation and user guide and the wash system's instructions
manual.
Verify that the operating temperature range is between -40° ~ 60° C (-40° ~ 140°
F), 0-95% relative humidity (non-condensing).
For the list of mounting accessories available for the camera, see the FLIR
Security Cameras - Accessory Guide.
3 Install the Camera
3.1 Fit Mounting Hardware
If required, install the mounting hardware for the camera according to the
instructions in the camera's installation and user guide.
3.2 Route Network and Power
Properly install the power and network cabling in the mounting hardware so that it
is accessible when the camera is mounted.
Power: Universal Power over Ethernet (PoE) 60W 4 pair forced mode, 24 VAC,
or 24 VDC.
Ethernet: Cat5e or Cat6 cable. Ethernet is required for streaming video and
configuring the camera.
3.3 Mount and Secure the Camera
Mount and secure the camera according to the instructions in the camera's
installation and user guide.
If you are installing an optional wash kit, mount and secure it according to the
instructions in the camera's installation and user guide, and according to the wash
kit's instructions manual.